Cookie Tray Memo Board

Friday, January 31, 2014 No comments
 After seven years of 'living' in the classroom I am currently in-I decided I might redecorate a little.  So...here's a little memo board I put together for random notes and to do list.  I found this pan at the Dollar General (2 bucks).  I sprayed the edges black to match the paper I bought.
 I cut the paper down to fit in the tray and glued it down.  You could also use mod podge, but if your paper is thin, it may bubble, so be careful.  Once it was glued down, I hot glued some rick rack I found on clearance to divide the two sections (purely just for looks).
 I had a bunch of buttons left over from another project and I cut off the backs and glued them to magnets
 I also glued ribbon at the top (on the back) to hang it up.
I'm making one of these on GMT with a completely different theme on Monday....super easy, and with the paper-it cost me less than three dollars.

Mailbox Valentine

Thursday, January 30, 2014 1 comment
 ...if I had a dollar for everytime I text my friends to tell them I've sent "something strange" through the mail....let me know if and when it arrives.....it's sort of my goal in life to torture the postal service finance, yes finance the postal service's salary...with the price of stamps ever increasing, I feel it's my civic duty to keep them in business.  Last year I mailed these little mail boxes to my Valentine's.  I found these at the dollar spot at Target, but I've seen them at craft stores etc out and about.
I filled it with all sorts of junk treasures.
 I popped the lid on....
..taped it closed, attached the address and the postage (2.15 to fly from TX to CA) and shipped it out.  Who needs those boring ol' cardboard boxes to mail stuff, it's way more fun to arrive in containers like this...not only am I civic minded, I'm, clearly, earth friendly.  Think of all the trees that would live to emit gases so we can breath another day if everyone would get on board with 'strange mailing vessels.'  
I think I'm quickly becoming this generations 'crazy Aunt Christy'...forget Afghans and a houseful of cats-I send crazy in the mail.  

Dino Jars

Wednesday, January 29, 2014 No comments
 Here's my next thirty craft using the stuff I recently snagged at the Dollar General.  I've seen versions of these jars around...in particular one for Easter using small bunnies (still looking for those little bunnies).  You could certainly use old mayo jars etc at instead of these jars, but I found these in the Christmas section on sale for 25 cents, so I decided to splurge. I also found a pack of dinosaurs for a buck.  I use little dinosaurs for a lot of random crafts, and I have been buying some for 'half off' at the craft store-the original price is 10 dollars!  The only difference I see, having used both, is the packaging!  I've got a few more ideas for these dinos, but in the meantime...a jar.
I'll be making these in multiple colors.  These would be cute for party favors, storage in rooms, gifts, whatever.  I glued down the dino with E6000 (any strong glue would work).  When it tried, I used a primer (b/c it's plastic) then some green spray.

Ripping My Heart Out Shirt ;o)

Tuesday, January 28, 2014 No comments
 I saw the idea for this shirt on wobisobi.  I adapted it some, but the concept is the same.  I made this for my goddaughter to wear this Valentine's day.
I grabbed a cheap black shirt at the craft store and turned it inside out.  I used some pink fabric left over from another project I made for her, and cut out a shirt and pinned it to the middle of the inside of the front of the shirt.  (That sentence was a little complicated?
 Again, sewing on the inside of the shirt, I sewed around the edge of the heart, then I sewed lines across in one direction at regular intervals.
 THEN I flipped it inside out.  It would have been cute to use pink thread so that the outline showed through the front of the shirt, but I am not, nor do I aspire to be that neat of a sewer anytime soon.  I then took a pair of scissors and I sliced between the lines I sewed to the edge of the heart outline.
 I took my hand and rubbed back and forth so the shirt would start to curl up and you could see even more of the fabric underneath.  Washing it will help as well.  If you did larger lines with the sewing machine, even more would show through as it curled up, but liked the thinner lines.


2 Dollar Chevron Frame

Monday, January 27, 2014 No comments
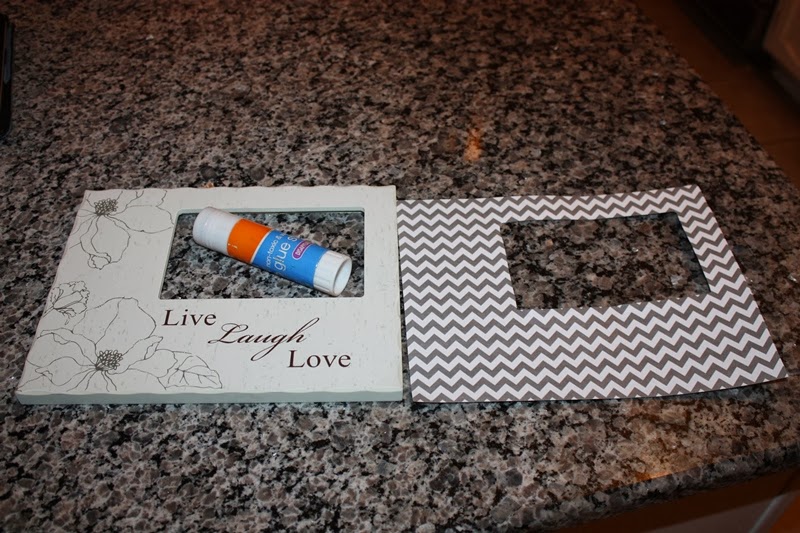
 I'm doing a series of thrifty crafts over the next week and then putting them all together on Good Morning, Texas next Monday morning.  Paige and I went shopping at the Dollar General (their pick) complete with a filming crew.  Sure, a craft store is my home away from home, but I always supplement the doodads with cheap stuff from dollar stores around town.  I say that a lot on TV.  I have no affiliations to any store, or an perks for saying I shop there-but...I do because...it's cheap.  The frames at this particular store were anywhere from a buck to 4 bucks.  I wasn't concerned with the design, but rather the shape. I found this one for half off in the clearance section (2 dollars total).
 I found some chevron paper at Hobby Lobby for 25 centers a sheet and traced the frame (make sure the print is facing the right way if your frame is not even like this one-I learned this the hard way).
 I just used a glue stick to get it stuck down, BUT you could definitely use mod podge for a stronger fix.  The paper is pretty thin, sometimes mod podge makes it bubble if you are using paper thinner than card stock and it takes a lot of smoothing down.  I'm waiting to get matted mod podge instead of the glossy stuff I have on hand.
I made a flower with a scrap of fabric I had, thought you could buy one.  Here is the tutorial for that flower (one of my favorite).  I just hot glued it onto the frame.  I'm going to make a couple more of these with different colored frames.

Bubble Gum Necklace

Friday, January 24, 2014 1 comment
 I made some baby necklaces a few years back using big chunky pearls.  Here is that tutorial.  I recently came across the idea of making necklaces out of bubblegum at onecharming...uhh....adorable...here is my version!  AND here is a free printable for tags that go along with these:  "I 'chews' you!", get it?
I found these bubble gums for 7 cents each, or 15 for a buck at Party City.  They come it all colors, and even have a fun little sheen on them that I LOVE.
 I took a small screw driver (phillips head) and poked a hole in one side  I did the same to the opposite side.  I didn't go all the way through b/c pushing from the inside makes it crack.
I then slowly rolled it around to make the hole big enough to thread a needle and ribbon through.  
 I used a needled (tapestry) with a head large enough to thread some ribbon through.
 I started with three feet of ribbon.  I left one foot loose and tied a knot on both sides and then threaded another piece of bubble gum, tied another knot etc.
 When I was finished, I tied it together with a ribbon, added a tag, and put them in little jewelry boxes (they sell these at craft stores.

Olympics: Chalkboard Nesting Dolls

Thursday, January 23, 2014 No comments
 I love nesting dolls.  I have a little collection-not too many...but only because my house is small and not because I don't one in every color, size, and shape.  I saw the idea for chalkboard spraying nesting dolls at cakies, and I thought, perfect-merging two of my greatest passions?  I think I will.  I found these unfinished wood dolls at Hobby Lobby.  At the time, they were with the other things (numbers, letters, small pieces of wood), but since then I've seen them in some of the paint your own section in a box for kiddos.
I sprayed them with chalkboard paint...
...and then pulled out my colored chalk to get down to coloring.  The great news-erase and repeat!  This Olympic season, perhaps my artistic rendering of an athlete or two set to star in Russia this Olympic season.

Olympics: Torch Trail Mix

Tuesday, January 21, 2014 No comments
 A little Olympic Trail Mix.  I think I will.  I've seen torches via ice cream cones, and what is cuter than a big Olympic edible torch?  A mini torch!!
Bugles-a buck a bag, which chocolate, and dye (if you want, just in case your sprinkles show through) and red and gold (or silver) sprinkles.
 I heated my chocolate in the microwave as the package instructed.  I do it in small batches.  I added a little yellow dye for the bottom, I picked it up out of the chocolate with a fork, tapped off the excess, then dropped it into a bowl of gold sprinkles.  I rolled it around, sticking a tooth pick up the center, and pulled it out the same way.
 I let it dry, then repeated with the red "fire" top.  You could add a little something to make it higher, but I was fine with this.
Toss in a trail mix, a bowl of this is sure to set the mood for opening ceremonies.  :O)

Olympics: Russian Doll Topper

Monday, January 20, 2014 1 comment
 This summer, I realized....it's an Olympic year!!!  Better yet, this year's Olympics take place in Russia, which means-NESTING DOLLS!  Fine, maybe it doesn't mean Nesting Dolls to anyone BUT me, but by golly-I'm obsessed.  I started the hunt.  I came across a bunch of ideas, and I saw some various toppers like the one above.....I put my scissors to work and cut out scraps of paper in various colors to make these bags of trailmix.  Granted, I'm excited about the Olympics, but I didn't put all my doll trail mixes together yet because....a party gift kind of loses it's luster when the treat is stale, but.....
The innards are simple-I decide to go with the colors of each dolls (using sixlets I bought in small quantities at Party City, so I can match each dolls outfit).
 I took my toppers and a bag...
 ...and will tape the toppers to each bag.  I scanned this gal, so if you don't feel like using your scraps to make your own dolls-you can print these on tag boards, cut, fold, fill. Party.   Here she is, free to a good home.

Corsage of Cookies-Salted Caramel Filled Brownie Sandwich Cookies

Friday, January 17, 2014 2 comments
 Last year I wanted to try out a recipe I had received at our cookie exchange the month before.  Taylor brought a delicious brownie cookie with a salted caramel filling.  I had also seen the idea for housing cookies in a corsage box on beeinourbonnets site and I knew this was a combo made it cute heaven.ions
First, the cookies-I really liked this recipe-it was the perfect balance of salty/sweet.  If you don't like things sweet-this may not be for you b/c it's rich, but I LOVE it rich.
Brownie Cookie
Ingredients:  12 oz chocolate, chopped and divided (I just used milk chocolate chips), 3 T butter, 2 eggs, 2/3 c. sugar, 1 t. vanilla, 1/4 c. flour, 1/4 t. baking powder.
Instructions: Put 7 oz of chocolate and butter in a saucepan over low heat and gently stir until melted and smooth (set aside, don't overcook-it heats within a few minutes at top).
Place eggs, sugar and vanilla in a bowl and mix it for 10 minutes (until pale and creamy).  It's a long time, but I didn't dare mess with the recipe.
Add flour, baking powder, melted chocolate and remaining 5 oz of chocolate.  Mix to combine.  Place in fridge for 5-10 minutes (it needs to harden a little so it won't spread too thing while baking).
Spoon tablespoon of batter on parchment or silpat lined pan.  Bake for 10 minutes at 350.  Allow to cool completely.
 Salted Caramel Filling:
1 c. butter (room temp), 2 c. powdered sugar, 1/4 t. salt, 1/4 c. caramel (I added a little more-you can use caramel sauce, but I made my own by boiling a (closed) can of condensed milk in a pan of water for 3 hours).  Stir together until blended.
 I put the caramel into a bag and snipped the end, then added some to the the bottom of a cookie and added a lid.
 I bought these corsage boxes for 50 cents each along with some baking cups.
 I added four to each little box.
 Tied on ribbon and hearts and tags.
 Oh my.
 Definitely going to use this storage idea again.  Heart it!