Category: Decorating
Showing posts with label Decorating. Show all posts

Sewing Pattern Flowers

Monday, July 30, 2012 1 comment
 I saw the idea for making flowers out of old pattern tissue at country living.  I'm am slightly, like, 12 steps away from a healthy obsession with projects out of old patterns.  I'd say it was because I grew up with a Mom that used to sew, but thinking back, this also entailed me sitting at her machine at one point of my life and actually sewing a needle through a finger....completely, and having to figure out which way the wheel turned to get it out.  Good news, I got it out....and then started screaming bloody murder.  Wait, I guess all my projects do include destroying patterns, which equals no sewing, which equals elimination future opportunities to add additional scars to my fingers, which is probably why I like them so much.  For these little flowers.....old patterns...
 I cut these down to roughly 11x8.  I accordion folded two together (more paper=puffier flowers). 
 I cut the ends in a slight arch.
 Squeezed the middle together and tied around a pipe cleaner for the stem.
 A couple flowers, and an old tin (another obsession for another post) and.....tissue flowers.  I don't like silk flowers, but dried flowers...and now, apparently, pattern flowers, I can learn to love.

Recycled Record Book Ends

Saturday, July 28, 2012 1 comment
 This is one of those projects that has literally been sitting around for six months, which is ridiculous because I spent more time moving the pieces around than it took to do the entire 'project.'   It's not even much of a 'project.'  I just spent so long not doing it, when I finally did it...I needed to blog about it!   I'm slowly redoing the decorations in my living room, trying to make it more 'me.'  I have a hodge podge of books that I've collected in my travels....sometimes I pick up coffee table books, sometimes cookbooks, always an ornament.....so I wanted to put a few of them up on the mantel in my living room, and I needed a little something to hold them in place.  A book end.  Duh.  I've been really into records for some reason and been crafting with old records I've found in antique stores.  I bought this little doozy-Olivia Newton Johns' Let's Get Physical (a work 'funny').  I used super glue to attach it to the book end. 
And now...a little bit of a conversation piece to hold those books in place.  So simple, and kind of fun.  I spent my childhood listening to my Mom's record collection in our den.....records always make me smile, might as well throw a few things worth smiling over in my living room. 

New Living Room Wall

Saturday, January 14, 2012 1 comment
 I'm sloooooowly working on redoing some things in my house.  It's been almost ten years, and the frantic decorating I did when I moved in....with things like this.....
 Need to change, mostly for my sanity.  I precariously framed the above pictures when I moved in, and they are wobbley, and dusty, and they were pretty much any picture that could fit in the frame on the day I put them together.  I like pictures, but I decided this hodge podge of frames just wasn't really me anymore.  This random hodge podge of recycled items is....
I have lots more to do, but it was amazing how many random pieces I could find around my house-half done projects, once dreamed up ideas, or random bits and pieces from my past.  I may eventually put a vinyl quote on the wall in the middle of the frame....but that's what 2022 is for, right?  I moved the book wreath from my room to the living room...mostly so I can find an excuse to redo pieces of my room as well.  I used an old crate I bought for a buck as a shelf using this same process, and even put these random quilt blocks in a jar on the shelf along with some books I have from my Grandfather, and one of the photos of him from my 'old' wall arrangment.  My favorite piece is the old window.  I have three more old windows to incorporate in some way in the house, or in a project, but this was my favorite.  I snagged in at an antique store a few summers back while visiting the Midwest.  I love that I can change the pictures around as I feel like it.  I just found three fun memories and printed them off, but as memories are made in the coming year, hopefully I can move those magnets around and display a few more memories.  The yellow frame has yet to be filled, but I have a few ideas.....Next up....I want to work on some throw pillows for the couch, maybe a blanket, and the mantel, and...and....and...

Old Window Repurposed for Photos

Monday, January 09, 2012 No comments
I can't even begin to express my love of old windows.  I found this beauty at an antique store on a road trip that took me through Illinois a few years ago.  I was thinking about repainting it b/c it's a little shabby, but....shabby was the look I finally settled for after much thought.  I'm redoing a wall in my living room....to be posted in full in the futre, and this is one of the new ways I'll be hanging favorite photos.  I made some magnets by cutting out scrapbook paper, and mod podging over them, and then placing a magnet on the back as well to hold them in place.  This will make it much easier to switch around photos regularly, as opposed to the maze of pictures currently living on my wall from ten years ago. 

Old Cabinet Door Chalkboard

Monday, January 02, 2012 2 comments
 In the new year, I thought I'd pull out an 'old' idea.  Chalk.  What better way to start a year?!?  So....I found this cabinet door in the alley by a dumpster. 
 I blame Terry for this bout of dumpster diving, she taught me everything I know.  I now am not allowed to drive though alley b/c I never know what 'treasures I'll find.  I spayed the middle with chalkboard paint, taped it off, and then added a color to match my room. 
I had removed the knob for the spraying, but added it back again, along with a little handle I bought at the hobby store.  I turned it upside down to hold the chalk (I saw that idea on ETSY).  I'm hanging this in my room. 

DIY Cloche

Saturday, February 19, 2011 24 comments
I saw this really fun tutorial for making a cloche out of thrift store finds here.  I love cloches, but they are always so expensive, so I decided to give making my own a go.  I made this little guy for less than 4 dollars, two of that was the knob on top. 
I used gorilla glue, painters tape, a knob, fish bowl, and plate.
I dabbed the glue onto the bottom of the bowl, set the knob in place until it dried, and then it was ready to go. 
I'm loving mustard yellow these days.  This would be cute at a bee themed party, and for some reason, it's screaming french to me.  I have no reason for that, but I never question things when they scream at me, at least not until they calm down.  Now....time to make something to fill this little guy!  I'm really impressed by how well the knob holds to the smooth glass bowl.  I've seen these with smaller glass bowls, and trivets, and larger glass hurricanes.  I like cloches any way I see 'em.

Book Wreath for $1

Tuesday, November 09, 2010 7 comments
I saw this really cute idea for a book wreath here.  She got the idea from another super cute site, and when I was done getting lost in cyberspace, I knew I needed additional firewood decorations for my house.  The process could not be much easier, AND it can't get a whole lot cheaper.  I'm thinking of quitting my job and mass producing these.  It would be really cute with an initial inside as well, or multiple colored paper.  I'll work on that soon. 
I bought a wreath for a dollar at the Dollar Tree, and a book in the Clearance Section of Halfprice books for 80 cents.  My criteria was that the book be as fat as possible for as cheap as possible with few G rated content.  I didn't even use fifty pages of the book to put this wreath together. 

I used a paper slicer to slice the 6 inch pages into 1 inch strips. 
I added a really small drop from the glue gun to create a ton of loops. 
I then start gluing these to the front of the wreath. 
The glue gun bit me a few times, but I really think this is the best way (as opposed to pins).  It let me completely manipulate the spacing. 
I also grabbed a 2 dollar frame from the thrift store. 
I used a dollar can of spray paint to paint it black as a backdrop for my wreath.  I've got the bow, and now I just need to find the perfect location.  I'm off to print off my recycled book wreath business cards now.  Or not.

Halloween-Candy Corn: Candy Corn Garland

Thursday, October 14, 2010 2 comments
I don't know if I've mentioned this, but I looooove candy corn....thus the last 4 post....and the one after this....and the one after that...and the one after that....  I prefer to eat it, but I kinda dig the colors, and I like the way it looks on a garland as well.  Here's my imperfect candy corn garland making process...I was going for the homemade look.  Yup, that's right, and I acheived it.  ;o)  It's never a problem to convince people my stuff is homemade.  ;o) 
Sew three strips (about 2 inches each) of fabric together (this would be fun with a collection of different orange/yellow/and white fabrics, but that would take money/forethought/andshoppingtime, so...).  I cut the tri-color strips down to about four inch pieces...
I used a solid yellow for the back, mostly b/c I was tired of sewing, and had an excess of pale yellow fabric.  I folded the two in half, and then cut the basic shape of a candy corn.  I guess you could make a template, but I like to live on the wild side. 
See....I'll even post a picture sideways, because I'm wild like that. 
Next thing you know I'll be running with the scissors while I cut out candy corns.  On a side note, see those scraps?  I save them and use them for stuffing for crafts like this.  I'm only writing that information b/c I often worry about the memory that is supposedly stored in my head, and I don't want to forget.  Not because it's sooooo clever, just b/c I don't want to forget.  I don't like forgetting this, and if I forget things I wish I could complete the process and forget what I forget so I don't have to be frustrated about forgetting.  After studying philosophy, and the theory of everything, I sewed the sides right side together, with a little part not sewn for the stuffing, I don't think I should talk about the theory of stuffing any further in this post, it brings up all sorts of feelings.   
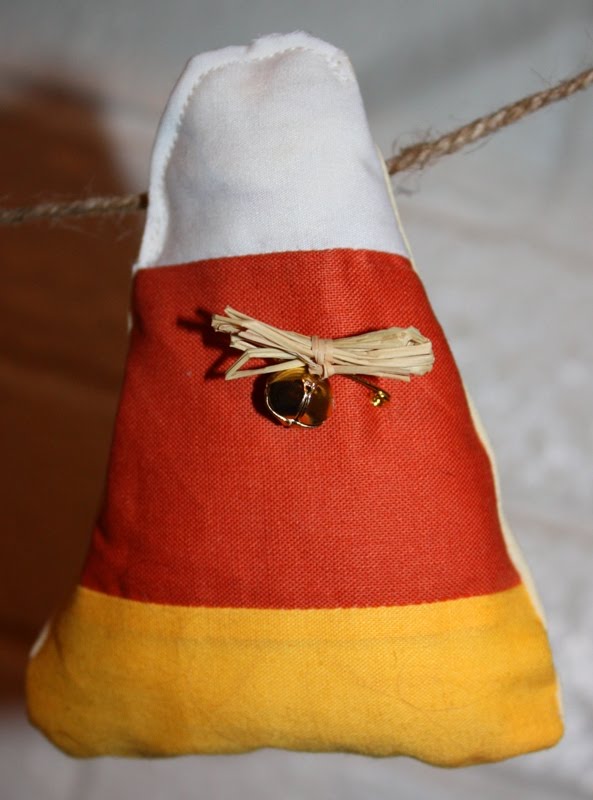
I stuffed, sewed the last little piece together, added a little bell with a safety pin and a raffia bow (I saw the bell and safety pin on some 'vintage' looking stuffed candy corn on a store's sit, I added the bow b/c it's just the kinda gal I am).
 Raffia makes me feel better about everything.  It's the answer to life's very worst problems, like forgetting stuffing ideas.  I used hot glue to glue the candy corn to a string, and then I strung it up, and then I blogged about it, and now here I am.  Christy Wuz --->Here<-----.
Linking To:

Entertain Exchange

Old Drawers=New Shelves

Sunday, July 25, 2010 22 comments
Old Drawers....

....to New Shelves....

I acquired these old drawers at an antique shop last weekend. Once upon a time, this is the sort of thing I would have tossed, now this is the sort of thing I see and can't live without. Go ahead, contact the show Hoarders, I'm going to need them in another week or two. I first eyed the drawer on the right hand side of the first picture, thinking it would be a cute place to store mason jars filled with....something (I've seen these ideas online). They didn't have a price and the lady offered me all three for ten dollars. I informed her I just wanted one, and to name a price, then she offered me all three for five dollars. I took the deal, and changed my mind about what I wanted to do with three drawers.
I like these drawers just as they are....missing the bottom, missing a nob, and chipping away splinter by splinter. I left them in their original condition, though I removed a little antique dust....they'll get enough of that at my house, they don't need to bring their own. I also added a few of the loose wood pieces on the 'best' drawer to the empty one so you don't see too much wall behind the drawer when I hung it. I had to put a few nails and glue in the square drawer b/c it was falling apart on one edge.
Once they were sturdier, I nailed picture holders on the back, and then went hunting for things in my house to fill these boxes, trust me, I have enough junk to fill 2,345 of these.
Just fyi...the drawer on the left houses some books my Mom gave my Great Grandfather (an avid reader) when she was a little girl. The Russian nesting dolls are from a friend (LeeAnne's) trip to Russia when we were teenagers. My friend Mary brought me the cross from Rome. The middle box houses a cross I bought in Mexico the first time I visited as a teen, the bell is from my Great....Great Grandparent's house, they used it call people working in the field for dinner. The last box houses a random candlestick floating around my house, a cross from a friend, and a Welsh Spoon from my friend Kelly's trip to Ireland.
Featured On:
Keeping It Simple
Craft Gossip
Linking To:
Funky Junk
Under the Table and Dreaming
Keeping it Simple
Between Naps on the Porch
The Girl Creative
C.R.A.F.T
Coastal Charm
Fine Craft Party
Night Owl Crafting
Beyond the Picket Fence
The T-Shirt Diaries
Simply Sweet Homes