Category: Gifts for Boys
Showing posts with label Gifts for Boys. Show all posts

Book Themed Gifts and Parties

Saturday, April 19, 2014 No comments
My very favorite gift to give for little ones are those that are oriented around a book.  I often pick a favorite book and then put together a gift set.  I started a pinterest board here.  Or you can click on the label 'book' below and these projects will pull up.  Some of my favorites include Fancy Nancy and all her fanciness, Chicka Chicka Boom Boom, and one year I recorded all my relatives reading a story and put them on a dvd and sent the book and the dvd to Blythe so she could have the book read to her from her different family members....even though she lives a few too many thousands of miles away.  I also love giving books instead of guest books at showers.  I even helped host several showers in the past completed revolving around bedtime stories.
I'm working on another birthday gift this year (May) that I'm really digging), and I'll be posting a bunch of Christmas gift book ideas I put together this past year in the fall.    I'm a reading teacher....so anything I can do to get kids excited about reading...I'm in.  I heart a good picture book!

Travel Trays

Friday, December 06, 2013 No comments
 It's travel time!  I made some travel kits for my niece, Blythe, a few years ago for when she flies out to see family.  I blogged about that here.  She came to visit soon after and her Elmo doll....and the entire section of Virgin Airline seating fell victim to the stickers I included in that pack.  Success.  She's coming again this year with her little brother, Jonathan.  He's two.  I wanted to make something to send them home with...to keep them busy while they traveled.  I saw the idea for travel trays using dollar store trays and magnets (LOVE that...things don't go flying all over the car/plane as easily) via paperwings.  I got to work making some trays that would be Blythe and Jonathan approved.
For Jonathon I sprayed a dollar store tray with green paint.  I used a foam brush and thin brush to paint a road.  I sprayed the whole thing with a clear sealant so it wouldn't scratch.
 I found these sticky back magnets and some cars at the dollar tree.  I put them on the bottom of the car so they wouldn't go fly into Mom and Dad....or the flight attendants head.
 I also googled road signs, printed, laminated, and added magnets to these as well to add to the road.
 For Blythe, I made a checkerboard.  She's getting old enough to play games that are a little more complex.
 I cut out little circles using a punch and mod podged them to magnets to be my pieces.
 I punched out the board.  8x8 is the goal.  Again, I glued and then mod podged the whole thing to the travel tray.
 I found these little containers to store the pieces in....
 I also found this FREE printable nativity via design dazzle.
 I used the magnetic tape so that she can play with this on her cookie sheet.  There are tons of free paper doll printables etc if you google it.  :O)
 I also sprayed the bag with chalkboard spray and found some chalk that is supposed to produce less dust.
 I printed some free coloring pages for each of them-princess pages for Blythe.
 Dinosaurs for Jonathan.  I added these little magnetic clips to hold the books in place.
 I intermixed the coloring sheets with blank paper.
 I put all the supplies...included stickers in little pouches...
 ...and added magnets to the back of those.
I could go on...and on...and on with this concept...but I'll stop here.  For now.

Pirate Tent and Play Set

Friday, October 25, 2013 1 comment
 I made a play fort this summer for the first time and blogged about the SUPER simple process here. I used this same concept for my buddy Donovan's birthday gift this year. I decided to use the same concept, with a pirate theme.  He loves Jake, from Disney (I had to do research on this), and I went back and forth between the hula hoop tent and the fort, and decided this one would be something his Mom could put up easily and get out of the way (as their family grows, this seemed important!).
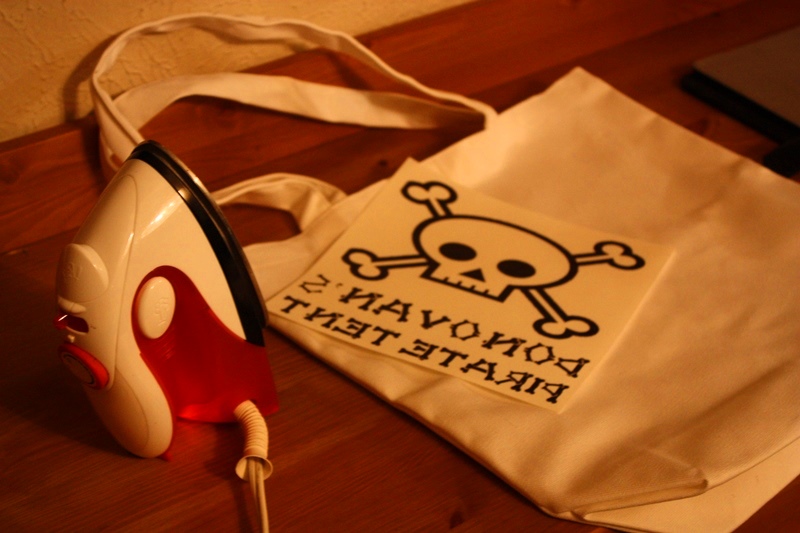
To start I made a bag to store it all in.  I found a skull and cross bones, downloaded a free bone font, and then saved it as a picture file and rotated horizontally so it would be the mirror image.  I printed it off on some fabric transfer paper (by Jolee, no benefit to saying that, but it's a fact), and ironed it onto a plan white bag.
 The hotter your iron, the darker your print.  I wanted it to look a little vintage pirate, so....I didn't go for the full heat.
 I also made a little pouch for the gold I made, here are those instructions.  I just cut off the top of the bag the sheets came in that I used on another tent, the stamped the word 'loot.'  I was going to put 'booty,' but he's going to be 4, and for the next few years, as he is put more and more into play groups and schooling....I figured maybe I wouldn't promote that word, least it is misused or misunderstood in other settings!
 Here's the final product there..
 I also decided instead of sewing on these little pirate designed pennants to the tent, I'd just attach them to binding I bought at the scrapbook store.  I sewed the triangles along the binding but you could also just use fabric glue.
 I also made a pirate map, the instructions were on the same tutorial as the gold.
 Very easy...I just drew a picture with permanent marker.
 I sewed blue felt and a sharks fin to one side of the tend, and also made a jolly roger flag out of felt.  There are six ties, and I also included some clamps so that it can be attached to various pieces of further/trees etc inside or out.
 Peanut thought it was fun...
 ...but then....out of all that junk...he played with the fake gold.  Notice he has flipped it onto his paw here?  Smart dog.
 The best part, it fits nicely into one snug little bag!!

Boy Book Gift Sets

Wednesday, October 16, 2013 No comments
 For quite a few years, all the little ones I bought gifts for were girls...and then the boys came.  It's a different sort of thinking that goes into gift giving, but I'm working on it.  My cousins little guy, Jonathan has a birthday right around Christmas, so these are two gifts I put together.  I've been trying to put gifts around a book theme.  Jonathan's a pretty busy little guy that likes to pull things apart.  I found this little board book called The Toolbox which is all about a little guy's dad's toolbox.  I then found this little wooden container in the unfinished wood section at the craft store and stamped the word tools across it.  You could personalize it, but homeboy has a long name.  In the past, I did a little something like this and made a tool belt, but this time I found this little set that came with one (found it on Amazon).  Works for me.
For Christmas, Jonathan is getting this little book that is currently a best seller, and super cute.  My friend Kristin told me about it, it's her son's favorite.  It's called Goodnight, Goodnight Construction Site.  I found this little Melissa and Doug construction site puzzle to go along with it.  A added a little hard hat I snagged at the craft store for a buck.
I've got a ton more gifts I've put together for Christmas/birthdays that come by the dozen, but I figured I'd share a few in case anyone is in the same boat...and I'm always looking for fun boy craft ideas!

Make Your Own Coloring Pages (From Your Personal Pictures!)

Friday, August 02, 2013 1 comment
 I made these coloring pages using photos for my niece, Blythe.  First...I should say...this is usually how taking pictures goes....
OK...on to this post...
....I've been seeing variations of coloring books online and I was like-if there are more than two clicks....I'm out.  After looking a little more deeply into how to turn pictures into outlines...I figured out....there really are only two clicks to get them going.  And a coloring book was born.  I put together a collection of family photos to send to Blythe to put her own little, four years old, artistic twist too.  She can only improve us, right?
You can take a photo like this...
...and turn it into this...
I'm definitely doing this in book forms to commemorate future visits from family and trips for the little ones to color their own memories to review through the years!
Here are the SUPER simple steps.
Open your photos in photoshop of some sort.  Make sure that the bottom square of color has the black on top...see the picture below with the arrow?
Next up, you go to FILTER on the top bar of choices, drag down to SKETCH and then select PHOTOCOPY.  Like so... 
Then your photo will be in black and white.  On the right hand side there is a little slider that say DETAIL and DARKNESS.  Just mess around sliding these back and forth until you have what you want. 
 The more simple the photo-the bigger the spots to color.  When you are done, press OK, then click print.  You will have a choice of sizes at this point.  If it's a horizontal picture, rotate it 90% and click scale to fit media if you are printing 8x10s.  
Here are a few of the close ups....
 I'll see if I can get an 'after' of some of her art work....