My pal Kelly called me and told me about this jewelry class she took that she promised would change my life. Kelly often makes these promises, but she did come across a pretty cool method for jewelry making fun. I've been wanting to get into jewelry making for awhile now, mostly because I want to be able to make the cute jewelry I see. This is actually a really easy process, but I'm not sure how good I'll be at explaining considering my lack of jewelry know how. The bottom line is I'll know what I mean, so I can remember how to make these five years down the road....I'll forget. I always do. I only have so much brain capacity and I'm having to throw stuff out all the time...this can be good...or bad...enough on that. Here are a few example bracelettes. Kelly made me the bottom bracelet, she taught me how to make the bracelet with example two, and the top is the bracelet I made as soon as I could get to the craft store....which was mere hours later.

Supples: "I" crochet hook, wire (.3 gaze...it was very pliable, you can use whatever, but this was best for me,and comes in all colors), 6 different beads (she used two of the same, but you will basically make 6 strands, so you can repeat your favorites, use the same one and just braid them all together, or use a combo of a few.
There are a bunch of tools I didn't get, I was able to do it without those tools. I don't need anymore tools or supplies in my life. Anyway, thread 8-12 beads onto each of the wire (still attached to the spool). 12=large wrist, 8=small. I used 9-10 for most of my strands (you'll repeat the following steps six times).

You can see the beads, but they are below my hand that is hold the wire that I've folded over with about 3 inches left loose. Make a loop.
Leave a little loop (big enough to put the crochet hook through), and wrap it around 3 times.
OK....slip the crochet hook through. You are going to make a basic chain stitch (google it, future me, I'm sure there is a tutorial since I know this will be tossed out...probably 3 days before I've set this to post)Basically, your loops need to be able the width of the hook. The good thing that is forgiving about the wire is it's going to be a crinkle of wire goodness (this same concept didn't go too well the first (and only) time I tried making a blanket).
This is a bad shot, but I've taken the loose end in my hand holding the hook, that will stay steady. The end (still attached to the wire paddled thingie) and pull it up and around the hook. It doesn 't matter which way you go, just always go the same way.
Pull this second wire through to make the first chain. Repeat this two more times.
Next, you start taking the beads one at a time and incorporating them into the chain stitches. Draw one bead up to add to the chain every other stitch. Bead inside a chain, 'just' a chain, bead inside a chain etc until all beads are used.
Once you've added all ten beads, do three chain stitches at the end (like you started).
On the last one, leave about 3 inches of wire, stip it (finally) off the wire paddle/roll thing, and pull it all the way through the loop.
Pull it until it's taunt to hold it into place.
1 down, 5 to go.
Time travel, a beautiful thing on a blog. I went with 6 variety of beads....it gave me an excuse to buy six different beads.
The strands should all be about the same length. Line them up, and hold them at
one end
Start twisting the loose wires (up until where the crocheted wire beings). Twist, twist, twist (and shout?)
Pull them into three strands (to beads in each strand).
Braid. Loose braids=wider braceletts. The wire allows you to stretch, or widen the bracelet as needed.
Once the braid is finished, repeat the 'pull together all loose strands' and twist, twist, twist on the second side.
Add a finding to one end.
Bend.
Twist around the twisted wire, stacking. This looks 'neater' if you have 'those tools.' I'm over it. Cut off loose wires.
Repeat on side two.
...this may mean nothing to anyone else, but hopefully I can at least understand myself. I heart these bracelets, I see a lot of them in my future, or should I say...my friends' futures?
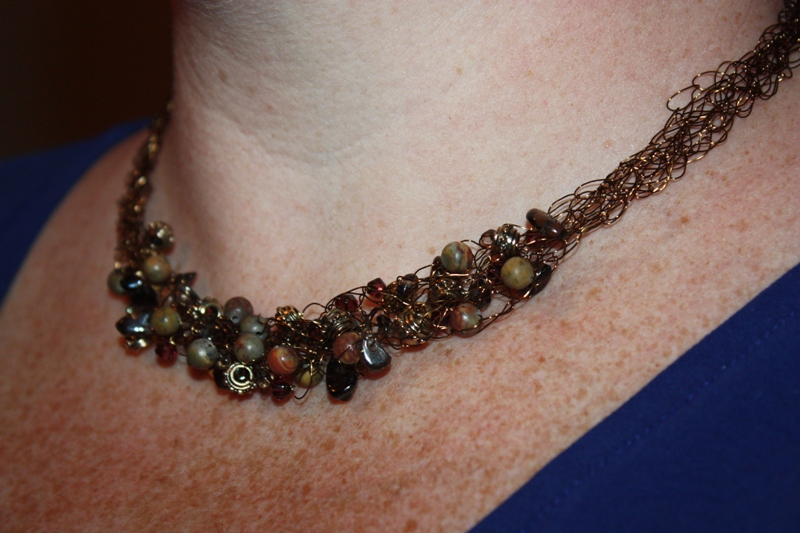
P.s. Kelly also made this necklace, she doubled the number of beeds, and did 3 crocheted loops on each side to make it long enough to be a necklace.
Then she did one crocheted with beads the entire length.

Linking To:
Under the Table and Dreaming Sundae Scoop


15 comments
This looks so great. We'll see if I can actually pull it off. Seems simple enough....until I try it.
Wow, great tutorial. And they turned out wonderful. You are so talented. I can't wait to see with all of your summertime hours.
Awesome!! (said in an "I hate you kind of way") :)
These would make great Christmas gifts for my nieces!
BBFF
I love this! I may just give it a try! It doesn't even look difficult. I'm more of a knitter, but beads are so much harder in knitting. hehe
Thanks so much!
This definitely looks easier than you would think. Thanks for sharing because I will definitely be giving this a try.
Love Love Love these....thanks for posting such a detailed tutorial!!!
This is so pretty, love it!! I love to crochet Barbie size clothes, I make my own patterns and I love to put beads on most of the dresses, will try this to make necklaces and earrings, bracelets, to go with the dresses. Also, want to make me some bracelets too!! Thanks!!!
The original nonwoven technology. Since the initial discovery in 1955 that led to Tyvek, DuPont has been a recognized global leader in selective barrier ...
wristbands
Thanks for the great tutorial. I just finished making one and I love how it turned out
Yay! So glad it worked out for you Tina! :O)
Thank you for a great tutorial. I have now made three of these bracelets. The first was in shades of pink and purple with some black and silver worked in. There were also two bright green beads to give it a little pop of color. The second was in shades of blue with a few pearly white beads and some clear ones. The third bracelet was all shades of blue. But, instead of using six wires, I used nine. Instead of dividing the wires into twos for the braiding, I divided it into threes. It was a pain to keep those nine strands from twisting where they shouldn't during the braiding process but the bracelet came out looking gorgeous. I've used silver colored 30 gauge wire for all three bracelets and I used a size H crochet hook. I used small magnetic closures so the recipient can put on and take off her own bracelet. Most of the beads I used were six millimeter ones but I also have used a few eight millimeter and even four millimeter ones. I have used mostly round beads but some were disk shaped and some were cubes. Glass or faceted beads are particularly lovely. I'm curious to see how a twelve wire bracelet would work. I'm also contemplating making a bracelet from wooden beads. These bracelets are fun to make and they are very easy to make. I'm so grateful to have learned how to make these bracelets.
Definitely giving it a try...thank you
I think your work is lovely. I have been teaching this to students for over 20 years, and the different ways and beads make this a favorite. It is my best seller also. I have been teaching at my church and at a local college. All the students have been great. A good lesson of my experience is to use a hook pin at the end, thread it through the final twist of wires and secure the twist, and then thread the hook through a bead cap, bought or made and finish with a closed jump ring on one side and the clasp on the other. Then you don't have to worry of the last twist wires fraying or sticking the person who bought it. It also looks more finished.
Post a Comment