As for the how to...let me start with...
When I was little, my Mom taught me to sew....as much as I can be taught to do something with 'rules.' Some of my biggest arguments with my Mom were over sewing directions. I just don't like them, and she seems to think they are necessary when following a pattern. She got frustrated reading through them, and figuring them out, and I got frustrated that she can't make up something much easier than the seventeen steps to attaching a button. I took another sewing class in high school....I needed the credit. I made a scrunchy, boxer shorts, and a dress. I'm trying to forget what those looked like. Anyway, here are all the wrong ways to make an apron. This is actually for me, so feel free not to read any further, but when you invent your own process, you tend to forget what you did when you decide to do another a few years later. This process works the best for me. I've actually made a ton of these, but I can't post them until they find their homes. I'm currently running an apron foster care until they can go to their Moms.
Supplies: I like going with three fabrics, which include a solid for the base, because it's A) Cheaper, and B) A little more mellow. I buy 1/2 yard of solid fabric, which actually would make two aprons, and 1/4 yard of two complimentary colors for the ruffle, band, and pocket. There are left overs of all, but you usually can't get a fabric store to cut anything smaller than 1/4 yard.
P.s. I love the board, and baby iron in my picture. I 'learned' about these at a quilting retreat from people that actually know what they are doing, and it's soooo much easier than lugging out big boards for small projects like this.
.JPG)
I cut this one (for a little girl) down to a 20 by 14 inches, and then I folded the two sides together and daringly cut up the edge freehand at a bit of an angle so I end up with a trapezoid.
.JPG)
I cut two slices from both of the complimentary fabrics (down the length) 2 3/4 inches. Then I sew the two slices of each fabric together to make one long strip.

Next, I go without pins, and make a pretty messy (look, I'm not selling these, it's free labor, OK?) line up three sides of the base of the apron (all but the top), three sides of the ruffle (the two short sides, and one of the lengths), and all four sides of the band.
.JPG)
I then take the unfinished part of the ruffle, and just start sewing it to the back of the base of the apron. I know, I know...you are supposed to make a loose stitch down your fabrics edge, and then start pulling the thread and gathering the materials. I squish it together and sloppily sew, and I like these ruffles so much better than the 'real' way b/c they are 'rufflier' and I love a good ruffle!
.JPG)
Rufflie goodness.

I pin the waist band to hold it into place. I pin it along the unfinished top, and then just sew a big rectangle so it's securely attached to the top of the apron. (Why do the simple sentences in this blog make me want to start reading a Dick and Jane book?)


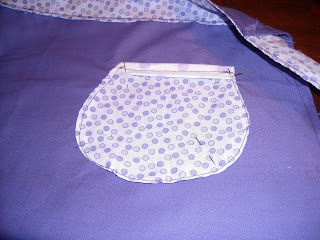
And now a pocket...it's like a mini purse b/c you never know when you are going to need your...ummm...chapstick? Lipstick? Driver's Licences? ...when you are in the kitchen.
If you don't go with a square....
Again, there is this whole process of snipping along the curve etc when you sew a curved fabric....I like a little messy forcing myself....and doesn't that just give it the homemade look? You can't find one of these 'unique' aprons in any ol' store....or really...in any store...ever, really, but I have fun!
I make a little edge, and then cut. Sew along the edge of the pocket...

...and then I sew along the edge of the pocket again while it's attached to the apron (the second time I sometimes pull out a few pins to actually pin things down, because I like to be exact :insert hysterical laughter:)

I guess this is where I say-I'm not a professional, feel free to try this at home, you can only improve upon it, trust me...a strait, even stitch would be an improvement. It would be fun to make this reversible, if you aren't into Nascar speed limits when crafting like myself, thus...no time for extra's like that...You know what-the 9 year old won't notice anything but the colors, and the concept, and it'll hold up in the wash. I'm sold on the process. Maybe I'll pull out my 10th grade Home Ec skills and make a scrunchy with the extra material...and give it to *you* for your birthday so you feel obligated to wear it...that thought makes me laugh. :O)
Linking To:

and funkyjunkinteriors


2 comments
Christy.... you linked! I love your ruffle idea, I love ruffles but the real way drives me nuts. I'll have to try that. There is a sewing link on funky junk interiors. I linked there today. Have a great weekend.
Lori, thanks for the suggestion. I had no idea there were link parties, ways to link etc until a few weeks ago....crazy! I accidently stumbled upon it, so I don't know how knew it is, but now I'm hooked on these great parties, thanks for sharing the site!
Post a Comment