Pencil Pops

Monday, September 12, 2016 No comments
 I went into Good Morning, Texas today to post tape a pencil theme craft segment.  I'll be demoing pencil jars, a pencil banner, and finally, pencil pops.  I saw these on Pinterest, and the best I can tell the idea originated at Bakerella.  I modified it a bit so they travel well, but the gist is you take a white cake mix and pour 1/3 of it into a bowl and dye it pink, and dye the other 2/3 yellow.
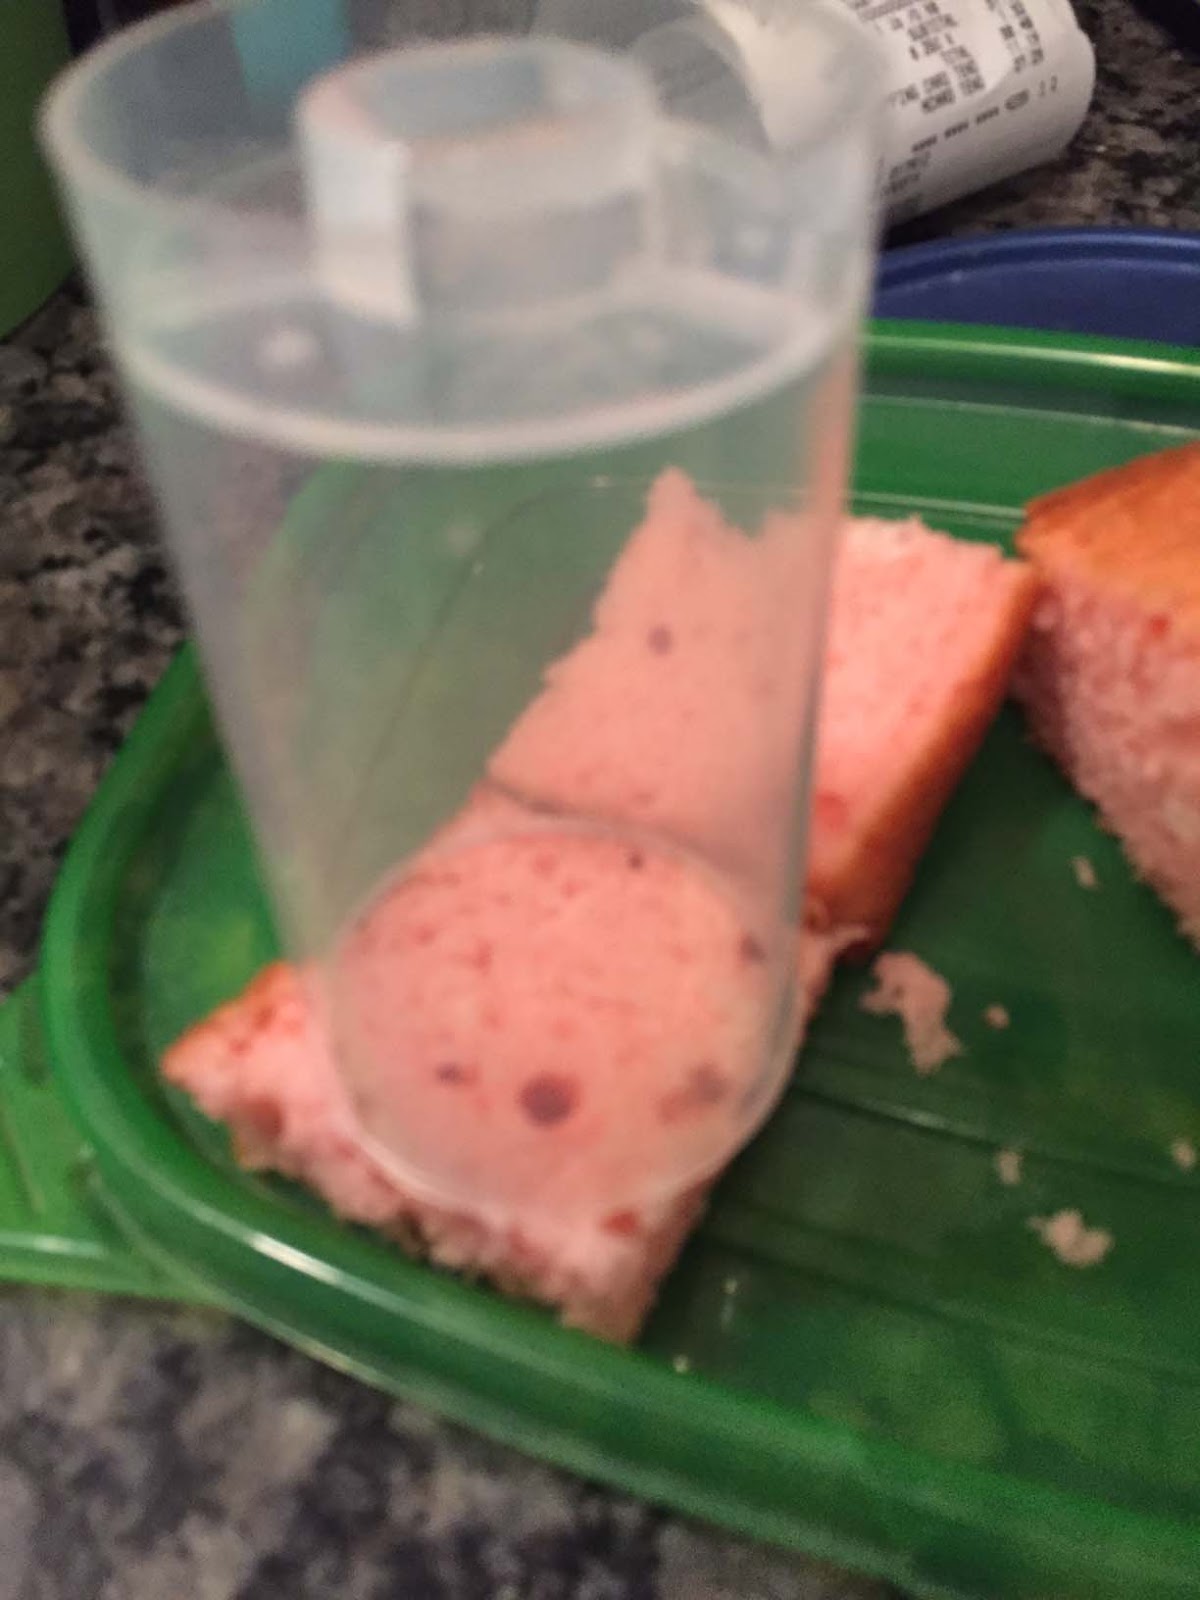
 I decreased the baking time a bit and just watched it, and then once it cooled I cut small squares.  I used these push pops I grabbed at a craft store and push out a piece of the pink cake.
 I slipped it down into the tub.
 I then took some canned icing and put a line of gray (I just dyed it with a little black) over the pink (eraser).
 I then squared off the yellow and used the container to cut out the cake and then slip it down inside.
 I dyed the other half of the icing a light brown.  The original just piped up a cone shape and put a small chocolate morsel on top.  I wanted to be able to close the lid, so I actually made a little 'cap' out of a half circle of beige paper.
I just taped it to the top.  If you want to just pipe up a cone and add a morsel, I wouldn't use the canned icing-make a buttercream b/c the canned icing is too runny to really create any sort of form, even if you add a bunch of powdered sugar.  I'll post the video to facebook as soon as it airs (tomorrow?).

Pencil Banner

Thursday, September 08, 2016 No comments
 I'm headed to Good Morning, Texas on Monday....and doing a post tape I THINK will run on Tuesday.  The theme is pencil crafts for back to school.  This is 2 of 3.  A pencil bunting.
 I cut out some 'pencil shapes' from some scrap burlap.  Then I used this no fraying glue I got at the craft store and ran it along the edges so it wouldn't continue to fray.
 I then used some paint to paint up some pencils.
When it was dry I glued it to some twine.  It's super cheap and easy to do.  I'll probably add a word to these pencils once I'm done with the show so they can hang in my classroom at school.

Freezer Meal: Sour Cream Noodle Bake

Wednesday, September 07, 2016 No comments
 I have so many friends that do the freezer meal 'thang.'  You know, set a day aside to chop, dice, grill, and bake?  I'm going to do that, I am...someday.  In the meantime, I've gone a different route this summer.  I typically have a little more time during the summer (though, even that statement is questionable these days), so I try to make more meals at home, or the fast food folks start to know my name, birthday, and approximate ketchup requirements.  BUT, I'm single, so if I make a meal I have to cut down the proportions (you don't know how many half eggs I've washed down the sink in my years, yes I know you can freeze them, but....).  This summer I bought some disposable pans from Dollar Tree (three for a dollar, which includes the lids).  I started making a meal, and baking half in a small pan, and putting the other half in the foil containers and freezing them.  This way I have a wide selection of meals ready to go now that the school year is in full swing.
 This go 'round I made The Pioneer Woman's Sour Cream Noodle Bake.  I'm just going to tag her recipe, and say....I added about twice as much cheese because...really do I need to explain why I added extra cheese?
 I did put a layer of syran wrap over the meal I'll pull off before baking.  I wrote on top with a permanent marker, and then I'll just put in in the fridge to thaw the night before I plan to make it.
This is definitely a meal that gets better the longer it sits together (let the seasonings marry), so freezing it is the perfect solution.

Beer Bread Gifts

Tuesday, September 06, 2016 No comments
 Last Halloween I put some of these together for my friends.  I saw the idea at homewithmandy and knew it was the perfect gift.  What a great hostess gift if you are headed to parties, or....just want to make someone's day.
You can buy the disposable pans, or....I found thee at the dollar tree, which seemed like a good price to me.  I grabbed some pumpkin beer and then mixed together:

Ingredients:  3 c. wheat flour, 1 T. sugar, 1 T. baking powder, 1 t. salt in a bag.

I added a 12 oz beer and made some printable directions.

You can download them for free here.

All you have to do is mix the beer and the bag of mixings and bake it up.
I even made one for myself.  It taste great with honey....and it's oh so easy, and a fun presentation. Proof it bakes.
*One bag of wheat flour was enough for 6 loaves, though I did have to add about 1/4 c. white flour to the last loaf to have enough.  

Felt Cupcakes

Monday, September 05, 2016 No comments
I'm a finisher.  This means, I finish every project, or every idea (I try, at least).  I think of pinterest as more of a to do list than an ideas list.  This can be a little bit of a problem.  Now, I'm not a fast finisher.  I have far too many projects I have the pieces to that aren't finished yet, but they will be...someday.  Having said all that...this is a project I wanted to try out probably four years ago.  I bought the muffin tins and then I saw a squirrel or something.  I finally uncovered these muffin tins and it was time.  I love it because they are play cupcakes you can also use to teach colors.
 I painted the inside of the tin to match the cupcake tops.  As far as making the cupcakes-google a free pattern to make play cupcakes-there should be a ton.  The ones I used didn't work out, so I had to wing it on the way.
I used brown felt for the base which I stuffed and then different colors of fabric for the tops and I hot glued the two pieces together.

Pencil Cup Squared

Friday, September 02, 2016 No comments
 I'm headed to Good Morning Texas in a little over a week and bringing a bunch of pencil themed crafts.  Hello, school year.  I saw these adorable jars and had to give it a go because I love Mason Jars...and pencils.
These are so simple-I got a jar and poured some yellow paint inside, then turned  it upside down and swirled it around so the sides were all covered.  I poured the excess back into the paint container and then let it dry overnight.  I also painted the rim pink and then once both dried I took some polyurethane paint over both so they wouldn't scratch and peel off.  I added a silver ribbon and some black stickers and I'm ready to go.  I'll be making a second jar at GMT as the demo, and then these are going into my class for my sharp/unsharp pencil jars.