Category:
Showing posts sorted by relevance for query burlap. Sort by date Show all posts

Burlap Wreath

Sunday, January 23, 2011 10 comments
Amanda and Taylor told me about this wreath tutorial they found on line for a Burlap Wreath.  It's so disgustingly cute, I can't even stand it.  I have about six wreaths in every room of my house, and 58 in my garage, but I 'needed' a wreath like this.  The flowers on top can be exchanged each holiday with a new tag, and flower, but I decided this guy wants a permanat home. I didn't have a single wreath in my kitchen :insert gasp:!  The tags can be seasonal as well, but 'laugh' pretty much covers so many of my cooking attempts...I knew I could look up and smile at my cooking motto-laugh.  Someday I'm going to start a blog about all my failures, but I'm going to be medicated first. 
Anyway....as for the wreath.  The supplies are a foam wreath, a glue gun, pins, and three strips for 4 inch by 70 inch burlap fabric, and then whatever you want for flower-ee acceories. 
You take one strip and wrap it around the wreath (secure with glue at the start and finish, don't wrap too closely together or it won't make it all the way around).  Take the other two strips, and sew a very loose line up one side of the other two burlap strips.  Pull to ruffle.  Pin it in place (I pinned the two ends together, and then laid it across the wreath in a circular form. 
You glue one to the back on the outer edge, and one on the front at the inner edge.  There should be one portion of the burlap that is finished, and I used this in the exposed inner circle. 
To make a ragged edge, just start pulling the edges of the burlap out until you get a fridge that matches your fringie wishes.  If you are a perfectionist....get over it.  Burlap is completely unforgiving, and part of it's charm is that it is a completely imperfect line of fabric.  Embrass the imperfection....my friends have to...daily. 
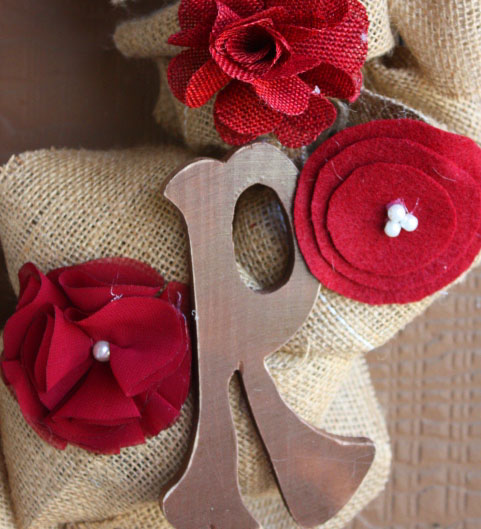
OK...and I thought this big no sew flower was so stinking clever!  Taylor came up with this process, and I'm pretty sure I want to open a fabric flower shop. 
All you have to do is cut a piece of fabric....about 20 inches by 8 inches, grab a pipe cleaner.
Throw some lint and misc dog hair on your floor.  This is necessary to the success for your project, just trust me.  If you don't have a dog, you can borrow one of mine for a week or 15.  Let me know. 
Take your glue gun, and run a line down the length of the inside of the fabric about 1/2 inch shy of the halfway mark.  I'm point to the general area you'd run the line (I couldn't photograph the process, glue dries to fast). 
You should have an opening a little wider than your pipe cleaner now.  Run it down the length of your glued fabric. 
Pull both ends together. 
Pull into a circle.  You don't have to finish off the outside edges because they are going to curl under.  Pull it tight and twist it tight.  Ta da. 
My wreath got a red flower.  Once you place this guy on a wreath, or a pin, you can glue it down to the shape you want it.  Case in point. 
Ultimately, I added a button to the center of this one, but that's because I am an unsuccessful member of bottons-on-every-project-anonymous.  They are cute by themselves as well.  This brings me to flower two....burned edge poppies, that tutorial was yesterday, but I can't talk about fire much more this week because there is a physiciatrist somewhere with a clipboard, just waiting to check a few more boxes off before they show up at my door.  I grabbed one more (dotted) flower, already made at Hobby lobby, and some fluffy feather stuff (also from Hobby Lobby).  Add tag...
I then I hung this in my kitchen. 
I'm off to make another wreath...my attic is poorly neglected in the wreath department. 

Burlap Watermelon

Tuesday, July 02, 2013 1 comment
 I made this burlap door hanging for my Aunt to hang on her door this summer.  I've seen these burlap hangings popping up all over, and I had a little extra burlap and I decided instead of storing it I need to use it up!
I cut out two slices in the shape of a watermelon (I actually cut on the fold so it was one less side to glue later.
 I just used regular paint and a foam brush to add the colors of the watermelon to my slice.  I painted on a trashbag, which helps the paint 'pool' a little and stick better to burlap.  Burlap and screens, I've found, do best when painted on bags or the paint will seep through.
 I used little round dabbers for my seeds.
I used a glue stick to glue the front to the back, but left about 6 inches open on one side....
 I stuffed it with plastic bags to make it 'puff.'
 I added rope and ribbon.  Super easy.

Burlap Initial Wreath

Friday, May 10, 2013 No comments
 I made this for my pal Sarah's new house.  She said for house warming gifts she wanted things with initials on them.  On the side she told me she had a big glass window and wanted something to cover up the gap so peeping salesmen couldn't see in without a struggle.  So....say hello to the wreath for 'the other seasons.'  I went with brown and burgundy per my instructions.  I've made a lot of wreaths.  I've used a lot of burlap making wreaths but I'd never made one of these bubble wreath's before.  I know you can do it with a coat hanger, but I went ahead and bought a frame at a craft store along with a yard and half of burlap (they sell ribbon you can use with finished edges, but it's cheaper to buy it by the yard).  The only other thing to make the bubble wreath needed is some wire.  I snagged an R and some pray and some other materials for flowers...
I sprayed the R with brown spray paint and then rubbed the edges and top with sand paper to make it look a little worn...just a personal preference....I like to make new things look old so I don't feel so lonely in this world.  
 ...random picture I took during the creative process because she is so helpful.
I cut the burlap into 6 inch strips, then thread 8 inches of wire through the burlap (weaving back and forth)....
I tied it to the wire wreath and then pinch the other side and tied it to the wreath as well making a 'bubble'.  
 See....
 I went back and forth across the 4 wires to create a bunch of little loops in all directions.  Here is the back....
Halfway there.  I later went and filled in any gaps with random loops.  I just kept adding when I ran out of my strips until the whole thing was covered.  

I'm traditionally the fan of a bow, but I found this wreath sort of makes it's own fluffy statement....so I bought a few burgundy flowers, then made a few out of felt and fabric.  
 To make the rolled flower I tied one end of a 1 inch wide strip I cut down the length of the fabric....
 Then I twisted, rolled, and glued.
 I glued the initial and flowers to the wreath....
The top two flowers.  
 You could add pins to the back of the flowers and change them up for each holiday with the burlap as the backdrop....but I think I'll just leave this here.

Burlap Gift Bags

Saturday, April 23, 2011 4 comments
I stumpled upon some burlap bags with small dots for sale on Etsy, and I decided I could not go another day without making a few thousand of my own.  I love burlap.  I love dots.  Could the world be any better?  These were so easy to throw together.  I had some extra burlap I cut into long rectangles.  I grabbed a 'dot' brush from the craft store, and paint. 
...and then...I got down to the business of dotting my bags. 
Be still my dot oriented heart. 
I sewed, turned right side out, and then added some rope as a tie. 

Linking To:  Lolly Jane Pretty Packages

Burlap Pillow...or...If Everyone is Jumping Off a Cliff...

Wednesday, June 29, 2011 3 comments
I know, I know....I'm late to the party.  Not only has 'keep calm and carry on' morphed into every other keep calm and eat a cupcake, be merry, or use a lint roller...whatever, BUT I needed to get this out of my system because...  #1  I love burlap.  #2 my bff, Regan saw this little saying for the first time when she was visiting me last fall, and she loved it because she said 'carry on' was sort of the motto in boot camp approximately.  So, I made her a little pillow just because that's the kind of gal I am, oh, and I was going to visit her for her graduation, and I couldn't wait to give her graduation gift (8 months ahead of time), but I didn't want to go empty handed.... 
I got a 'filler' for the midde, and then cut a piece of burlap about 1 inch wider on all sides.  I printed out my message with the cricut onto freezer paper, including the crown that is the top of 'everyone's 'keep calm' subway signs, pillows, tattoos.  I ironed down the shiney side of the freezer paper (best invention ever). 
I've foun (through doing it wrong many times) dabbing a foam brush filled with paint (I also add some textile paint that can be ironed when dried, and then 'permanantly set) over the outlines. 
I peeled away the freezer paper (it sticks down firmly while paiting, but peels right off when you are ready).  I sewed, stuffed, and tried it out on one of my chairs. 
I considered forgetting to bring this to her, but I decided to anyway, it just gives me an excuse to make more for myself. 

Burlap Stocking

Tuesday, December 14, 2010 3 comments
I saw this stocking idea on HGTV.  I thought it would be a really cute package idea for gifts.  I traced one of the stockings I have hanging in my house for the shape onto two  pieces of burlap and cut it out.  I sewed them together, left the raw edge showing, and put a little muslim ruffle at the top along with a small loop of fabric for hanging. I thought about painting on an initial, but sometimes it's fun to regift packaging...or, uh...so I hear.  I'd love to try this out again with some old coffee burlap bags with printing per the original idea.  This little guy got filled up with some gifts, and it now has a new home.

Wish Banner

Thursday, April 24, 2014 No comments
 I bought this window for two bucks in TN....I would have spend 10 times that (literally) in Dallas.  I had to store it at my pal's house for six months...along with about four others until I drove my car back up for a visit....and was able to take these with me.  I'm pretty sure her husband canceled his membership to my imaginary fan club when I took up his garage space.  I can live with that for a savings that big.  I wanted to use this as a frame for my room.  I bought some metal roses with magnets on the back, and then used a second magnet on the other side of the window to hold them in place.  These hold up my pictures.  I have a few more things to add but in the meantime....I wanted to make a little banner.  My room needed a little more burlap to cancel out so much white.
I cut some burlap into the shape of pennants.  I hot glued the top edge to some rope.
 Burlap loves to shed.  I didn't want to sew the edges, so I found this no fray glue 'stuff' at the craft store and ran it along the sides on the back.  It dries clear, though I could still see it on the back side, but not on the front.
I cut out the letters on cardstock.  I then just placed them over each triangle and used a dabber to dab white paint on the outline I had cut out.  I did this using freezer paper in the past.  Here is that tutorial.