Gingerbread Clothes Pins

Friday, November 28, 2014 No comments
I'm slightly (completely) obsessed with gingerbread men, so when I saw gingerbread clips at eyeballs I know I had to add this project to my gingerbread collection.  Really, a collection I house here on pinterest. Just a few dozen gingerbread themed crafts...because admitting you have a problem is the first step.  
The clips were super easy-I took wooden clothes pins and sprayed them brown with paint, then added some face-I put the black on with a permanent marker and the rest with a thin brush per the instructions.  I'm going to use these to clothes some cookie bags.

Thankful Still

Thursday, November 27, 2014 No comments
I know there are some picture perfect meals being prepared as I type this...
I also know there are some empty tables.  Torn families.  Lonely friends.
I don't know why some years bring bounty and some years bring famine in the lives of those I love.  In my life.  But I know that each year it's the same God I thank for the blessings, and sometimes for the lessons that lead me to the next blessing through the stories that sanctify me.

Gingerbread House Cookie Decorating Kit

Tuesday, November 25, 2014 No comments
 I saw the idea for making decorative sugar cookies at beeintheirbonnet, where I got the free kit card printable.  I have a friend that loves a sugar cookie recipe make a lot (again, a recipe from another friend-where all the best recipes come from).  Here is that recipe for the cookies and icings.  I found a little house cookie cutter via Wilton.
 I used the little plastic organizers in the jewelry section of craft stores to fill with misc. candies for decorating.
 I added a bottle of icing and cookies.  You could add several colors of icing, but....I figured my friend and her grandkids would get a kick out of this...
 I found this little gingerbread house box to put it all in (at a craft fair).  Much easier than the traditional means of trying to keep those walls up with lines of royal icing.

Thanksgiving Favor Idea

Monday, November 24, 2014 No comments
I saw the idea for making these little favors at fickle and knew it would be the perfect last minute/easy thing to throw together!  I bought some of the longer/thinner bags (usually used to house those pretzel sticks).  Filled it with skittles (yes, Reeses would work too, but I am a fan of the skittle).  I googled free tag and add it with some raffia sticking up like a corn husk.  Super easy and delicious.

Cinnamon Almonds....and Print on a Tag Instructions

Friday, November 21, 2014 2 comments
 Here's a  two in one tutorial....cinnamon almond nuts...and...how to print on tags.  First up, the nuts.  Seriously, this is what heaven smells like.  So....if you need a little heaven in your house...and mouth....this is an super easy recipe for incredbily delicious almonds. I got the original recipe from richestoragsbydori.
Cinnamon Almond Nuts
Ingredients:  3 cups of almonds (salted or unsalted), 1 1/2 c. sugar, 1 1/2 c. brown sugar, 3 T cinnamon, 1/8 t. salt, 1 egg white, 2 t. vanilla, 1/4 c. water
Instructions:  Mix the sugars, cinnamon, and salt.  
In a separate bowl whisk the egg white and vanilla until it's froth.  Add the almonds and coat completely.  
Add the cinnamon mix and toss to coat.  
Spray a crock pot with cooking spray and add your almond mix.  
Cook on low 3-4 hours (stirring every 20 minutes).  In the last hour, add 1/4 c. of water and stir well.  (This makes it crunchy).  Cook at least 45 minute after adding the water.  Spread the almonds on parchment paper to cool.  Separate them a little (they will stick to the nuts near them, so avoid large mounds of nuts.  
Once you've got your nuts, add a tag.  I created a little video you can watch here for how you can print on tags/envelopoes, cards etc.

Wooden Place Mats

Thursday, November 20, 2014 No comments
 I saw the ideas for these place mats at shanty last year.  I adapted in a bit to fit the wood I had on hand.  I had some 1x12 pieces that were cut into 18 inch slices (Home Depot will cut these down for you if you don't have your own tools).  You could also take two 6 inch wide pieces and glue them together with wood glue.
 I found some 3 inch stencils I liked, though you could also grab a stamp.  I used a dobber and paint...
I lined it up in the corner and made my monogrammed chargers.  I can't wait to set these out this year...it should be a fun addition to the Thanksgiving table.

Gold Dipped Wine Glasses

Wednesday, November 19, 2014 1 comment
 I've seen variations of this project around for years, but now....it was my turn.  I mentioned yesterday I'm obsessed with gold....for the fall.  ...and don't even get me started on silver for Christmas.  But first.....I had these wine glasses left over from a project and I decided to jazz up my table and match some name tags I made yesterday.
I tapped off the stem of the glasses, and then I sprayed the bottom of the glass so they look like they've been dipped in gold.  They are hand wash only now, but....it's a fun look/addition to this year's table.

Gold Leaf Name Tags

Tuesday, November 18, 2014 1 comment
I saw this awhile ago on search to understand food and stored in in my memory bank.  This year I'm all about gold for Thanksgiving.  So...it was time to pull out this simple little table nap tag idea.  You can do this with real leaves...or....I found a 'stem' of fake leaves at the dollar store.  
I sprayed my leaves down with gold spray and then used a permanant marker to write the names of my guest.  Warning...more gold to follow.

Baked Beans

Monday, November 17, 2014 1 comment
I'm all about making things from scratch....but when it comes to beans, there are so many ways to jazz up a can of store bought beans and not mess with the rock hunting and soaking required from when you do it starting with a bag o' beans.  This is an easy recipe that was a huge hit the last time I served it!  So...if you are into tasty, easy recipes....and need a side dish....without further ado.
Baked Beans...The Easy Way
Ingredients:
1 15 oz cans of baked beans (drain somewhat, not totally), 1/4 c. brown sugar, 1/2 onion (chopped), 1/4 c. ketchup, 1 T. mustard, 1 t. Worchesetershire, 1 t. Red Wine Vinegar, salt and pepper to taste, 2 slices of bacon (sliced into 1 inch pieces)
Instructions:  
1.  Mix all ingredients except the beans.
2.  Place in a 9x9 pan.
3.  Add the raw bacon pieces on top.
4.  Bake at 350 for 1 hour (or until bacon is cooked).
*You can also cook this in the crock pot on low for 2 hours.

Legend of the Candy Cane Cookies

Thursday, November 13, 2014 No comments
 Last year I hosted a cookie decorating party with some of the gals in a bible study I met with.  I made a bunch of candy canes to bag up for friends.  Here is a free downloadable printable I created to attach to the cookies.  I used my favorite sugar cookie recipe (it doesn't spread while baking).  This time for the red, instead of using a dye, I had one of the girls bring some already mixed in the decorator tubes you find by the cakes.  We squeezed it out, added Karo syrup (about 1 T per tube) and then put it into bags for piping.  The karo syrup helps the icing harden enough for bagging.

Gingerbread Crafts

Wednesday, November 12, 2014 No comments
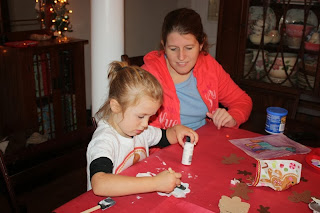
 Last Christmas my cousin brought his precious kiddos into town.  I had them over one morning for a gingerbread brunch.  Blythe and I have been crafting together since she was 6 months old.  Really.  She was more a victim at the time-paint a hand/force her to stamp something with it, at the time, but now she loves crafting and she has a little brother, Jonathan to join her.
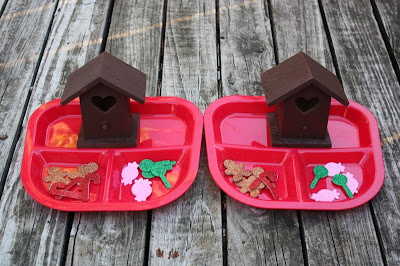
I found some bird houses for a dollar and sprayed them brown to look like gingerbread houses.  I decided this would be easier than the 'real thing' this year.
 I found a bunch of glittery foam stickers and jewels and let them go forth and decorate.
The thought is they can maybe even hand these little treasures on a tree of their own....or at least keep them for a fun memory for a month or two.
 We also decorated gingerbread cookies.  I used store bought gingerbread dough and a canned icing.  I bought a bunch of misc candy.
 ...and they put their artistic skills to work.
 I also had them paint some little wooden angel ornaments.  Yes, gingerbread men would have been better, but Blythe and I already did a gingerbread themed ornament one year....
 Blythe wrote her name with a silver pen and I added a bell and a bow to the front.  I appreciate that as long as all the letters are present, it counts as her name.  Cutest.  Name.  Ever.

Gingerbread Brunch Invitation

Tuesday, November 11, 2014 No comments
 When I found out that my family was coming into town for the holidays for the first time in 4 years....I went a little nuts.  And the base in which I measure 'nuts' is already pretty far off the scale.  One of the 7,564 things I did in the 6 days they were hear was throw a gingerbread brunch...mostly for Blythe and Jonathan, but I let others attend...they just didn't get the shirts.  Blythe is all about the party as well.  A few years ago when she came I threw a princess party and when she came over that evening and I asked her what she had been doing all day she said she had colored and 'waited for the princess party.'  I knew I had to send an 'invitation' and some fun stuff to get her and Jonathan (as much as a two year old can be...) excited about the brunch...and more importantly the gingerbread crafts we would be doing.
I typed up a little invitation to mail....watch out Dr. Seuss....
 ...and then I made some party shirts to wear.  I hunted down some cute shirts I liked, then designed my own in paint using some free clipart.  I used some tshirt transfers to print them on and then iron them down to some shirts I grabbed at the craft store.  The thing I ALWAYS forget is to flip the rotation so it's the mirror image you press down so the name is written correctly on the shirt.
 Ta da.
 I also bought a book so that they would be familiar with the story when we put together our cookies and crafts.....though I was a little disturbed when I reread this book, but.....I think they can look past the morbid details towards the end for a few more years.
 I tied together my shirts, books, invite and some cut outs and sent them at the beginning on December.
Party details to come....lots and lots of party details.  

Hostess Gift Ideas

Monday, November 10, 2014 No comments
 I'm headed to Good Morning, Texas today some hostess gift ideas for the holidays.  I'll post the link later to facebook, but in the meantime....here are the how to's...some links to free printables, and grammatically incorrect sentences to house all the info.
First up (actually last in the line up) is this Cranberry Salsa.  My friend Jennifer brought it to a pot luck two years ago and was generous enough to share the recipe.  In Texas, I say....always say it with Salsa....and what says holidays better than Cranberries?  Here is a link to the free tag if you are interested in added them to your jars.  For the recipe:
Cranberry Salsa
Mix 12 oz of fresh cranberries (chopped in a food processor to smaller chunks), 1 c. roughly chopped cilantro, juice from two limes, 3 green onions (chopped), 1 c. sugar, 2 cloves of (chopped) garlic, 2 jalapenos (take out the seeds if you don't like it too hot). Mix and serve with tortilla chips. Chill and let it sit for a few hours/overnight to really let the flavors marinate.   It's also great over a block of cream cheese with crackers.  Makes about 3 cups of salsa.
 Another easy gift idea is flavored olive oils.  ALL you have to do is buy some regular olive oil and add herbs.  The key is to make sure your herbs are completely dry.  I bought some rosemary and let it sit out for a few days.  I then funneled some olive oil in a jar (1.50 from Hobby Lobby) and slipped in the dried rosemary.  The key is that you don't want fresh/wet herbs or your oil will need to be refrigerated and discarded within  weeks.  It can spoil with fresh herbs.  The longer your herbs 'live' in the jar, the stronger the oils are.  If you added lemon peels or garlic you might want to pull them out after a few weeks.  Rosemary is my personal favorite.  I use it to toss potatoes/chicken/bread etc.  This would be a cute 'set' to give as well-experiment with several flavors.
 I learned this trick for making caramel a few years ago from a friend named Marie.  She taught me that you can take a can of sweetened condensed milk (about 1.20) and put it in a pan (leave the can completed closed up, it will cook in the can) and boil it for 3 hours.  I just check it every 30 minutes or so and add more water.  After three hours.  Pull the can out and place it in the fridge for 4 hours.  You can add nuts and then serve it with apples....or just a spoon.  It's magic...and much cheaper than the 3+ dollar bag of caramels and 3+ mini carton of heavy cream.  Here's  link to the tag for this as well.  This would be cute to give with a basket of apples.
Last up, wine.  A little different idea for delivering the wine-find a seasonal tea towel and wrap it around the bottled.  Add a ribbon, I used a few pins to hold it closed in the back, but....little waste in this gift-it's a two part gift-tea towel and wine....you've covered a future holiday as well with this gift!!