Santa's Magic Key

Sunday, December 08, 2013 1 comment
 I made these little magic keys this years for the kiddos in my life without a chimney.  I've seen these around, and when I saw these little skeleton key at the hardware store I thought-hey....I've got a plan for that.
You could use old keys to retired locks in your house, or buy these vintage-ish looking keys for just about a buck.  I went with gold, though I could have sprayed it silver or rust.
I painted it with mod podge, then glittered.  Once it dried I painted another layer of mod podge.  It dries clear, but it helps the glitter adhere to the key and not flake off.  I made this free printable I adapted from other poems I read.  You can print that here.

Travel Trays

Friday, December 06, 2013 No comments
 It's travel time!  I made some travel kits for my niece, Blythe, a few years ago for when she flies out to see family.  I blogged about that here.  She came to visit soon after and her Elmo doll....and the entire section of Virgin Airline seating fell victim to the stickers I included in that pack.  Success.  She's coming again this year with her little brother, Jonathan.  He's two.  I wanted to make something to send them home with...to keep them busy while they traveled.  I saw the idea for travel trays using dollar store trays and magnets (LOVE that...things don't go flying all over the car/plane as easily) via paperwings.  I got to work making some trays that would be Blythe and Jonathan approved.
For Jonathon I sprayed a dollar store tray with green paint.  I used a foam brush and thin brush to paint a road.  I sprayed the whole thing with a clear sealant so it wouldn't scratch.
 I found these sticky back magnets and some cars at the dollar tree.  I put them on the bottom of the car so they wouldn't go fly into Mom and Dad....or the flight attendants head.
 I also googled road signs, printed, laminated, and added magnets to these as well to add to the road.
 For Blythe, I made a checkerboard.  She's getting old enough to play games that are a little more complex.
 I cut out little circles using a punch and mod podged them to magnets to be my pieces.
 I punched out the board.  8x8 is the goal.  Again, I glued and then mod podged the whole thing to the travel tray.
 I found these little containers to store the pieces in....
 I also found this FREE printable nativity via design dazzle.
 I used the magnetic tape so that she can play with this on her cookie sheet.  There are tons of free paper doll printables etc if you google it.  :O)
 I also sprayed the bag with chalkboard spray and found some chalk that is supposed to produce less dust.
 I printed some free coloring pages for each of them-princess pages for Blythe.
 Dinosaurs for Jonathan.  I added these little magnetic clips to hold the books in place.
 I intermixed the coloring sheets with blank paper.
 I put all the supplies...included stickers in little pouches...
 ...and added magnets to the back of those.
I could go on...and on...and on with this concept...but I'll stop here.  For now.

Packaging for Edible Presents

Thursday, December 05, 2013 No comments
 I'm headed to Good Morning, Texas on Monday morning.  I'll be doing two live segments, so here is half of one of those...the outer layer at least...with a few more ideas I'll share on the show along with the insides.  I'm using a bunch of things you'd normally toss to deliver edible gifts this year...I'll be sharing those edible gifts after the segment.  I'll link up that video to facebook on Monday.  Both.  I'm also doing a post tape for a show to run on Thursday.
First up, my friend Kelly shared this idea with me.  You can fill these little cardboard canisters with cookies and then wrap the outside.  It's the perfect size to slip cookies inside.  Subtract the bow, adding some mailing tape and a label and you can mail these through the mail in the can as well-fun!
 Next up, one of my favorite things-filling egg cartons with mini muffins, or in this case...cake balls.  There will be a theme...more to come soon, but here is the outside.
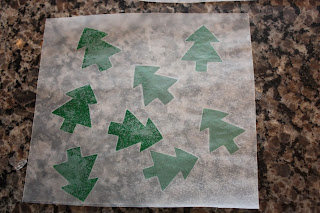
 Last, I made some wax paper a few years ago via a tutorial I had seen (all linked here).  I decided I could use this same concept to create Christmas themed wax paper.  Gingerbread men!
 I cut out the shape of gingerbread men out of tissue paper.  I just found a template online for the outline.
 Scatter them around a piece of wax paper.
 Cover the wax paper with a second sheet of wax paper.
 Use a heated iron and slide it all around the paper it makes them stick together.  I did several shapes.
 I wrap up bread for a fun and (practically) free delivery.
Now....I'm off to make the innards for these packages!  

Penguin Pack

Wednesday, December 04, 2013 No comments
My goddaughter's mother loves penguins....thus-Micah has no choice.  Zero.  She will like these little creatures, or there will be therapy involved.  This year, for her birthday, I decided to go with the theme.
 I bought a book (of course) and then went a little crazy.  I made a tic tac to board with little wooden eggs (Mondays' post) and then a penguin shirt (yesterday's post) and then I let the store 'make' the rest of the penguin themed stuff.
 I found quite a bit in the dollar section of Michael's and Target as well, along with anything and everything penguin....she doesn't already own.  Incidentally-I'm predating this post and writing it on April 9th....almost 8 months before I'm mailing this....you can bet it has grown since this time.....

No Sew Penguin Shirt

Tuesday, December 03, 2013 1 comment
I made this little shirt for my goddaughter.  Her gift this year is penguin themed.  Here is a free template for the parts of the penguins.  I just cut it out of some of my scrap fabrics.  I use some steam a seam (Warm Company Steam-A-Seam 1024 (Google Affiliate Ad)) (cut out to the same size of each piece).  
 I followed the directions to iron it onto the fabric, peel and then iron it onto the shirt.  I will hold on the shirt, though after washings you may have to iron it back down if the edges lift, or you can run thread along the edges to hold it into place.

Penguin Tic Tac To

Monday, December 02, 2013 No comments
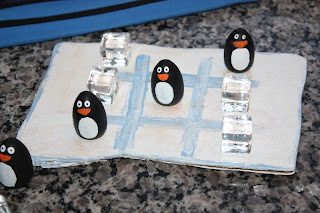
I saw a little board like this at a craft store last year.  My pal Regan loves penguins, so I decided to give it a go....super easy, and a fun little travel-able tic-tac-to board.  I bought some little wooden eggs at Hobby Lobby and painted five up to look like penguins.  
 I sanded off the bottom so they would sit flat.
 My friend, Terry, gave me a little piece of scrap wood cut in a curvy pattern to look like a pond.  I sanded it and painted in white, then added a tic tac to symbol before adding some glue and glitter.
I found some little ice cubes in the craft section for the 'other' persons symbol.  
 They all fit nicely into a little pencil pouch