Lemon Sugar Cookie Bars

Monday, July 31, 2017 No comments
They say your taste buds change every seven years.  I don't know who 'they' are or if it's true, but lemon is a a taste I definitely acquired in my 30's....unfortunately I haven't dropped any of the things I like, so I just keep adding....I'd like to subtract something-like chocolate.
I digress.  Anyway, I was trying to think of a good dessert to bring for a pot luck style that included lasagna, and besides some obvious Italian choices (that don't travel well)...lemon seemed like a good choice.  I found a recipe for lemon bars where you make your own sugar cookies, but....I simplified it and just used a tube of store bought cookie dough and it was delicious.
Lemon Sugar Cookie Bars
Ingredients:  tube of sugar cookie dough (divided), 8 oz of cream cheese (softened), 1/4 c. lemon juice, 2 T lemon zest (divided), 1/2 c. sugar
Instructions:
Heat oven to 350.
1.  Take a 9x9 dish and cover the bottom with foil.  Spray foil with cookie spray.
2.  Press half of the cookie dough into the bottom of the pan evenly to form a crust.  Bake for about 25 minutes (until golden brown) in a 350 degree oven.
3.  While the crust cools beat together the cream cheese, lemon juice, 1 T of lemon zest, and sugar.  Pour over cooled crust.
4.  Top lemon mix with the second half of the cookie dough.  Crumble and spread all over the lemon filling evenly.  Bake at 350 for another 25 minutes (until cookie is browned on top).
5.  Top with last 1 T. of lemon zest.  Cool and slice.
*It took me two lemons to get enough lemon juice and zest for the dish.  
*By using the foil, you can lift it out of the pan easily for slicing.  

Mermaid Tail Straws

Friday, July 28, 2017 No comments
I made these simple little straws for a shower I hosted this month.  The theme was mermaid or pirate. I decided the drinks would be a mermaid theme.  I had the blue straws already, and I decided that instead of buying an svg file, a tail would be easy enough to cut out.
 I made a template and bought some green sparkle paper at Hobby Lobby.
 I raced my tails and cut.
 I ran some glue along the straws to attach them. The straws are paper, so it doesn't melt them.  My plan was to serve these in small fish bowls I bought at the dollar store with a blue drink inside. Stay tuned....a full set of details to come.

Root Beer Pulled Pork

Wednesday, July 26, 2017 No comments
I'm always looking for easy recipes....and during the heat of a Texas summer I search, in particular, for recipes that don't require an oven.  I recently found this recipe via MomonTimeout.  It's simple (just a few ingredients), and tasty.  Your meat will basically be as good as your BBQ sauce, so...don't skimp on this...and now....back to lazy summer days and staying cool....
Crockpot Pulled Pork
Ingredients:  2 lbs pork loin roast, 12 oz root beer (your fav), 18 oz bbq sauce (your fav), 8 hamburger buns, coleslaw (for topping)
Instructions:  
1.  Place pork in crockpot and cover with rootbeer.
2.  Cook for 6 hours on low.  Drain out liquid, shred meat with fork.  Cover with bbq sauce.
3. Cook for an additional 30 minutes on low.
4.  Serve on buns with coleslaw on the bun (or on the side).

(Vegan) Oatmeal Cake

Monday, July 24, 2017 No comments
     I'm not a vegan, I just play one on holidays when the 'real' vegans come to eat with us.  My goal is to turn some traditional recipes vegan without sacrificing the taste.  This cake is one of those examples.  I've found that there are some great ways to turned baked goods vegan with a few substitutions.  This guy definitely isn't low calorie, but come on-when you read the word 'cake' that probably wasn't the first thing on your mind.
     If you want to try out this cake, but don't want to make it vegan I'll leave some notes in the actual recipe for what I substituted.  Just fyi-the 'icing' isn't your traditional icing-it's more like a sauce.
     All of this to say-this cake was a big hit with the vegans and the non-vegans who didn't know any substitutions had been made, so that's a win in my book!
Oatmeal Cake
Cake Ingredients:  2 1/2 c. boiling water, 2 c. quick cooking oats, 1 c. margarine (*or butter for nonvegan), 2 c. sugar, 2 c. brown sugar, 2 t. vanilla, 1 c. non-sweet applesauce (*nonvegan this takes the place of 4 eggs), 3 c. all purpose flour, 2 t. soda, 1 t. salt, 1 1/2 t. cinnamon, 1/2 t. nutmeg
Cake Instructions:  
1.  Pour boiling water over oats.  Cover and let stand for 20 minutes.  Beat butter until creamy and slowly add sugars and beat in until fluffy.  Add in vanilla and eggs.  Add oats to mix.  
2.  Add flour, soda, salt, cinnamon, and nutmeg.  
3.  Spray 9x13 inch pan and bake at 350 for 1 hour.  Cool.
Icing Ingredients:  1 c. melted margarine, 2 c. brown sugar, 6 T.  coconut milk (*nonvegan use evaporated milk), 1 c. chopped walnuts or pecans, 3 c. flaked coconuts
Icing Instructions:  
1.  Mix everything together and spread it over the cake. 
2.  Place cake under broiler in over until frosting becomes bubbly. 

Laundry Room Mirror

Friday, July 21, 2017 No comments
 This is my unfinished laundry room a month or so back.  I will post it all in another post, but I did a bunch of different projects to try to make it a little more fun....as fun as laundry can be.  I also TRIED to keep the budget low since I SHOULD be the only one frequenting the room, but it's become a catch all that is slightly frightening.
There are no windows in the room because it used to be part of the garage that the owners before me walled off.  To lighten up I painted the walls white, and I've found in the past if I added mirrors it sometimes seems lighter (at least to me) because it catches some more light.  Normally, I would have hunted down a mirror at a thrift store for dollars, but....it was a busy time, so I found this one at Walmart for ten bucks.  I taped off the mirror part and gave it a couple sprays of some mint paint I had.  I then bought a svg file on Etsy and cut it out on my cricut and applied it to the mirror.  It was a really quick project, but it makes a big impact.

Sweet Coleslaw

Wednesday, July 19, 2017 No comments
The only thing better than tasty is easy.  I love coleslaw, but a lot of it is just too dry...or too liquid(y).  I found this recipe at allrecipes and it's my favorite by far.  It's the perfect side dish to summer anything.
So if you like summer, simple, and tasty-try this!
Sweet Slaw
Ingredients:  16 oz bag coleslaw mix, 2 T diced onions, 2/3 c. mayonnaise, 3 T vegetable oil, 1/2 c. white sugar, 1 T white vinegar, 1/4 t. salt, 1/2 t. poppy seeds
Instructions:  
1.  At last two hours ahead of time, combine coleslaw and onions.
2. Combine all remaining ingredients, stir, and then toss with coleslaw mix.
3.  Chill until serving.

Taquito Echiladas

Monday, July 17, 2017 No comments
 This year, as (a very warm winter for North Texas) came to a close-I started going through my freezer. I like to stock up b/c if there is a snowflake anywhere within a 15 mile radius we shut the city down, right after we buy every loaf of bread at the grocery stores within a 20 mile radius.  So, each fall....I stock my freezer for all both days I might be snowed in....it hasn't happened in several years, but it happened once-five  snow days in a row-once in 37 years.  So, to make a short story long,  one thing I had in the freezer were some taquitos from Costco.
 Several years ago a friend introduced me to this variation on enchiladas.  You lay your taquitos out while they are still frozen in a 9x13 baking dish.  Mix 1 can (10 oz) of cream of chicken soup, 1 can (about 1/3 c.) of green chilies (drained), 1 c. of cheese, and 1 egg.  Mix and spoon it over the frozen taquitos.  Top with 1 c. of cheese.  Bake uncovered at 350 for 50 minutes.  You can serve them with aside of sour cream or guacamole, but....man are these good.  If you have small taquitos you can make several layers and divide the mix between the layers.
..and now there is room in my freezer for next winter!

California Vacation

Friday, July 14, 2017 No comments
 I tried to narrow down the pictures for this post, but it turns out this June when I headed to Yosemite for my first visit....they just so happen to be having the best waterfalls in over fifty years thanks to some major snow this past winter....and I just can't narrow it down.
 I love visiting National Parks, and each one has it's own set of rules and ways of successful maneuvering.  I headed here at the beginning of June before a lot of schools were out, but it was already super crowded, and I know it only gets more crowded as the summer heats up, and the waterfalls decrease.  I can see why.
 We had rented a car and we took it down all the paved roads in the park and lucked into some spots, BUT they also provide a shuttle service for free throughout the park, which is definitely something I'd do in the more crowded months.  One stop we made a few times was the Majestic Dining room-it had a beautiful view.  They recommend reservations, but if you go at lunch they do have some openings and you can get on a list-we did that twice and were able to get seated within 20 minutes.
 We had better luck parking the first day when we arrived before the lunch reservations (about 11-the dining room opens at 11:30).  My favorite find was the vegetarian onion soup.  They are famous for this, and it was really delicious!
 My two favorite stops were at tunnel view (the view you get after coming through a long tunnel).  It overlooks El Capitan and a beautiful view of the valley below.
 Glacier Point also took my breath away-and Half Dome and more waterfalls.
 On our second day we hit up Toulumne Trail.  One of the park rangers told us to get there well before 8 b/c the parking lot filled up since some of the more famous sequoia groves are currently closed.  It was down an old paved roads cars and carriages used to drive down, but it was straight down.....and then alllllll uphill on the walk back, but very peaceful.
 It was a mile before the first Sequoia tree, BUT the famous drive through tree was just a few hundred yards up the road from the first tree, which was my main goal!
 We also went to a less frequented part of the park-Hetch Hetchy.  The winding roads were gorgeous (and a little frightening).  It ends at a dam where we got to catch a great double rainbow in the mist...a common sight around the park when the sun is just right.
 The easiest trail in the park is one called Bridalveil.  It leads to Bridalveil falls. Again, the parking lot backs up, but you can shuttle up there too.  We went later in the day and were able to snag a spot.  It was not too far up a hill before we caught sight of the falls that definitely did it's job soaking us with those sprays.  A lot of folks brought ponchos, but my camera and I just dared the damp.
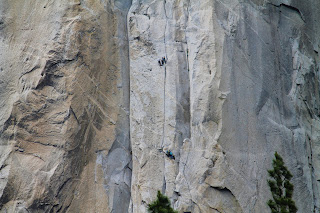
 We did not spot any real wild life (a few deer, and a lot of squirrels), but one of the most fascinating things we spotted were the rock climbers on El Capitan.  There were often crowds, or even folks seated in chairs watching their climb.  I used my telephoto lense b/c I forgot my binoculars.
 This was my first trip to Yosemite and it did not disappoint.  I learned a lot about maneuvering through the crowds, but even with a lot of folks enjoying the same views, it managed to be peaceful and it did not detract from it's beauty.
On our way back to LA we decided to stop in Sequoia National Park as well.  It takes about an hour from the highway to get to the park, and then another full hour to get up to Giant Forest where General Sherman resides.
 I had never seen sequoias before this trip and when I had taken the trail in Yosemite I kept wondering if each large pine was a sequoia, BUT once I spotted my first I understood the magnitude of these beast.
 It's hard to capture in picture, but it's worth seeing at least once!
 To get to General Sherman (the largest tree in the world) you have to take a half mile trail downhill, but if you don't want to walk back up you can walk a few hundred more yards and catch a shuttle back up the road to where the trail started from the handicap parking section (just fyi).  Again....I couldn't even fit the tree into my lense....
 After the Giant forest we also took a small road near the museum that led to a tunnel carved out of a fallen sequoia you can still drive through.
 We weren't able to get over to King's Canyon b/c we wanted to head back towards LA to spend more time with family, but it was worth the stop.  Warning, the roads are really windy snaking back and forth, and there are some really sheer drops.  That makes me totally nervous, so I'm glad I didn't know before....and I'm glad I wasn't driving.
Back in South Pasadena I went to visit Olvera Street.  It's  small street that is where Los Angeles began.  There is a Mexican Market with merchandise and food up and down the street.
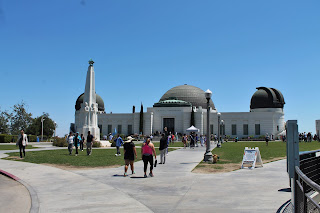
 We walked up and down and then headed on to the Griffith Observatory.
 There are all sorts of parks around this area, but at the top is this planetarium with an amazing view of LA and the Hollywood sign.
 In the evenings you can also use their telescope for free to check out space.
I spent the day with my cousin's kiddos and they were satisfied with these little scopes.
 Inside the observatory are all sorts of space exhibits and a show in the domed ceiling.  There are all different shows that last 30-40 minutes (kids 5 and older only after the first show of the day).
The kids and I really enjoyed the show.  The planetarium was one of my favorite places as a child, and they fell in love too and wanted to see the next show (the shows were only 5 for kids and 7 bucks a ticket for adults).  I've headed to California quite a few times since my family lives there, but each visit I try out new things, and this trip was one for the books and will be hard to top, which is a great problem to have.

Unicorn Album

Wednesday, July 12, 2017 No comments
 This year is all about picture albums.  I'm alarmed by the number of friends that don't print pictures, so I'm hoping if I give them albums already ready to fill they will print a few.  One of my friends loves unicorns (as do I), so I used a paper pack from a line they have at Michael's and some of the stickers and flowers hanging near the line to make this little folio album.
My thought is she can print thumbnail size pictures, or cut down the regulard and fill these pages.  I did a quick walk through here to show all the details.  They are a pretty quick gift ideas.....and this makes four of these little guys.  Below is the video walk through.
https://youtu.be/grzOM5GlK3A

Almond Joy Cookies

Monday, July 10, 2017 No comments
I know it's July, but...this also means we only have 5 months until Christmas.....and I started planning for Christmas 7 months ago...so.....here's a cookie recipe I 'collected' last year at my school's annual cookie/recipe exchange.  My pal, Kristine made it, and not only was it delicious, it only required four ingredients, which is a win in my book at any time, but especially in the busy seasons of life!  It's not just a Christmas cookie, but...if you are looking for the perfect recipe to share this year at YOUR exchange, try this one out!
Almond Joy Cookies
Ingredients:  14 oz bag of sweetened coconut flakes, 2 c. semi-sweet chocolate chips, 2/3 c. chopped (lightly salted) almonds (Blu Diamond sells a low sodium brand), 14 oz can sweetened condensed milk
Instructions:
1.  Heat oven to 325 degrees.
2.  Line a baking sheet with parchment paper and set aside.
3.  In a bowl combine the coconut, chocolate chips, almonds, and sweetened condensed milk.  Stir until combined.
5.  Scoop onto baking sheet.
6.  Moisten the tips of your fingers with your water and shape into discs.  Pat the tops flat.
7.  Bake for 12-14 minutes until the tips of the coconut are just starting to turn golden brown  Cool and store in an airtight container.

DIY Gold Chargers

Wednesday, July 05, 2017 No comments
 It's the day after the 4th of July....which means it's time for Christmas.  OK, maybe only if you are a craft store, but still....isn't that always how it works?  So....I'm typing this post during Christmas past, but I'm setting it to post now....as the craft stores start pulling out their Christmas crafts, here's a little something I put together last year.  I found gold napkins at Hobby Lobby in the Christmas section last year.  I used my embroidery machine to embroider "Jingle" on each one, and then I sewed a bell to all four corners.  I got the fine china from the dollar tree, and for the chargers.....
I found these for 67  cents at Hobby Lobby in the clearance section-I guess shiny lime green chippy paint chargers didn't work out too well!  I used some plastic primer (which turns them white-but this allows spray to adhere and stay)) and then I layered on some gold spray paint.  I wanted to try out a different color scheme for my Christmas table last year, so this was the perfect solution-I literally spent less than 2.40 on four chargers.  4 bucks on the plate, and 6 dollars on the napkins and I had a whole new look for the season.  OK....back to summer, but...thinking ahead....I'm always on the hunt for ugly chargers I can change up any old way I want!