I'm headed to Good Morning, Texas today to share some oober affordable ideas for lighting up the holiday table. I'll add the link to facebook later, but just in case you have, like, a turkey to bake or something and don't feel like watching....here is a pictorial how to....
#1. Wine Glass Candle Holders.
I bought 16 oz cups and cut off the top.
I measured around and created a template to use to cut out strips of scrapbook paper. Here is a
copy of the template you can download.
I just taped it onto the cup (you could also just use the paper if it's thick enough). I added a little left over crepe paper for a fringe. This slips right over a wine glass. These would be really cute to personal for each guest to have by their place setting. I just used a little glue to hold it in place. Slip a tea light inside.
#2 Decorate your own candles....
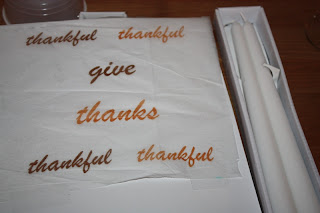
I taped some tissue to a piece of cardstock and I printed off some various Thanksgiving words.
I cut them down to size, and then grabbed some candles at the dollar store (two for a dollar).
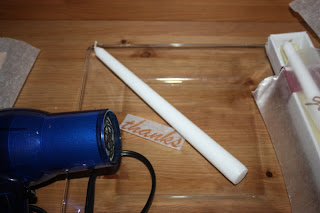
I held it in place with a piece of wax paper, and then I held a hot hair dryer against the candle until the wax melted just enough for the tissue to cling to the candle.
It took a few minutes, but it adhered so completely that they blend and you can't tell. The wax paper helps hold it in place, gives you a little space from your hand and the heat, and helps them melt evenly. When the candle burns and hits the tissue it will give the flame a little umph, but no fire department should be called assuming you don't have your newspaper collection suspended above. This would also work for pillar candles-vintage Santa pictures, or family photos, hand written notes from family etc etc.
#3 Decorate Tea Lights
I traced a tea light onto tissue paper.
I cut out circles and then used a stamp and stamped snowflakes on top. One little trick-instead of ink on stamps-a lot of times I just color the stamp with a marker-much cheaper and less space to store all those different colored inks.
Stamp the snowflakes. I used a punch to cut out the center...
I slipped it on top and then just heated up the wax a little with my hair dryer. Again, it will flare a tiny bit when the candle starts to burn, but I think they are pretty cute....it would be fun to add these to a candle holder etc for a small Christmas gift. I saw this idea
here.
4. Snowmen Tea Light
Last up-(my filler in case they tell me to keep talking)....plus I saw this on google images and thought it was cute.....
I just took an electric tea light (3 for a dollar from the dollar store) and colored a snowman face on with a sharpie....the light=the nose.


