Category: Monsters
Showing posts with label Monsters. Show all posts

Teaching Tuesday: Spooktacular Stories Day

Tuesday, October 16, 2018 No comments
I might do this on the regular....or this might be the only post ever.  When I'm not crafting or traveling, I teach.  My LOVE is lesson planning.  I'm a reading specialist, so I do a lot of school wide activities and test prep fun.    I love creating themed lessons.  Yes, I know there is a place to make/buy/sell lessons, but right now I'm not there.  I've been blessed with an outlet to make money (a very little bit) via ads on a place where I can give stuff away.  So.....maybe I'll get my act together and share the actual plans with TEKS and Objectives), or maybe I won't, but here is something I planned for my school on Halloween.
We have some families that do not celebrate holidays, so I was hoping by picking spooky stories this year (with one exception) we could do some school wide activities.
BOOK ONE:  I pulled Hallo-Wiener and provided some reader's theaters (just google it, there are a ton you can print for free), big letters that spell out Halloween to use to make words, and a sequencing activity (also found free via a google searching.  PTA also generously donated some flashlights to be able to do some dark reading.  I found a reader's theater about the history of spiders for the classes who would not be able to use this book.
(Bring on all the drama TEKS.)
BOOK TWO:  Creepy Pair of Underwear  Seriously, who doesn't love underwear?  We are actually doing this one last.  The gist is this bunny thinks he's brave enough to wear these creepy underwear, but decides the glowing is too spooky and he can't sleep....so he spends the rest of the book trying to get rid of the underwear, but they keep coming back (he even sends them to China and they come back in a package).  At the end of the story, he embraces them and they are hanging all over his room.  Each kid is going to get glow in the dark bracelets to take with them that day (and trick or treating).  There is a post card for them to write on and show what adventures they think the underwear went on next.  BUT THE BEST PART...I copied and blew up a picture of the underwear and made 500 copies.  The PTA helped me cut them out, and some parents are volunteering to come up and COVER the walls with them.  I'm going to have every teacher read it at the same time with a subtle message on the intercom and then we are coving the halls, so when the kids leave they are going to leave with 500 pairs of underwear all over the walls.  Here is the postcard printable.
Postcard Printable
(Great for letter writing, writing in sentences, predictions, inferencing etc).
BOOK THREE:  I Need My Monster  Seriously, the CUTEST book ever. And I found this youtube video and almost died.  This little kid is really put out b/c they want a scary monster and he/she keeps getting sent duds that aren't scary.  The PTA got glow in the dark monster fingers for each kid, and I made a handout with four monster pictures and I'm asking the students to create an ad to try to sell their monster via flipgrid.  (Great for adding descriptions to your writing.)
Monster Printable

Make Your Own Monster Eyes

Monday, September 09, 2013 No comments
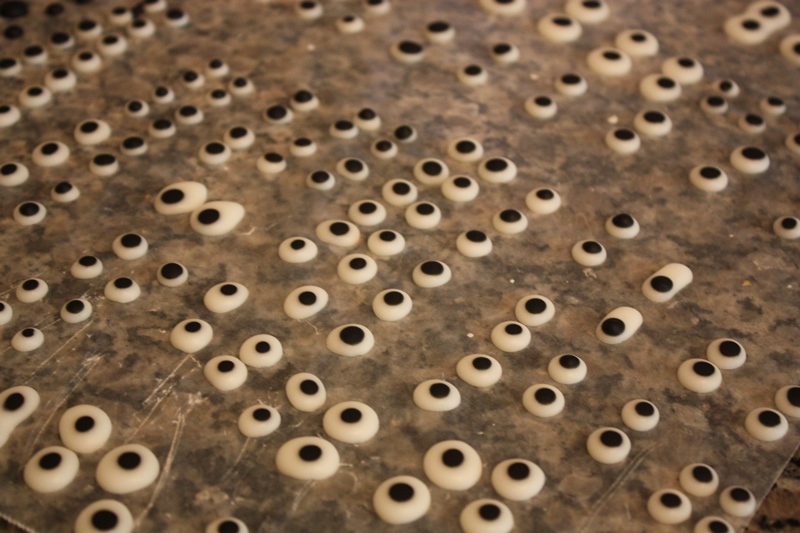
 Last year I noticed little eye balls sprinkles popping up on all the aisles in my favorite craft stores.  Now, I'm a sucker for a cute jar of sprinkles.  There is a support group for someone like me, but these...these I can make.
Super simple-I used the following recipe:  5 T. meringue, 1/2 c. water, and 1 lb of powdered sugar (if you don't have a scale-this is apparently 3 3/4 c.).  I didn't need the number of eyes these would make, and I didn't feel like making any other decorations at this time, so I cut everything in 1/4th (this means I did just a little under 1 c. of powdered sugar since it was just shy of 3 3/4 c. originally).  You beat this for 4 minutes until it's stiff.  If it's too stiff (it will form a peek when you pipe it), just add 1/4 t. of water back into the mix and beat, repeat if necessary.  If it's too wet (doesn't hold it's shape/spreads), add more powdered sugar.  When you are ready, leave 3/4 of your icing white, and dye 1/4 black.  Pipe your designs onto wax or freezer paper.  The full recipe makes 600 eyes.
I put the icing in a baggie, and snipped off the corner, then I piped my eyes on wax paper.
 Next, I piped the icing I had mixed some black dye into over the white.  I did all assortments of sizes.  There are all sorts of circle templates you can download on line, but a random mix of dots worked fine.
 I let them dry overnight, and then I started adding eyes to all my crafts.  It's a little bit disturbing to have your food watch you.  I got over it.  I'll be sharing a few of those sweets soon.

Halloween Transfer Shirts

Monday, October 08, 2012 1 comment
This Thursday I'm taking a collection of projects to GMT....this is half of the first segment.  I got a little carried away.  I'll be demoing how to make these little shirts, incredibly easy.  I've done this about fifteen thousand different ways.  I've sent out all my Halloween cards and gifts for this year, so now I'm working on NEXT year.  Above, the shirt for Micah's second Halloween....now I'm on the hunt for some cute leggings and an appropriate bow. 
I made this little Halloween bag for my buddy Donovan....
 He has a little brother on the way (coming to a nursery, not nearly close enough to me, February).  His name has yet to be revealed, so I thought I was super cleaver (don't burst my bubble) and I found a monster icon and and put Monster Mash....get it....baby food, mash, get it?  OK....I'm over it. 
 My pal, Laine, at school has a little baby girl who will be here by Friday whether she comes on her own, or with the help of the doctors.....she is definitely going to need some Halloween gear.  She also has a little black kitty waiting to meet her at home who has no idea his life is about to be turned upside down, but maybe he will be more forgiving if she wears a little tribute to him?
Seriously, I could go on and on, but I'll stop and review the steps to making these....and then I'm off to making turkeys and gingerbreads, and probably leprechauns and firecrackers. 
Step One:  You need to grab some transfer paper and a shirt/onsie/bib/bag/anything that will stay still works.  They sell this for transfering to white fabric (light) or dark fabric, so depending on what you are doing, depends on what you purchase. 

Step Two:  You can create your own design via the paint, or you can purchase them on sites like Etsy and have them personalized.  Here is the cat without a name.  You can download it, put it in a word document, right click and move it to the 'back' and then type the name in whatever font/size you want.  I then did 'print screen' or snag it to get the whole thing.  There may be an easier way, but this is my ghetto computer skills at work. 
Step Three:  Paste the whole thing in another word document.  Under picture tools one of the options is to rotate horizontal.  You need the name to be facing the opposit direction b/c you iron this down and you want the mirror image. 

Step Four:  Print it out (sometime of the ink jet transfer papers have a program you can use for free, if you just do step two and ssave your file as a pdf, you can copy them into the program and it will rotate the whole thing for you). 
Step Five:  Cut it out, I leave a little bit of the white, it won't show up on the shirt, but it helps as you peal it off if a little wants to come up, the color will stay. 
Step Six:  Press it down (put pressure, pick up the iron, and press in the next stop, don't 'rub' it like a normal iron so it doesn'ts lip around).  Let it cool, and lift carefully. 
These are machine washable on the gentle cycle after they 'set' for 72 hours.

"Eye" I Hope You Have Happy Halloween!

Saturday, October 01, 2011 2 comments
 I saw the post for making these monster eyes at Bee in Your Bonnet, and I had all the supplies on hand, so I could not resist.  How easy, and what a fun little snack to pass out to...well, people that like little snacks shaped like monster eye balls. 
The first cast of character-cream puffs.  You can grab these at the store in the freezer section.  Isn't the store a magical place? 
 Instead of dipping these in icing, I just used white chocolate.  Is chocolate covered anything ever a bad thing?  The answer is no....don't bother to spend too much time on the question.
 Press a chocolate chip into the center. 
 I melted some green chocolate in a ziplock, and snipped off the edge, and then ran a line around the chip.  (You can also use icing, but.....I just invented a reason to use more chocolate). 
I bagged them up in pretzel bags.  A bag of eyeballs, who wouldn't want me to deliver them to their door step.  Don't.  Answer.  That. 

Halloween: Monsters: Jello

Saturday, September 10, 2011 2 comments
Sometimes I feel guilty if a craft is too easy, but I just think this would be fun on a dessert bar with green, orange, and yellow monsters starring out.  I added some chocolate to marshmallows (you could also use chocolate candies like M&M's and press them into the center), and added them to the bottom of a jar, trying to wedge them down as far as possible.
 
I knew they would pop up, but at least they weren't totallly floating on top.  I made my jello, and poured it over.  Since the jello is hot, I let it cool a little.  Once these set in the fridge, they were pretty cute starring out when I opened the fridge.  One small package of jello makes about three monsters.  Uhh...and is it OK for me to say that lime jello smells like kitchen cleaners when you dissolve it in hot water?  Is it worse that I ate it and thought it was still yummy despite that fact? 


Halloween: Monsters: Franken-Pudding

Friday, September 09, 2011 2 comments
 As I was coming up with a round of monster crafts, the theme has been-easy!  This is another easy, but fun dessert.  I originally saw this on Martha's site, she used chopped chocolate cookies for hair.   I took some clear cups, chocolate I melted in a ziplock in the microwave.  (Heat at 30 second intervals, squish, heat another 30 seconds, usually 1 minute is plenty).  Snip off an end, and pipe your face inside the cup. 
Place in fridge to harden. 
I mixed up some instant jello, adding about 6 drops of green color.  I poured it into the cups (this particular size cup makes two monsters).  I topped it off with brown jimmies for his hair. 
It would also be really yummy to use mini chocolate chips for the hair.  Puddng+chocolate chunks=monster goodness.  Just a little math I learned in my youth. 

Halloween: Monsters: Marshmallow Pops

Thursday, September 08, 2011 No comments
I saw this last year on CraftOManiac.  I popped a few of these out for friend's kiddos last Halloween.  Marshmallow+Melted Green chocolate for dipping, and Melted Milk chocolate for pipping (from a ziplock).  Easy, yummy, and they would have probably like these little guys too if I hadn't eaten them all first.  Kidding.  Maybe. 

Halloween: Monsters: Brownie Frankensteins

Wednesday, September 07, 2011 No comments
These are some guys I put together last year for a little work treat.  I baked up some brownies, added pretzels rods in the side.  I iced the brownies with some green icing, used melted chocolate to pipe on a face, and added  peanut/regular m&m for features. 
 The most difficult part of this project was eating alll the other M&M colors....it's a tough job, but I was up for it. 

Halloween: Monsters: Hand Soap

Tuesday, September 06, 2011 2 comments
I saw this idea a year ago here at Greenbean Crafterole.  It was really easy to put together, and a fun addition to Halloween decor.  I took a rubber glove (I have these on 'hand' due to medical , but you can buy them at the drug store, or ask the doctor's office for a pair.  I took two binder clips, and pinned the sides to keep it open as I followed the medical monster soap making procedure.

 I bought some clear soap squares at Michaels, melted them in the microwave as directed (about 6 at a time), added  a little scent (also sold in the same section), a few drops of dye (a little goes a LONG way), stirred, poured,
...and then repeated with each color.  The first layer hardens within about ten minutes (tops). 
After about an hour, I cut the glove away.....
I added a ring....because what monster DOESN'T have accessories, and ta da-monster hand soap!

Halloween: Monsters: Monster Eyes Hot Chocolate

Monday, September 05, 2011 1 comment
This is a really quick, fun idea for cool Halloween evenings after Trick or Treating.  I saw it a few years ago in a magazine.  Take two marshmallows, draw on eyes, or use brown M&M's and poke them into the marshmallow.  Make hot chocolate as the package directs, but add green food coloring until you acheive your desired green color. 

A Week of....Monsters

This week is going to be filled with REALLY easy, super simple monster projects.  I have a lot of monsters ideas I want to try out this fall, but these are all little guys I put together last year for friends who were 3 feet and smaller. I'll be attaching the links with resources and instructions as the week progresses (as if some of these even need instructions!).  While these post, I'll be stitching together a ton more little green and orange friends to post in October.
Monster Brownies
 Jello Monsters
 Monster Soap
 Monster Hot Chocolate

Linking To:  Tip Junkie Crafty Soiree Tatortots and Jello Funky Junk Be Different Act Normal Under the Table and Dreaming Sunday Showcase Dittle Dattle Keeping it Simple Sew Can Do CRAFT Boogie Board Cottage Running with Glitter I Heart Naptime Nifty Thrifty Design DNA