Category: Father's Day
Showing posts with label Father's Day. Show all posts

DIY Personalized Notepads

Monday, May 02, 2016 No comments
I'm headed to Good Morning Texas today to share a few Mother's Day gift ideas.  It's also Teacher Appreciation week, so....some of the ideas could overlap for that as well.  I'll post the video later on facebook later.
In the meantime, here is one idea I've been wanting to try out for awhile....homemade notepads.
I actually made this for a friend of mine at work.
I printed off "From the desk of..." onto the four quarters of a piece of paper.
I then had four of her students write her name and draw a picture of what she looked like at the bottom.  You could do this with the whole class if you wanted/or all your own kiddos-have them write mom or dad or grandma...whatever where I had the students write their teacher's name.
I made about 25 copies and then sliced them into even quarters.  I aligned the top edge and the pad of 100 sheets of paper together with some clips.  I bought some book binding glue via Amazon.  I'm sure you can find it other places, but...that was my go to.  It comes in different colors as well.
I brushed some of this glue to the top and let it dry (with the clips on) for a few hours.
When it dries you have a pad of paper that sticks together/can be torn off piece by piece.

Movie Night in the Mail

Monday, September 22, 2014 No comments
So....my cousin has some pretty precious traditions with his two and four year old.  Each week they go to the library to get a movie to watch as a family.  This Father's Day I wanted to send something for them to enjoy together.  I cut a slit in an empty coke bottle and filled it with all sorts of movie candy, microwave popcorn, popcorn bags, a gift card to go get a movie (it was too narrow to slip in a DVD) and some confetti etc.  I printed off this label, added postage and it ready to mail.  Simple, and something the kids and my cousin can get excited about

Football Crafts

Monday, August 26, 2013 No comments
 I'm bringing football crafts to Good Morning Texas today.  I have a collection going here on pinterest with recipes and ideas from the past.  First up are the foam fingers above.  Great straw toppers, or cupcake toppers, and just plain fun.  Here is the full tutorial, including a free template you can download to cut out the shape of the finger.
Easy oatmeal pie desserts.  I blogged about those here.  
 Very simple koozie, great for a party gift, or a fun vessel for gifts for football fans.Here are those instructions.
Last up, chili and cornbread in a jar.  Again, very easy.  The tutorial is found here.   Make the chili the day before (or even freeze weeks ahead of time, plop the cornbread mix on top the day you plan to serve these, bake as directed on your cornbread mix (I put my jars on a tray) and then serve.  The nice thing about these is you don't need 874 little bowls of stuff for people to build their bowls.  I'll post the link to today's show on my facebook account after it's online.  I'm a giver.  

Personal Photo Koozies

Wednesday, August 07, 2013 1 comment
 I was trying to think of some fun gift ideas, and I stumbled across this idea at BritCo.  It's a super cheap way to personalize some koozies!  The possibilities are endless-these would be fun father's day gifts, or great for a football or sports party (maybe shots of the players 'borrowed' from the net?)...or...I was thinking, how fun would these be at a family reunion?  Scan old photos, and have these out for guest to use with drinks, and help them start conversations.
I bought some sheets of foam at the craft store (you can make four of these out of one sheet, and they cost about a dollar), some spray adhesive, sticky back velcro (b/c I didn't feel like sewing) and fabric transfer sheets (they sell these 10 to a pack).
 I found two photos I wanted and pulled them as wide as I could get them.  If you want your picture to go around the whole thing, you can only do one per page, but really, it just leaves about an inch of fabric at the back with the velcro is overlapping, I'd rather go the frugal route!  Take some scrap fabric (old tshirts wold work), and an iron.  Once you print these on the transfer paper (if you have print on your pictures, don't forget to rotate your photo horizontally b/c you press it down and it transfers as the mirror image.
 I cut my foam, fabric, and transfer sheet (once I printed both pictures) to a ten by 4 1/2 inches.
 I ironed the photo as the transfer instructed (photo facing down towards the fabric), use a lot of heat and press for a long time so that it all transfers (it will be a little washed out if you don't apply enough heat).
Peel off the wax back and then take your foam piece and spray adhesive spray all over it, and then lay the fabric over the sticky foam.
 I trimmed the edges.
 Then I applied a piece of velcro to each side.
 Closing...
 Ta da.  They sell the foam in all colors...white would be good too if you want your photo to stay true to it's original colors, but I needed a little neon green in my life.

DIY Personalized Rubiks Cube

Friday, June 07, 2013 No comments

I saw the tutorial to DIY your own Rubik's cube using sports stickers a few years back on sceneofthegrime. I decided to try this idea out using vacation photos.  This would be a super cute idea for a family gift or work gift (thought about giving one of these to my bosses with group shots of my coworkers, but....didn't seem like much of a gift ;o)).
I printed off 6 photos from my recent trip to Hawaii and I snagged this rubik's cube for a buck at the store. I tried to choose photos with different colors on on the back drop (blue/black/tan etc) to help with the color matching later on. I first pealed all the stickers off the rubik's cute...not a problem, I'm practically a pro at this-it's how I solved the puzzle when I was little too...peel and replace.  ;o)  I then traced the size of the whole square and then used the stickers to measure out the inside squares.  I traced the whole thing onto the portion of the photo I planned to use....
  
 If you look closely at the photo of my mine, you can see where I held my squared off square on the top of the photo and drew down the lines to 'engrave' the lines on the photo so I knew where to cut.
I cut it each side into little squares.  
 I then glued them into place using a glue stick, though some (like the the one with the hole) needed a little dab of permanent glue to hold.

Father's Day BBQ Gift Set

Thursday, June 06, 2013 No comments
 I'm headed to GMT today to share an idea for Father's Day.  These were all really affordable gifts to put together, and hopefully very useful.
I'll be demoing fire starters for the grill and this little container for matches with a 'striker' for a lid.  I blogged about this on Tuesday. *Make sure you use the strike anywhere matches.  You still can light any match on sand paper with enough heat, but it can take a few tries-matches are made differently these days and are harder to light for 'safety' reasons-so....save yourself trouble and get strike anywhere matches.  
 We will be making a rub for meat.
The recipe is really simple, source.
To make a DRY RUB just blend: 8 T of brown sugar, 3 T of kosher salt, 1 T chili powder, 1/2 t. pepper, 1/2 t. cayenne pepper, 1/2 t. thyme, 1/2 t. onion powder
I'll be making some bbq sauce (attaching a little brush to paint the meat...I don't know the grilling term, but in my world-that looks like a paint brush).
 BBQ Sauce Recipe:  (Makes one cup) 1/2 c. ketchup, 2 T brown sugar, 2 T Worcestershire sauce, 1 T. cider vinegar, 1 t. garlic powder, 1/4 t. mustard powder, 1/4 t. salt.   Mix it together, you can simmer all the ingredients together for about 5 minutes to really help the ingredients marry.
I put all the supplies into a disposable foil pan, I thought it was more useful and practical for 'dad'....I found some hickory wood, skewers, serving trays, and dish towels to round out the gift. All the 'accessories' were available at the dollar store (even the wood).  I'll post a link to the show later here.

Fire Starters...or....We Didn't Start the Fire....

Tuesday, June 04, 2013 4 comments
 I'm working on a little somethin' somethin' that includes fire. And so....here are a few ideas for fire starters adapted from 7,456 things I've seen over the years.
#1-little fire starters.  You know when you light wood or charcoal and you run in a circle sparking little areas in hop that one will catch? Enter...these doo hickeys.  You can add them to the bottom of your pile o' stuff and light them to burn and help catch the other 'stuff' easier.
Just take toilet paper or towel tubes and fill them with dryer lint and shredded newspaper if you are low on the lint...
 Stuff....
 Roll some recycled store bags around and twist or them shut, then toss them on the bonfire while it's just a bon and you are hoping for the 'fire' part to happen....
 Next up....a place to store my matches.  I always run out of striking area before I run out of matches, so I'm actually storing these in my house for my candles, but it would also be great to take out to the bbq or on a campout.  There is just something that makes me a little nervous about those little paper boxes filled with matches....a little glass jar makes me feel less nervous.
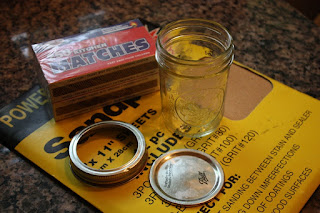
Grab a mason jar and some sandpaper (found 12 sheets for a buck at the 99 cent store...you do the math)...
 I cut out a circle the shape of the lid and put it on top and then filled 'er up with matches (make sure they are the strike anywhere matches-they still will light on sandpaper, but most matches are made to just strike on the box, you can still light them on sandpaper with enough heat, but the avg person may take a few tries).
Do you "noes'tice anything in the picture I was trying to take below?  Welcome to my life....I have the greatest inspection team this side of the Mississippi.