Category: Burlap
Showing posts with label Burlap. Show all posts

Pencil Door Hanging

Friday, September 15, 2017 No comments
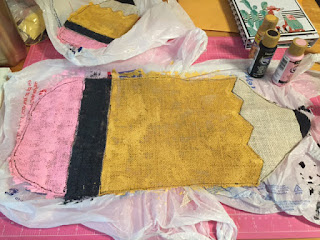
I made this pencil wreath last month as the school year geared up.  
 Step one is to cut out the shape and then run some glue or no fray glue around the edges so the strings won't fray away.  Cut out two of the same shapes and I do this to both the front and back.
I then paint my design on plastic.  Since the holes are so large in burlap it takes a lot of paint and this helps the paint kind of 'pool' and stick better.  
 Once it dries, run hot glue along three side's edges and glue the paint front to the blank back.
 I left an opening so I can stuff this.
I stuffed mine with paper b/c I plan to add some heated vinyl with a name or word eventually, but you can also stuff these with plastic bags or stuffing.  
Glue the last side and then add some rope for hanging.  These would be cute as a pumpkin or I've seen cute summer watermelons and flamingos.

Heart Burlap Banner

Saturday, February 08, 2014 No comments
 This little banner could NOT be easier to make.  Seriously.  I've seen them out and about and I finally decided it was time to make a Valentine's version.
I cut triangles out of some scraps of burlap.  I ran some no fray glue along the edges so strings won't fall over over time.
Then I punched out the size heard I wanted.  You could do this on freezer paper and iron it onto your burlap.  It pulls right off without any mess and won't move.  I found holding the paper in place worked fine for my purposes.
 I like using these dabbers you can find near the foam brushes.  I just took some red paint and pressed it all around the hole of the cut out.
 Finished.
 I hot glued the top by folding it just a little bit over a piece of rope.

DIY Make Up Bags

Tuesday, July 16, 2013 No comments
 My friend showed me some bags like this for sale for bridal party gifts.  You can change the flowers out to match the dresses.  I loved the style, so simple and pretty, and I already had these little burlap bags from a previous project.  I found mine at Hobby Lobby and they came in various sizes.  All I had to do was add the flower.
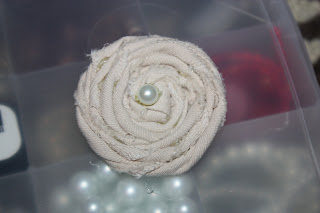
I used some off white fabric I had and I snipped the edge and then ripped both sides so that it was frayed...I tied one end...
 I twisted the fabric and began wrapping it around the center in a circle.  I put a dab of hot glue every inch or so to hold it together.
 I added a pin to the back with my glue stick, and a little strip of fabric across the back to make it even more firmly 'stuck.'
 I glued a little pearl onto the front.
 ...then pinned it to the bag.  You could add some matching ribbon to the zipper pull too, but....I'll leave that for 'you' to do....I dig it.  Anything burlap and white is right up my crafting alley!

Burlap Initial Wreath

Friday, May 10, 2013 No comments
 I made this for my pal Sarah's new house.  She said for house warming gifts she wanted things with initials on them.  On the side she told me she had a big glass window and wanted something to cover up the gap so peeping salesmen couldn't see in without a struggle.  So....say hello to the wreath for 'the other seasons.'  I went with brown and burgundy per my instructions.  I've made a lot of wreaths.  I've used a lot of burlap making wreaths but I'd never made one of these bubble wreath's before.  I know you can do it with a coat hanger, but I went ahead and bought a frame at a craft store along with a yard and half of burlap (they sell ribbon you can use with finished edges, but it's cheaper to buy it by the yard).  The only other thing to make the bubble wreath needed is some wire.  I snagged an R and some pray and some other materials for flowers...
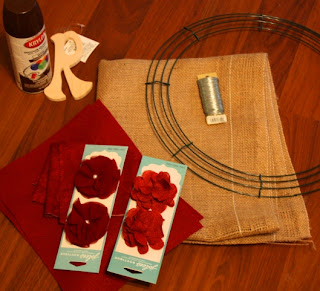
I sprayed the R with brown spray paint and then rubbed the edges and top with sand paper to make it look a little worn...just a personal preference....I like to make new things look old so I don't feel so lonely in this world.  
 ...random picture I took during the creative process because she is so helpful.
I cut the burlap into 6 inch strips, then thread 8 inches of wire through the burlap (weaving back and forth)....
I tied it to the wire wreath and then pinch the other side and tied it to the wreath as well making a 'bubble'.  
 See....
 I went back and forth across the 4 wires to create a bunch of little loops in all directions.  Here is the back....
Halfway there.  I later went and filled in any gaps with random loops.  I just kept adding when I ran out of my strips until the whole thing was covered.  

I'm traditionally the fan of a bow, but I found this wreath sort of makes it's own fluffy statement....so I bought a few burgundy flowers, then made a few out of felt and fabric.  
 To make the rolled flower I tied one end of a 1 inch wide strip I cut down the length of the fabric....
 Then I twisted, rolled, and glued.
 I glued the initial and flowers to the wreath....
The top two flowers.  
 You could add pins to the back of the flowers and change them up for each holiday with the burlap as the backdrop....but I think I'll just leave this here.

Valentine's Day: L O V E Banner

Sunday, January 22, 2012 1 comment
 I saw this banner here, it's something being sold on Etsy right now, and it's cu-ute.  I made it last spring to go with a shabby sheek/beach themed shower. 
I chopped some pennant shapes out of burlap, used my cricut to cut out letters on freezeer paper, and ironed them down. 
 I used a dabber and some white paint.  That little circle dabber saves my sanity.  I used to just use foam brushes to do this, but it's alwas seeped, the dabber....it's like the  magic wand of projects. 
The paper comes right off, and then I just hot glued these to a rope, and added those big satin ribbon (about 3 yards total).  Burlap meets satin ribbon bows-they have these sort of banners in heaven.

Coffee Bean Bag

Friday, July 15, 2011 3 comments
 This year I'm making bags for most of my friends...family...family's favorite restaurant employee's, dog's, vet's, bistro girl's mailman....you get the point.  I made the above 'over the shoulder' bag for my cousin's birthday in a few weeks.  I saw a girl at church carrying a bag kind of like this and I loved the make up. 
 It's made out of cloth (I tried to get cloth that looks 'vintage/old' because I don't own any old fabric, a tie (from goodwill), a coffee bean bag (I researched these and I called my local coffee shops b/c that's the suggestions online..they laughed at me and said their coffee isn't delivered in these....so I bought one on Ebay-the bag was affordable, the shipping...not so much)....and a vintage pin I bought a month ago in my quest for vintage pins to turn into jewelry (still in the works).
 I created little pillow case type things for the bag itself. 
 Inserted, and sewed down with a fold.  You could add pockets, and the gal I saw had a little elastic strap attached to the inside of her tie for her chapstick. 
 I attached the tie as a strap (I purposefully wanted my stuff to be a little mismatched).  I used some embroidery thread to add the x's for funk factor.  The one I saw had five....three felt fine to me. 
 Pin....love this best of all. 
My cousin doesn't drink coffee, but I love the print on this, and the bag was huge so I have more left for another craft...or another bag.  She does, however, carry everything across her body/over her shoulder so the style is perfect for her, and she loves to tote books around with her. 

Linking To:  Tatortots and Jello Funky Junk