Category: Candy Corn
Showing posts with label Candy Corn. Show all posts

Candy Corn Garland

Thursday, October 15, 2015 No comments
 Last summer I made some large Candy Corn door hangers, and I had some scrap wood I cut little candy corns out of.
I did not 'sand them' so they are perfectly shaped....I call it character and not laziness.  I painted then 'flicked' more white and black paint on with a toothbrush and strung these up with twine from the dollar tree.
I'm obsessed with candy corn, but the good thing about these are that they don't come with calories.

Candy Corn Sign

Wednesday, September 23, 2015 No comments
I promise to do an extended tutorial on wood signs (just in case someone is curious), but....here's a finished project, in case *you* already know all about the ins and outs of wood (and could probably teach me a thing or six).  I bought some stakes at home depot and a sheet of wood.  I drew a bunch of candy corn (they could also be gumdrop) shapes.  There were cut/sanded, then painted.  It didn't have to be perfect lines b/c I went back with black paint and made all sorts of little squiggles and lines and flicked it with black paint.  Paint flicking covers up a multitude of painting sins.

Peat Moss Boo Bucket

Friday, October 19, 2012 1 comment
 I've seen these little buckets made out of peat moss pots for every holiday....I found an 8 pack in the dollar spot at Target....for 50 cents (go figure), and it was time I added this to my craft collection of things I've tried.  I've made thee this year for my Halloween treat buckets for friends. 
I used these round dabbers (from the craft store....they changed my life....the perfect circle makes me smile)....
 You could also use a cute Halloween stamp, but....if you just go with the black theme, the receiver can regift these.....I added some glue to the top rim, and then glittered it up.  I punched a hole in each side and folded and twisted a pipe cleaner in half for the handle. 
I added some crepe paper ruffles with hot glue, a tag I printed online after googling vintage Halloween pictures, and then my very favorite fall combination....candycorn and peanuts.....salty and sweet-life's balancing act complete. 

Halloween Transfer Shirts

Monday, October 08, 2012 1 comment
This Thursday I'm taking a collection of projects to GMT....this is half of the first segment.  I got a little carried away.  I'll be demoing how to make these little shirts, incredibly easy.  I've done this about fifteen thousand different ways.  I've sent out all my Halloween cards and gifts for this year, so now I'm working on NEXT year.  Above, the shirt for Micah's second Halloween....now I'm on the hunt for some cute leggings and an appropriate bow. 
I made this little Halloween bag for my buddy Donovan....
 He has a little brother on the way (coming to a nursery, not nearly close enough to me, February).  His name has yet to be revealed, so I thought I was super cleaver (don't burst my bubble) and I found a monster icon and and put Monster Mash....get it....baby food, mash, get it?  OK....I'm over it. 
 My pal, Laine, at school has a little baby girl who will be here by Friday whether she comes on her own, or with the help of the doctors.....she is definitely going to need some Halloween gear.  She also has a little black kitty waiting to meet her at home who has no idea his life is about to be turned upside down, but maybe he will be more forgiving if she wears a little tribute to him?
Seriously, I could go on and on, but I'll stop and review the steps to making these....and then I'm off to making turkeys and gingerbreads, and probably leprechauns and firecrackers. 
Step One:  You need to grab some transfer paper and a shirt/onsie/bib/bag/anything that will stay still works.  They sell this for transfering to white fabric (light) or dark fabric, so depending on what you are doing, depends on what you purchase. 

Step Two:  You can create your own design via the paint, or you can purchase them on sites like Etsy and have them personalized.  Here is the cat without a name.  You can download it, put it in a word document, right click and move it to the 'back' and then type the name in whatever font/size you want.  I then did 'print screen' or snag it to get the whole thing.  There may be an easier way, but this is my ghetto computer skills at work. 
Step Three:  Paste the whole thing in another word document.  Under picture tools one of the options is to rotate horizontal.  You need the name to be facing the opposit direction b/c you iron this down and you want the mirror image. 

Step Four:  Print it out (sometime of the ink jet transfer papers have a program you can use for free, if you just do step two and ssave your file as a pdf, you can copy them into the program and it will rotate the whole thing for you). 
Step Five:  Cut it out, I leave a little bit of the white, it won't show up on the shirt, but it helps as you peal it off if a little wants to come up, the color will stay. 
Step Six:  Press it down (put pressure, pick up the iron, and press in the next stop, don't 'rub' it like a normal iron so it doesn'ts lip around).  Let it cool, and lift carefully. 
These are machine washable on the gentle cycle after they 'set' for 72 hours.

Candy Corn Trail Mix

Friday, October 07, 2011 2 comments
 Last year I made some trailmix for New Year's Eve using bugels.  Instructions are here for that trailmix. 

I also made up another Halloween mix, cats and hats. 
I used this same basic principal to make this trail mix.  I originally saw the idea, and I fell in love via cookies and cups blog.  I heart candy corn.  I dedicated a week's worth of projects to the little boogers last year. 
This little candy corn mix would make a really cute hostess gift, and they are very easy to put together.  First up....melting chocolates.  Heat 1/2 cup for about 40 seconds.  Stir, if they are not smooth, heat for 10 additional seconds at time.  If you overheat they won't be smooth any longer, but rather crystalize. 

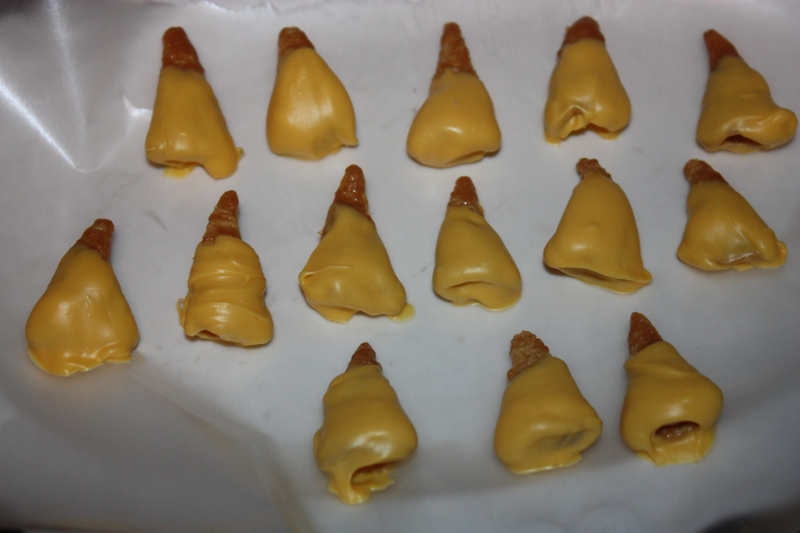
 Dip one side in yellow chocolate.  Place it on wax paper to dry.  To speed up the drying process, throw it in the fridge. 
 Dip side two in orange.  Repeat drying process, and then dip the tips in white chocolate. 
 I just mixed these up with a bagged trail mix...it made it look so much more homemade. 

Microwave Caramel

Friday, June 03, 2011 5 comments
I saw this recipe for microwave caramel at Craft Envy here.  I love caramel, but I have found I have been unable to conquer the candy world in my kitchen, and any attempt has turned out runny or two hard.  I decided to give it a go because it seems like the microwave gets to do all the work.  Guess what?  It worked! 
I'm including the recipe because over time I never know what will happen to links, and this is my living recipe site, but visit Craft Envy and check out her site...anyone who can introduce me to a fail proof caramel has got to be a pretty great gal! 
Ingredients:  1/2 c. butter, 1 c. brown sugar, 1 c. white sugar, 1 c. Karo syrup, 1 can sweetened condensed milk. 
Instructions:  Melt butter in a bowl.  Stir in the rest of the ingredients. 

Microwave in a bowl for 12-14 minutes (I did 14 based on my microwave's usual power level),
Beat with hand mixer for two minutes (ummm...just realized I forgot this....but mine still turned out OK....I might try following the instructions next time and see what happens).  Pour into 9x13 inch pan.
Let cool for 2 hours.  Cut and wrap in wax paper. 
Don't tell anyone you made them, you might have to share. 

P.s.  I have to say I finally fulfilled a life long (and when I say lifelong, I mean, a least a year) fantasy of owning those little green berry containers....which will be a part of a party I'm hosting soon, and approximately 8,876 more projects in the near future.  I bought 420 of them, it made them well under half price.  I'll eventually put my left over on Etsy or something....when I see the Horders filming crew show up, but if you are interested in buying some, let me know....for blogging friends, .20 cents each (I can fit 25 into the medium size flat rate mailing boxes....mailing kills me every time, but it's still a lot less than buying them bulk, or for $1 each from other sites)....or you can follow the Horder's filming crew and dig them out of my trash....your choice.
Linking To:  Sugar Bananas 

Candy Corn Recap (7 examples of why I need help)

Saturday, October 16, 2010 4 comments
I got a little carried away with the candy corn this week....7 projects later, and I'm starting a support group.  Our first meeting will be November 1st.  It won't be the last of the candy corn in my life, but it will be the last I blog about this Halloween (I think).  Next up, random Halloween stuff, random fall stuff, gingerbread stuff, and then I'm going to start blogging about all the homemade gifts I've made for Christmas.  That should get me through about March of 2014.   I just need to find the friends to match.   BUT one more Ode to Candy Corn.  I'm attaching all the links to the instructions for each of the projects because I'm a giver (click on the titles).  I won't say when I usually give people truckloads full of, but I do give. 
Homemade Candy Corn

Candy Corn Cupcakes

Candy Corn Tutu

Candy Corn Garland

Candy Corn Cookies

Candy Corn Cookies

Make You're Own Candy Corn Fondant

Linking To:
Under the Table and Dreaming
Sundae Scoop
Sew Can Do
CRAFT

Halloween-Candy Corn: Candy Corn Fondant Leaves


I saw this idea for turning 'left over' candy corn into fondant here.  I never actually met a left over candy corn, but I was willing to buy a package for this experiment. 
I popped the whites off my candy corns. 
The whites are now in a better place. 
I broke up the oranges and yellows. 
Next up, squishing.  The warmth of your hands and a little pressure should quickly form a 'fondant ball.'  Too bad the same can't be said for coal, a little pressure, and diamonds. 
I covered both sides with wax paper, and rolled out my candy corn fondant with a rolling pin. 
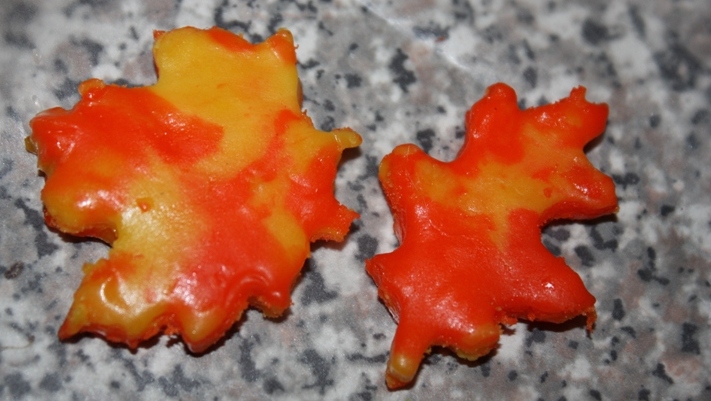
I cut out some little leaves with small (pie leaf) cookie cutters.  I pealed the excess away before removing the cookie cutters.  It's a little sticky, thus, peeling around the cookie cutter kept the shape true to form.
These little leaves would have been super cute on a cupcake, but they disappeared far too quickly.  I'll get a detective on the job.  In the meantime, I'm loving candy corn fondant!
Linking To:
Along for the Ride
Tatortots and Jello
Funky Junk
Be Different...Act Normal
Sassy Sites
Visit thecsiproject.com