Category: Home "Repairs"
Showing posts with label Home "Repairs". Show all posts

Vintage French Bathroom

Monday, March 30, 2020 No comments
It's fair to say, it's been a weird, scary, and tiring last few weeks.  In the midst of all the quarantines, I was able to finish up my bathroom redo (with the exception of organizing some of my drawers b/c I lack a few supplies and most stores are currently closed).  I wanted to do a (sort of) vintage French theme for my bathroom.  I wanted whites (b/c I can change it to anything very easily in the future) with cream walls (my favorite).  I also wanted to get this completed before I turned 40....at least I managed to beat 41.  I have 3 more things on that list, and I'm not giving up despite the deadline.  In this case, I was trying to be financially responsible.  
 I've shared a few things already, like this little sign that is a page I framed from an old French dictionary.  The word was 'swimming'-complete with pictures on how to save someone from drowning.
 And I love this 5 gallon pickling jar I'm using to store towels and rest books and magazines.
 I also found a box of old French phrase cards from high school.  This is probably the first time I've ever used them.  I sandwiched them into a frame from Target.  I did have to use double sided tape on the reverse side to keep them in place.
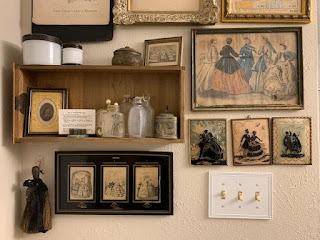
 When you first enter the bathroom I have a wall of just some fun antiques I've been collecting.  Several are pages from old fashion magazines.  I also found (and framed) fabric samples written in French.  I have also just collected some fun little jars and containers that don't have a lot of purpose.  I'm TRYING to be better about making things functional, but....what function would an entrance wall really hold?
 Some closer views.
 Over the sink, one thing I left from my old bathroom were jars of ducks.  I had a lot of blue and white and silver, but I just loved them too much to let them go.  I also have a big jar of vintage buttons I just thought were fun.
 I have also become obsessed with mirrors.  I have a collection in my room now too in creams and golds, but....black were for the bathroom.  I've been collecting these for a couple of years.
 I also found this two tiered basket at Sur La Table that works great for housing a lot of the necessities without taking up much space.
 I love the old shaving mirror.  It's not functional, but instead of using the mirror that came with this vanity, I decided I wanted to keep my old mirror and it was a little off center, so this helps make that less obvious.
 I also found the cutest bath math from Anthropologie in French.
 As soon as I laid it down, I realized it was going to (more likely) end up being a dog bed.
 I love this old tin piece.
I also found an old bedside table to sit next to the bathtub with bath salts etc.  
 I had this old window in my bathroom, but to stick with the theme, I added some vinyl to make it look like an old shop window.  I also embroidered some towels.
I also had someone from Etsy sew me some shower curtains in black and white striped fabric.  
 I bought a little spoon on Etsy as well I had someone stamp "Bath Salt" in French as well.
 So, with our current normal, I guess this is where I'll be going to seek a little relaxation and to 'get away.'

Laundry Room Makeover

Friday, April 28, 2017 No comments
In January, I FINALLYdecided to tackle my Laundry Room/Utility Room.  Through the years it had become this place where I shoved everything I kept meaning to do something with until it became almost unwalkable. In the last few years I've redone my bedroom, closet, craft room, and now my utility room.  My living room/kitchen/yard that everyone sees needs some major TLC, but.....their day will come.  Redoing these unseen rooms actually makes the biggest impact on me  I breath so much easier!  As much as I wanted to go all out-I used the shelves and things I had already.  I did give the walls a coat of white paint b/c it's a dark room, and I threw down a rug over the concrete floor.  Maybe I'll go back SOMEDAY and add some 'real floors', but there are so many other things in my house that need some attention, and this is a million times better than it was.  I don't have a before in this case b/c....I'd like to be left with some dignity.  It was a hard room to photograph b/c it's long and skinny (an add on from the garage), so I took a video TRYING to show a bit more....that video lives here....
https://youtu.be/CSttADHct_4

Grout

Tuesday, January 05, 2016 1 comment
 Grout cleaning....torture.  I didn't choose the cream tile or the white grout in my house, but....I can't bring myself to replace it until it falls apart.  12 years later it's about the only thing holding up.  I've tried every product known to man to clean it, and some of them work...so so.  I decided it was time to give the grout a go again over Christmas break.  I googled options looking for a miracle cream.  It turns out...vinegar, baking soda, and water are the magic ingredients to getting it cleaner than it's ever been.
Step one:  Mix 1 c of baking soda with 1/3 c of water and place it into the cracks.  I just ran it along the grout, no need to pack it or anything.
Step 2:  Place 1 part water 1 part vinegar (1 c/1 c of each) into a spray bottle.  I sprayed down the baking soda/water filled cracks.  It bubbles a little.  
Step 3:  I then took a bristle brush and gave it a quick scrub and then wiped it clean.  
Here's a picture with one row down and the rest of them...well, not....I guess I better get to work on that.  It's hard to tell the difference in these night time/winter pictures, but....trust me, it's pretty amazing.  The one row was b/c  I totally didn't trust it, but...I really did finish the grout and it looks great.  Plus....baking soda, vinegar, and water are more in my price range!

Closet Redo

Friday, August 28, 2015 2 comments
 Two summers ago, I redid my bedroom.  Here are those photos.  I decided it was time to redo my closet this summer.  It had become a place I just shoved things into.  I wore the same outfits weekly, which would be fine...if I didn't have so many other options just collecting dust!  So...every good post starts with a before.  Don't be scared....
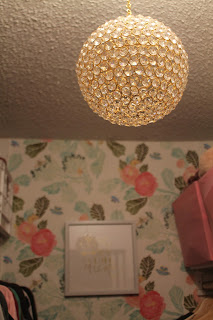
 Oh my goodness, I didn't even like opening my closet.  I went on the hunt for closet ideas, and I found a post that I pretty much copied down to a T at ViewAlongTheWay.  I fell in love.   I usually just gather ideas, but in this case...I pretty much loved each piece.  The original is much better, I had to stick with what I was capable of.  For instance, I ordered this garden lantern.  She restrung and rewired it to be the light bulb.  My light is attached to the ceiling with a fan, so I just hung it below to catch the lights.  Maybe someday...but in the meantime....I love it...and I think it really brings out the popcorn ceiling.  ;o)
 I did add some other hanger options.  I bought some velvet, some wood, and then I sprayed some plastic hangers I already had with gold.  These separate skirts from dresses from shirts.  I blogged about them earlier this week.  Fun, huh?
Before:
After:
 I went ahead and kept my shoe cubbies.  I had my brother build me some low shelves on one side I could someday use for shoes, but for now....they hold pants and shorts.
 I didn't need as much room for jewelry etc b/c I have mine stored in a dresser in my room, but I wanted something a little frivolous.
 I bought tons of baskets from Home Goods along with the rug and the seat (to throw on shoes etc.
 Last up, I ordered this wallpaper from Anthropologie.  I did a terrible job of putting it up...I tend to sort of charge forward with life and the second sheet is bubbled and wrinkled and it's really a crying shame...but, oh yeah, it's a closet, so....it's going to be OK.  I can be OK with imperfect.  If you sign up on their site, you get a birthday discount (15 percent I think?) during that month....this is probably why I fell in love with the original closet.
 My dog approves.  In fact, it was impossible to get shots without her in the picture.
 I found this frame at Hobby Lobby.
 I also bought these antlers to hold bracelets.  I don't know...I needed it.  I was going to paint it, but....decided not too.  There is also a hook I got from Anthropologie.
My goal the whole time was to make it look different from my room-not shabby chic....more modern and gold.  I kept finding myself buying vintage mirrors etc, rustic tin wall hangings etc....I guess my room is getting a few additions b/c I had to then go and grab something 'not so me.'  I love it...now I just have to figure out what to do with all those boxes that used to live in this closet!
OUTTAKES:  This is what every step of the project involved....June running around the house with old....and new pieces from the closet. 

Gold Hangers

Tuesday, August 25, 2015 1 comment
 This summer I had a long list of things I wanted to get accomplished.  I did two.  I painted  a hall in my house...the very smallest 'room' with the least painter's tape necessary, and I redid my closet.  As I type this....all the things that used to live in my closet are currently stacked to the ceiling in my bedroom, but by golly, the closet is done...almost....minus some clothes I haven't managed to squeeze in, bubbling wall paper, and whatever else falls over night.
One thing that needed to change were my hangers.  I started by buying some wood hanger at Ikea.  I bought 25.  Ha.  25.  Ha.  No.  So then my friend, Kelly, told me about these velvet hangers that prevent your shirts from slipping.  I bought about a hundred of those.  I still needed more.  The wooden hangers look great, but....they take up a lot of space.  The velvet hangers are great, but....I had hundreds of these stupid plastic hangers.
I decided to go grab some spray paint.  I've seen it on Pinterest, and if it's good enough for pinterest, it's good enough for me.  So, shirts get velvet, dresses get wooden hangers, skirts get gold hangers.  Shorts and pants get shoved on a shelf b/c I hate wearing pants and shorts.  More to come on the only thing I got accomplished this summer.

My Great Grandmother's Sister's Desk

Friday, April 17, 2015 1 comment
 I'll eventually post a picture of this desk sitting in it's new home...I'm just taking my time finding the perfect items for the innards.  I do a lot of crafts....thus the blog, but this one was really personal.  I loved this desk when it sat in my Mom's room.  It had been her desk when she was a little girl.  At that time it was already 50 years old.  Now....it's working on more than 100 years of surviving and thriving in our family.
 Before it was her desk, it was her Mom's, and before that it was her Mom's mother's sister's desk.  Her sister died when she was just 24 years old.  Once upon a time this desk was red.  At some point it was stained white and antiqued.  It's had several hinges, and was down to one hinge....that then broke, and the outside shelf fell off...and split in two.  Age wasn't kind to the coloring.  I found little pieces of tape that petrified to the wood....I have a feeling I was responsible for that.
 I enlisted my brother to fix the desk portion and I then I made my first foray into chalk paint.  I realize, I'm late to the party.  I was told by my friend that I missed the party completely and chalk paint was 'out.'  I don't believe that-I still see chalk painted items-real and fake in every store I visit.  I also found some for sale at JoAnne's.  I used a coupon to make it even cheaper.  I bought some the color of 'sheepskin' and some brown and clear wax.
 The deal is you aren't supposed to have to sand old paint off-it's supposed to cover it up completely.  I'm not so sure if it's this particular paint, but mine did not dry smooth.  It crackled a little.  In the end-that was the look I was going for-so it saved me some sanding etc to make it look more aged.  All that to say-if you want a smooth coat-don't paint over fifty year old paint...if you wanted crackle-use this.
 I then took some of the brown paint and rubbed it along the edges and made some streaks across the white panels.
 I took a wet paper towel and started streaking the paint around so that it looked more 'aged' and uneven.
 Once the brown wax dried I covered the whole thing with a thin coat of clear wax.
 I let is rest for 6 days-per the instructions.
 There were a few things I bought new-one were these little glass handles (from Hobby Lobby-half off-so 4 bucks total).  The original handles were long gone.
 The old hinges were missing pieces...I decided to leave the indention b/c I kind of like the stories they tell.  The priciest part of these projects were these new old hinges I bought on ebay.  I wanted them to be authentic to the time.  I found two antique 'butterfly' hinges.
I decided the arms were just not worth finding antique-since I'm keeping it-I think it's fine.  I had my brother attach these pieces.  I love that it folds out to become a desk you can write on.  My FAVORITE part are the little cubbies at the top.  The little drawer in the middles pull is actually a little nail.  I spent hours messing with these cubbies when I was little....and I have the crayon remnants to prove it on the bottom of the drawer.  
I also repainted the chair.  These have now found a home in my room.