Book Club Ornament

Friday, November 04, 2022 3 comments


I'm a part of several book clubs, but I made a commitment to one of my friend's book clubs, or rather, to myself.  I decided I was going to read every single book this year.  We have a rule-it's for fun, there is not shame, if you don't read the book, still come.  So, I have, and I do, but this year, I decided to personally challenge myself.  

Last year, I saw this super cute ideas for making an ornament with tiny replicas of all the books you read throughout the year, and I decided to adapt this to the 12 from our book clubs, so I made each girl one of these ornaments I'm going to gift them at our Christmas get together (and book exchange).  

I bought a package of plastic, empty ornaments, and I printed off little books using thumbnail size prints.  I'm going to post the whole process on youtube.  I also added the year with some vinyl and a little book charm to the top.  

I don't think I'll commit to that next year b/c there was one that was so not up my alley, but it was a fun year regardless, and it will encourage me to pick up more of them, in between all my 'regular' reading.  

Succulent Pumpkins

Friday, October 07, 2022 6 comments


Recently, someone at work had one of these succulent pumpkins delivered and I thought it was so cute, but I had NOT idea how easy it was to make these!  I immediately started to research and bought the supplies.
I got two small pumpkins for less than $2 each at Trader Joe's.  I found some moss at the Dollar Tree, and I ordered 10 succulent cuttings off of Amazon.  
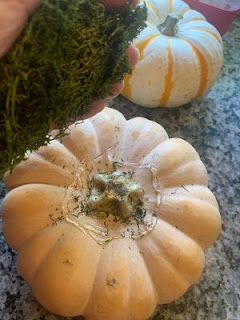
The key to picking a pumpkin, is picking one with a flat top.  And then, you add hot glue and press down the moss.  
Next, I added hot glue to the bottom of the succulents and pressed them into the moss.  This small pumpkin took about ten little succulent cuttings.  
I pulled off some of the bottom leaves of some of the succulent varieties.  After you get it arranged, you can spritz it with some water about once a week.  I've read that the succulents can take root, but regardless, these should last awhile b/c succulents are pretty forgiving.  When I'm ready to move from fall to Christmas decor, I'll probably try to slice off the top of the pumpkin where these lives and place it in a flowerpot and see what happens.


Homemade Vanilla

Saturday, October 01, 2022 No comments


I'm about to head out on my annual girl's retreat in October.  We decided to do a 'favorite things' exchange (I do this in the summer with a group of crafting friends I've been retreating with for over a decade and we love it).  My favorite thing is probably something sweet.  I was planning on getting a favorite cupcake or cookie, but I brought cookies last year from an Austin bakery I love, so I decided to bring something sweet related-an ingredient.  

These would also make awesome gifts for Christmas.  It's not super 'cheap' to make, but it is fun.  I found a pack of 9 bottles on Amazon that even came with tags (I didn't use) and a funnel (I did).  I bought 8 oz bottles, but in doing that, they do use a lot of Vodka, which upped the price.  

I also bought some vanilla beans on Amazon.  I read the reviews really carefully to find some that were not already split (apparently some people split them and take out the 'good stuff' and then sell the rest of the bean, which impacts your vanilla).  This company also had good reviews when it came to returns (if the seal breaks while shipping, they can mold).  I split my whole beans down the middle, but left about an inch together at the end b/c you just want it to infuse your alcohol and not have too many pieces floating around.  You can strain your vanilla after a few months, but....I'll leave that to the girls that get these.    
I then did some alcohol research and I learned not to use a bottom shelf Vodka, and not to use one infused with flavors.  Tito's was one that was recommended, so I went with that.  1 liter fills 4-5 bottles, depending on how full you make them.  
I put two beans (split in two) in the bottles, poured vodka over it, and sealed the bottles.  I also made some little tags for the front and I'm going to add an instruction tag.  I read these can be used within 8 weeks, but are best after 8 months.  It also says you can continuously refill your vanilla bottles, using the same beans for years.  I guess I'll let you know this time next year!  

The vodka is already amber (a few hours later), and I'm planning to shake them up every few days until I gift them away.  I probably spent almost $10 a bottle, but the bigger bulk you buy, the cheaper your vanilla will be.  

DIY Croutons

Tuesday, July 05, 2022 No comments

I recently was unable to find my favorite croutons.  When I've looked up recipes in the past it seems like it takes a long time to bake a crouton, so I've never tried...until now.  I finally found a simple recipe and I've already made it twice.  I'm posting it here for future me b/c present me is digging these croutons!
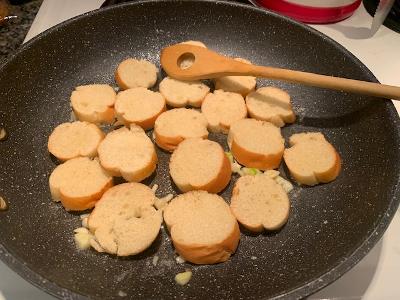
Step 1-Melt 1 T spoon of butter with 1 1/2 T olive oil and 3 gloves of crushed garlic.  Heat it on low heat for about ten minutes just until the garlic is starting to soften and brown slightly.  You are just infushing the oil with the garlic flavor.  
Turn the heat off, and then lay some thinly sliced piece of baguette to the ban and coat one side.  There is enough oil for about 16 slices.  I sliced my bread about 1/3 inch thick.  
I then flipped the bread over so the second side was covered.  
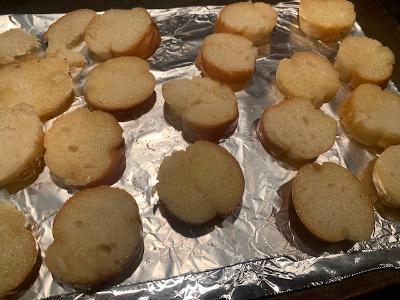
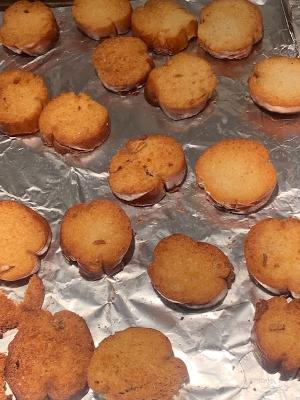
I put my slices on a foil lined pan and backed them at 350 for about 15 minutes.  They go from looking uncooked to crispy really quickly, so start eyeing the bread at 15 minutes and check it frequently if it's not quite done.  
Serve with salad.  


Travel Journal

Sunday, June 26, 2022 1 comment

     I've kept a journal when I traveled for years. It's been great to go back and read about the day to day vacations I only remember as vacation blobs (beautiful blobs, but....just a generic summary and not the day to day details).  It's also been a great way to remember the things I wanted to remember before returning.  In the last few years I've added some 'scrapbooking' to my journal, as opposed to keeping a full album for the trip separately.  Now I might do a few pages in a larger book I'm keeping with chronological life moments, but I don't have as many full albums anymore because....time.  
     I've also slowly been teaching myself the most efficient way TO scrapbook on the go.  I know I used a two page spread each day.  I have a few walk throughs on youtube on past journals, but this last trip (Hello, Oahu), I took a few photos of what my set up looks like.  
I now travel with a pouch with my glue, a few paper scraps, some enamel drops, a mini stapler and little strips of washi, but I try to do most of my decorating beforehand.  
I attaching a few things to each page I think I might like to use when I decorate the page.  In this case, I made a little pocket using half an envelope beyond the house.  I put in some litlte squares I used for extra space for journaling, and a place to put my photos.  I also make little date tags in advance with my label maker.  This way I could use more than two pages, so I don't put the date on the pages until I get to that day.  
I use a canon ivy, which really prints great little photos AND you can buy your paper with a sticky back.  
I'm on my fourth travel journal now, and they sure do take up a lot less space.  I'm sure I'll go back to the 'big books' someday, or on really different vacations, but for now, I'm loving the travel journal life!

Muddy Buddy Truffles

Tuesday, December 07, 2021 7 comments


Every year for at least 15 years I've hosted a cookie RECIPE exchange at my work.  I've talked about it in the past, but the gist is that you bring two cookies and a recipe attached for each person.  We've had 25 people and 10 people.  You never know how wants to bake, and what they want to bake.  I always find a few new recipes this way regardless of the number, and this year was no exception, including the one I brought.  
These muddy buddy truffles taste exactly like you would expect them too.  The crunch of the chex and the pb, powdered sugar, and chocolate give them the delicious taste of a muddy buddy, but I thought they were easier to make (I can never shake my muddy buddies evenly).
The original recipe says they make 12, but I got more like 18 out of a batch.  It also said to wait for the chocolate to dry before rolling them in powdered sugar (double rolling), but mine got a little too hard b/c the powdered sugar didn't fully stick.  I think I'll try to roll when it's ALMOST dry next time, but that didn't impact the taste, it was just powdery!