Homemade Gifts: One of My Favorite Flakes-Ornament

Tuesday, November 30, 2010 No comments


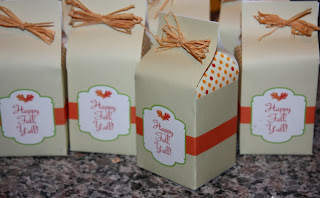
I don't know if I got this message across, but I have the most perfect niece on the face of the planet. Last Christmas, she flew in from California (with her mom and dad, who are also fabulous, but were slightly less photographed by me during that trip). I wanted to commemorate her first Christmas, but even though she is perfect, she wasn't QUITE ready for my colors,and paints at 7 months. Every year my Mom pulls out a little ornament I came home from Sunday School with on my first Christmas. It was a bell with the year written on it. I mean, I brought it home, so that means it's special, but I wasn't writing at 5 months (I think it was more like 8 months that I picked up my pen and began my writing career), so....I wanted Blythe to actually be a part of the first ornament she made. It just so happened to snow last Christmas as well, it was the first truly white Christmas in the Dallas area since they began keeping records well over 100 years ago. I took a glass ornament, and painted Blythe's hand (with the help of her Mom), and then pressed it to three ornaments (one for her, and one for each Grand-family). She wasn't into it yet, so it was really hard to get her to stay still without causing too many long lasting scars, but we figured these little smeared hands will just represent the true process. Crafts aren't perfect when you are 7 months or 7 years or 30+ years old, which is the charm of it all. I had her Mom use a paint pen and write the date, and the memory. I added some fake snow to the inside of the ornament, and tied a ribbon to the top. I considered adding blue beads, or snowflakes, or even sequins inside as well, but....I think this is more Lydia's style. I also found the paint did not want to stay on the glass, so I bought a little tube of paint sealer, and very carefully painted over the hand (so the wet paint wouldn't rub off our impression). I love these little flake hands. These were made a long time ago, but in attempt to allow time for more surprises, and because I know they sometimes check my blog, it had to wait. Lastly, I found these little chinese take out boxes with flakes to store these little ornaments in from year to year. And thus completes another cute Blythe post.

Linking To:
Saturday Mornings

Homemade Gifts: Personalized Guitar Picks

Monday, November 29, 2010 15 comments
                      
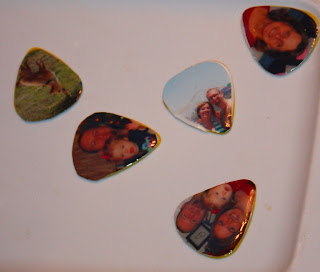
My cousin loves music.  He taught himself how to play the guitar when he was younger, and has been playing, and writing songs ever since.  His master's in in theology, and he is an associate pastor, but his main gig is leading worship each Sunday.  Last year I tried to think of a homemade gift that would go along with his love, in particular-what to do with guitar picks.  I had the thought of personalizing picks in some way, and googled the idea.  I saw that you can actually order guitar picks with personal pictures on them...the problem is it's about 25 bucks for 5....so then I began the hunt on how to 'do it yourself.'  I came across a tutorial on youtube that was right up my alley, and really easy.  Step numero uno...snag some pictures from your cousin's facebook page.  Case in point. 
Plot ways to borrow above cousin's daughter for a week or 57 because she's cute, and if you borrowed her, above cousin could get in lots of practice without interruptions.  Proceed to project. 
Print array of pictures in smaller sizes (but bigger than thumbnails), grab some picks at a guitar store, mod podge, and diamond glaze.  (I couldn't find diamond glaze, but if you can...get it, it dries clearer than this 'other stuff.')  I would not print these on photo paper because it bled, I reprinted them via a 'real' photo printing place, and it didn't bled. 
I traced the pictures down to the size of the pics, mod podge them down, mod podged again over the top, and then diamond glazed the top (not too much). Dried. 
(The dog pick is for my brother, who also plays guitar, these are just a few samples of people in my cousin's life)
I took an over exposed, too close blurry picture before packing them up forever so that you can just imagine whether they might or might not look better than the finished product, and sent them on their way.  The overexposed, blurry picture is a really imporant part of the process, so don't forget that.  Another year of the 'impossible' to buy for family homemade gifts  are now out of the dusty attic that is my brain and on their way to their new owners.

A Week of Homemade Gifts

Sunday, November 28, 2010 No comments
     If you need homemade gift ideas, you've come to the right place.  The reason why I started blogging about the gifts last year was so I'd remember who I gave what to when so I didn't redo an idea I love.  The problem is, a few years after I started blogging with a small handful of friends, some of my extended friendship circle now have my web address, which isn't a problem, except when it comes to gift making/blogging, I don't know if they check it, but they could!  A lot of my gifts I'll have to blog about after Christmas, but I've got a solid week's worth of some gifts I kinda heart, and then over the month of December I'll be posting a TON more of the gifts I've made.   I guess I could someday blog about some of those past gifts, but I'd have to stop crafting in real time to do that.
      A few years ago I went to almost exclusive homemade gift giving b/c I got really tired of walking through a store, trying to find the perfect thing for someone, and ultimately spending money just to spend money to show I cared, but not giving the thing I really wanted them to have.  To be honest, if I were making gifts for the reaction of the recipients, sometimes that just isn't going to happen (that is not meant for any of my friends that might be reading this, I don't believe in being passive aggressive via the net), but it makes me feel better to know it's a gift from the heart, and I know in this world of blogging, there are others out there that totally 'get' the joy and process of making things and thinking about those friends and family members as you make it.  Below my link, under the labels, I have a lot of my prior gifts labeled with "homemade gift," but I'm about to add a lot more, so....without further ado....

Holiday Cupcake Contest

Hoosier Homemade hosted a seasonal cupcake contest through the month of November.  I participated this summer in a summer cupcake competition and loved seeing what other cupcake cohorts came up with, and this second round didn't disappoint either.  It sort of snuck up on me as far as baking prep, but this is a run down of my holiday cupcakes.  Attached are each link to the cupcakes, recipes, and rantings.  On Tuesday, Hoosier will open up her site for voting, so everyone will be posting their four cupcakes for the competition. 
Week 1:  Seasonal Flavor:  Peppermint Patty Cupcakes

Week 2:  Thanksgiving Cupcakes:  New York City's Macy's Parade Black and White Cupcakes

Week 3:  Naughty or Nice Cupcakes (in Ornament Holders)

Week 4:  New Year's Champagne Cupcakes

Linking To:  Hoosier Homemade

Autumn Fruit Salad

Saturday, November 27, 2010 1 comment
I saw this recipe last year in a Taste of Home magazine I bought.  I finally got around to trying it out, and it was a fun mix of some of my favorite flavors. 
Ingredients:  1 1/2 c. sugar, 1/2 c. all-purpose flour, 1 1/2 c. water, 1 t. butter, 1 t. vanilla, 5 c. cubed, unpeeled green apples, 2 c. halved red seedless grapes, 1 c. diced celery, 1 c. walnut halves. 
Instructions:  In a large saucepan, combine sugar, flour, and water.  Mix and bring to a boil.  Cook until the mix thickens, this happens quickly, and when it does, it looks like this. 
Let the mix cool, and add the fruits, nut, and celery to a large bowl.  When the mix is cooled, pour it over your bowl of diced fruits and goodies.  Toss, and refrigerate until serving.  This make a lot.  I think it would easily serve 8-10. 

Kelly's Twice Baked Potato Casserole

Friday, November 26, 2010 4 comments

My friend, Kelly, introduced me to a version of this one holiday. I've adapted the cheese a bit to fit what I had in my fridge, but I think it would work with any combination of cheese you like, and work it does. I'm actually not a huge fan of potatoes, and I love this, as does the rest of my family, which is a small miracle. Someday I need to do a run down of the things my extended family eats, it would be the shortest, easiest blog post ever b/c they each have about three things they eat without conflict, hesitation, or protest, so holiday meals can be difficult. You better believe this makes it to the table quite often when it comes to attempting to fix a meal that will be eaten. It does NOT, however, make it on any weight watcher's sites but it's worth the splurge.
TWICE BAKED POTATO CASSEROLE
Ingredients:
10 large russet baking potatoes (about 7 pounds), 1 stick of butter, plus 2 T of butter (at room temperature), 1 c. sour cream, 1/2 c. heavy cream, 2 t. salt, 1 1/2 t. black pepper, 3/4 lb bacon-cooked until crisp and crumbled, 1/2 lb sharp cheddar cheese, cubed, 3/4 pound mild cheddar cheese, shredded, 1/2 c. chopped green onion, 3 eggs, lightly beaten.
Instructions:
Heat over 400 degrees.
Wash and dry potatoes. Prick potatoes with a fork and bake for 1 hour-1 hour 15 minutes (until tender). Set aside until cool enough to handle.
When cooled, cut potatoes in half and use a melon baller to scoop out all the insides.
Put potatoes insides in a bowl and mix with 1 stick of butter, sour cream, heavy cream, salt, and pepper. Mash. Add bacon, cubed cheese, half of grated cheese, green onion, eggs. Mix well.
Butter a 9x13 inch dish with remaining butter. Pour mix into bowl, and top with the rest of the cheese.
Reduce oven heat to 375. Bake 35-40 minutes until bubbling around the edge, and cheese is melted on top and lightly browned. Serve hot.
I've put the casserole together the day before, covered it and baked it the day of the dinner to save time the day 'of.' This also reheats well.
Linking To:
Remodelaholic House of Hepworths

Thanksgiving 2010

Thursday, November 25, 2010 1 comment
This year, my best friend, Regan came down from Tennessee to visit for Thanksgiving break.  Her husband is deployed overseas, and I got custody for the holidays.  We've made about 3,000 projects, eaten 300,000 calories, and stayed up past 3 am every night...more on this later when I have time to go through photos, and we are finished making memories to talk about later.  When I start listing the things I'm thankful for, the list is long, but our friendship of 22 years...and counting makes the list every time.  Here's hoping your table is filled with the people you love most, and that you are making memories you  talk about in the years to go. 

Thanksgiving Trail Mix Placecards

Wednesday, November 24, 2010 7 comments
I saw this precious little milk carton printable at Frog Prince.  I'm completely in love with milk jugs, milk jars, and everything milk right now (more on this later....much later).  I died from the sheer cuteness, then my chihuahua tapped on my chest enough to resusitate me, and I got to the paper printing business.
Next came the innards.  I saw THIS cute trail mix recipe using bugels to look like baby cornocopias.  I banged my head against the wall because I want to be this clever.  I died again, but God sent me back because heavens not quite ready for me.  I don't know what He meant by that, but...thank goodness I'm here to share these cute little projects I found on the net. 
I changed my recipe up a bit, but you get the basic idea-bugels=super cute and Thanksgiving-eee!
I stuffed, and got over it. 
Dear Internet,
    I love you.  Let's get married. 
                    Love,
                           Christy
I think these would make some really cute placecards, write a name across 'em and set them by each place.  I'm not doing this, only because I couldn't want until Thanksgiving to do this, and the trail mix is now just a piece of history, but *you* could.

New Year's Champagne Cupcakes

Tuesday, November 23, 2010 6 comments
I'm sure this has been done before, but....this is my version, from my head.  Instead of trying to flavor a cupcake 'like champagne'....I think nothing says, "Happy New Year's" like confetti.  You can buy these great boxed cake mixes with the confetti already mixed inside. 

Or mix your own stash of sprinkles into a white cake mix. 
I made most of my cupcakes in mini, using these supplies: 

  • Mini champagne glasses.  I found these at the thrift store...donated from a wedding, but I've also seen them at the Dollar Tree, and every craft store in the wedding favor section.  They are much more affordable when feeding a crowd than trying to find large champagne glasses for a large crowd of people.

  • I used a whipped, vanilla icing on the cupcakes to hold on the champagne bubbles.

  • For the Bubbles:  Wilton sells these white round 'bubble's in mass, or they have jars of sprinkles that are white and round.  I think the most affordable (and tasty) way to add bubbles are white Sixlets.  I've found them at a bunch of Candy Stores (after purchasing these Wilton candies for my trial run).  They also have vanilla whoppers you can grab if you want a variety of bubble sizes. 
I did make a few larger cupcakes, just to test out which idea I'd fall more deeply in love with. 

These would be really fun to serve at midnight along with a fun toast, but I have to tell you, I think I'm going with a tower of the mini cupcakes with confetti scattered around the base.    Mini always wins my heart. 
Linking To: 

Apple Pie Bites OR My Favorite Recipe in a long LONG time....

Monday, November 22, 2010 20 comments
I bought some pie crust at the store (because I refuse to make my own, I had a tramatic experience...not really, but I'm not good at it...).  When I got home, I looked in the freezer and realized I already had bought three packages prior to this "Oh yeah, I need pie crust..." episode.  Apparently, I'm also having memory lapse.  The good news is....I had this little idea wandering in the back of my head for awhile.  Having said that, if you've seen this (because I realize in a world this big it's hard to have an original idea) I want to assure you I can live the rest of my life without knowing about it, I pretend I can be creative sometimes.  ;O)  I love pie, I love it in jars, and on sticks (not my ideas, but ideas I've tried).  I love apples, I dedicated a week to apples.  I love miniture.  I've dedicated my life to minis.   I'd tag all my past ideas, but you can just use the search button on the left hand side of the blog if it means that much to you.  Here's the problem with pie....there is this whole crust to filling ration that's never quite right.  These little guys hit...the...spot. 
It's also super easy....
I grabbed an apple and a melon baller and carved out some little round apple pieces. 
I  peeled the apple skin prior to carving out my balls.  I used two medium apples, and got 14 pieces out of the two apples.  I tossed the apple balls with about 2 t. of lemon juice, 1 T. of cinnamon, and 1/2 c. of sugar (you can adjust these easily according to your taste). 
I then cut the pie crust into small squares and added an apple ball, and a small bit of butter.  I wrapped it up tightly.  If your dough is too soft, it may pop through, keep molding until the ball is totally covered. 
I placed these little guys on a vintage cookie sheet and put them in the freezer for about thirty minutes (to prevent the dough from falling apart while cooking).  1 pie dough makes about 14 of these guys. 
You could potentially freeze these long term, but there is no such thing as long term in my life when it comes to desserts. 
I heated some oil to medium, and then start dropping my buddies in the oil.  They were pretty heavy, so they sank towards the bottom, and so I used a spoon to keep 'em moving.  They fried up in a few minutes.  When they were golden brown, I yanked them out, placed them on paper towels to drain, and sprinkled them with cinnamon sugar (you could also roll them in the stuff before draining if you want more sugar in your life). 
Outside...
Inside...
These are SOOOOO delicious.  I will say the longer you freeze them, the apple inside may be a little cold if you pull them out too soon, serve them over ice cream and you won't notie, or keep them in a little bit after they turn golden so it's warm all the way through.
Linking To: 
Just Something I Whipped Up  Keeping it Simple CRAFT It's a Blog Party  Trendy Treehouse
Simpsonized Crafts Night Owl Crafting  Free Pretty Things For You Fireflies and Jellybeans It's Fun to Craft 504 Main Crafty Soiree Along for the Ride Be Different...Act Normal A Vision to Remember Under the Table and Dreaming

Misc Stuff, and and Important Message from my Dogs....

Sunday, November 21, 2010 1 comment
     Today was a good day. 
     I'm filthy from dust and dirt b/c I'm throwing my house around trying to hide stuff before my Soul Sister, Regan, flies in for Thanksgiving holiday on Tuesday.  Her husband is overseas right now (coming home soon...yay), making it possible for us to safely sit in my house and craft, site see, eat, cook, laugh, and never act above the age of about 11 and a half in the 5 days she's here.  I'm excited to get custody this holiday!
      In the midst of my pretending to keep a somewhat clean house,  I took a break for church, and then ate lunch with some lifelong friends of mine, and at the end, I felt 'healed' from anything and everything real and imaginary, dwelled on, or squished out of concious thought.
     The last two weeks I've been a little discombobulated.  Amid two weeks of headaches, real and 'situationally' created, sleepiness (not a state I'm used to), a side of coughing, and  lots of repairmen in and out, out and in.  I can't say that I started with a very organized house to begin with, and when moving disorganized projects around, it's hard to find a place to put them, and it's certainly not easy for find a place to put them back.  And when I say there have been guys working here, I mean, sometimes two times a day..most days, two a day.  My Mom has been a big help on this, but since it is my house, it's ultimately my cleaning, and :gulp: bill.  More on that later.  
    I have a lot of work ahead of me b/c I'm determined to A)  Get organized and B) Get off the waiting list for Hoarders.  Insert a need to get rid of some stuff.  I had my first 'giveaway' last week....drawing was tonight, it was a very serious process.  This is a gift I made for Blythe about 15 Blythe gifts ago, and I just don't have the space to store it, or unrealistic expectations that it's all I'll make between now and next year.  I will, however, be blogging a week of gifts next week that I'm giving this year (some of the ones I can share at this point, most will have to wait.   Next week I'm also taking some of my extra cra(p)fts to work to get rid of them, and when I say 'get rid of' I mean, I'm slapping 50 cents to a few bucks dollar on most of this stuff.  What doesn't go, will show up here and be shipped to a house near you real soon.  I like the process of creating it, but now...it needs a new home.  Here's the first item that's finding a new home:

Umm, and if you've made it this far, and you commented, it was just what the doctor ordered.  Most of the comments made me laugh, all gave me warm fuzzies,and it gave me an opportunity to stalk you ;o).  I decided less than a year ago to just have a public blog and find imaginary friends on the internet because most of my 'real' life friends weren't really interested in my need to just share, get feedback on,'If a tree falls in a forest...' and unicorn stories via blogland. 
...because I take life really seriously, I took this drawing seriously.  I got out my Wilton food writing markers and wrote numbers on stale bread.  I lined them along a counter straight off of where Max was sleeping (these counters were brought by some workmen over the last few weeks, along with other stuff that was brought/carted away...another blog...another day...).
 I called Max over, and the first number he ate was the first digit in the number. 
Notice number 1 is missing?  He pushed 0 back with his nose in his attempt to grab it (so close), ate 1, and quickly gobbled up 2. 
Next, for the second digit, I called all three over. 
I explained the importance of the decision they were about to make.  I had 0-9 written on bread.  I tossed them up in the air, and they ate....ate....and when there was one piece left, I grabbed it. 
#13, Holly.  :O) 
No hanging chads in these election result....
P.s.  No dogs were harmed in the drawing of these numbers.
P.p.s.  Don't forget I also do birthdays and bar-mitz-vahs....actually, it cost you more to pay me to stay away than it does to come entertain, but who wants to quibble over details? 

A Week of Gingerbread

Saturday, November 20, 2010 3 comments
I've just spent a week (and then some)  blogging about a love of mine....gingerbread.  Just because my week is  over this won't be the last I blog about gingerbread, in fact, having begun, I could have done a month of projects, but I decided I was even getting on my nerves a little bit.  I'm putting all the links here (in no partiuclar order) for my future sanity.  All the tutorials, talk, and the secret to life are contained in the attached links...or not.
Mini Gingerbread House Mug Hugger

Gingerbread Scented Playdough

Mini Gingerbread House-On-A-Stick

Felt Gingerbread Playset (and Giveaway)

Scented Gingerbread Garland

Gingerbread Cupcakes

Soft Gingerbread Cookies

Laura Ingall's Gingerbread Recipe

Gingerbread Men Crayons

Linking To:  Be Different...Act Normal, Tatortots and Jello Sunday Showcase Somewhat Simple

Christmas: Gingerbread: Gingerbread Man Crayons

I love making crayon shapes from recycled and melted crayons.  I used the same process I always use to make these little gingerbread shaped crayons.  The steps are here.  I might add a few more brown crayons next time around, but these are still fun, and would be fun in a gift shaped like a stocking ;o)...or on a kid's Christmas table with brown paper in place of a table cloth for coloring fun....and when I say 'kid's table'....I am referring to the one I'd prefer to sit at if there is coloring and crayons involved. 
Linking To:

Christmas: Gingerbread: Laura Ingalls Wilder's Gingerbread Recipe

The reason I love this recipe is NOT because it's the best gingerbread I've ever tasted.  If I were giving advice for great gingerbread, I'd say it needs more spice, but I love that this belongs to Laura of Little House on the Prairie, who I wanted to be when I grow up (when I wasn't so grown up).  I love that she made this recipe in some little house, on some prairie, and when I make it....I get to channel that slice of American living for just a moment.  I would have loved making this when I was ten and reading the Little House series for the 10th time, and I still enjoyed baking this recipe today.  It's a wholesome recipe.  It did puff up nicely, and it tasted like gingerbread (always a bonus). And now....I'm going to learn to play the fiddle like Pa. 
Here is Laura's Recipe,  I bought this in Independence, Kansas when I visited the site of the Little House on the Prairie last summer.
Gingerbread Recipe Serves 20
Cream 1/2 c. butter, 1 c. brown sugar, 1 c. molasses.  Add 2 t of soda to 1 c. of boiling water, and then pour into the bowl with the first three ingredients.  Add 3 c. flour sifted with 1 t. ginger, cnnamon, cloves, allspice, and nutmeg.  Beat 2 eggs well, add last.  Bake at 350 for 30 minnutes in a 9x13 inch greased pan. 
*It took my oven longer to cook the bread all the way through. 
*I would suggest adding powdered sugar, or whipped topping.

Christmas: Gingerbread: Mini Gingerbread Mug Hugger

Friday, November 19, 2010 1 comment
Testing...testing...1...2...3?!?!?!?  I saw this idea a year ago, and I absolutely fell in...love....I'll go so far as to say this is the thing I've looked MOST forward to trying out all year...OK...with one exception, I have another project that I am cheating on this project with that I'll share around Easter, but I heart this more than I've hearted ANYTHING in at least the last 16 hours 24 minutes and 32 seconds.  I love little drink rim huggers.  This is not the first project I've made that 'hugs' a drink lip (case in point, lemon wedge cookie), but I'm planning on taking this one one step further very soon.  I wanted to test it out before adding it to a little gift package, but here's the problem....I had to try it to make sure it turned out the way it says (so often things don't), and my first attempts didn't work out (NOT because the project is hard, and the tutorial isn't great, but because I'm stubborn).  I tried eyeballing the tutorial twice, and time two I got closer.  I'll come back to this...I need to get my feelings out, but I'll get to my project point first, when I actually followed the instructions, and pattern on NotMartha's site here, it worked out perfectly.  I only changed a few steps.  Time three sold me on the idea, and also reminded me there is a reason people give tutorials. 
Basically, there is a little printable sheet you can print from her blog, she used a mini gingerbread house kit she has to make it.  You roll out your dough (here's my favorite gingerbread cookie recipe), and cut out two of each template. 
I cut my pieces on wax paper so I could just flip them over onto my cookie tray and none of the pieces changed shapes. 
I baked my pieces as instructed in the recipe, and once they cooled....I decided to use some white chocolate instead of royal icing b/c it dries faster.  I just melted some in a ziplock in the microwave, snipped the edges, and 'glued' the pieces together. 
I went ahead and spread a layer of chocolate on the roof and sprinkled in with clear sprinkles it for a snowy look.  I'm going to experiment with more sprinkle-ee features when I make these for gifts. 
They are so precious sitting on the side of the mugs.  I'm planning on filling the mugs with hot chocolate mixes, and I may try out some different cookie doughs, but this pattern has won my heart. 
Now I want to talk about my feelings. 
I made these time one, I didn't roll the dough thin enough and I just winged the sizes, and thus, my house didn't stay glued together, and I tossed it in frustration.  I was using the scraps of some gingerbread at this attempt, so...I had to make more dough... 
Time number 2....I winged it again, but I learned, and I got closer. 
Lilly and Peanut supervised, per usual, and we were happy with the results.  I crushed some peppermints for the rooftop, did a happy dance at the outcome and the concept of it 'working', and turned to grab my camera.  I took a picture of this....like it's anything new....but it never really gets old.
In the meantime I hear 'plop' and I turned around and two of my walls are missing, there was icing on a puppy nose, and after much investigation, a lengthy trial...a unanimous decision was made....
It's not his first crime, you'd think I'd learn, but you just don't understand how fast this criminal is when it comes to things he wants! 
He obviously learned his lesson. 
I'm now off to solve the case of the abused duvet cover.  It was suspiciously found laying across the floor carelessly strewn about as if Pottery Barn duvets grow on trees.  And then...I'm calling a glue factory to get the exact requirements for product submission.