Category: Crafting
Showing posts with label Crafting. Show all posts

Penny Vase

Friday, February 27, 2015 1 comment
 I made this a few months back for Good Morning Texas at the request of one of the host.  She was it in a magazine, so...here's my version.
I got a vase for a buck and sprayed it brown (because the pennies have a little bit of space between them).
 ...and then...I just glued a bunch of pennies-front and back at all different directions and I called it a day.  Easy enough!
 I filled it with wheat just because I can.

Rusting

Friday, August 22, 2014 1 comment
 I've been meaning to try rusting things for awhile now.  I finally gave it a go.  Before I move on I have to say-the cheaper your metal, the better.  If you can find bells from the dollar store....grab them.  If you can pick them up with a magnet-that's a good thing.  If not, they have a coating that is going to be a booger to get off.  The same things applies to metal pieces like safety pins that you might want to rust.  Second, the longer you soak them, the more rust your item with acquire.  After the first few days the brown 'stuff' with be floating around your bucket, but it takes awhile to start adhering to the item.
 All you need is vinegar, hydrogen peroxide, and salt.  I covered my items with vinegar and let them soak for about three days.  I dumped out my vinegar and then I covered them with the hydrogen p and I added about 1/4 cup of salt.  I let THIS soak for over a week.  The second step is when the rust started forming.  It may not take as long with cheaper metal, but I learned the hard way.
When you pull your items out, let them dry on a newspaper for a few years so the rust 'sets' on the item.  If you are going to keep your item out in the weather, you might spray them with a coat of clear spray to make sure they stay rusted.

Faux Enameled Numbers

Friday, July 19, 2013 No comments
 I've always loved french enameled house numbers.  I love everything about them...except for the price.  I saw a tutorial awhile ago to make these little tags via cantstopmakingthings and I had to give it a go...
You need just a few supplies...first off those little metal rings.  You can find them at hardware stores, online, or I even found some near the jewelry making gear at the craft store.  I got 20 for 3.99...then used my 40 percent off coupon.  Grab those and some sand paper.
 You want to rub them down b/c you are going to spray them, and without those rough ridges the paint won't want to stick around.  The tag on the left I scraped with my sandpaper.
 I gave them a quick coat of white spray paint (a buck from the supercenter).
 Next up, I grabbed some number stamps and a black ink pad and stamped my numbers.
 Last supplies on the list is clear embossing powder (near stamps at the scrapbook store).
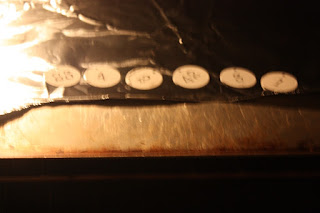
 I put a cookie sheet with a piece of foil in the oven and heated it up to 350.  As soon as it beeped I threw my numbers on the tray (no more than 6 at a time).  Just leave them in the for about 40 seconds, if you leave it in too long the paint will start bubbling.  You just want it to get hot.
 Pull them out of the oven and slide them off on a tray (with a spatula) and put them on paper.  Quickly cover them with these with your powder.  Once they are cool enough, tap all the excess back into the container.
 Place these tags back onto the tray (it will look like they have a coat of sand on them).
 Throw these in the oven for about a minute.  You just want them to be in the oven long enough to 'melt' the powder, it will then create a clear glaze.
 Let these cool, add string and decorate jars/cards/dog houses.  Whatever.

Ornaments: Painted Dough Ornaments

Wednesday, November 28, 2012 3 comments
 When Blythe was a baby, she came to Texas and spent her first Christmas with us.  It was truly a precious memory, and I got to start a tradition with her that we have been carrying forward, and I hope will mean a lot to her in the future.  That first year we took her hand print and pressed it on a glass ornament I filled with 'snow' to also commemorate her first white Christmas.  The next year I made a gingerbread shaped ornament and pressed her thumb into it.  This year, she was finally old enough to do a little more than be held still while we pressed random digits into materials.  I used a really simple recipe to make up some dough ornaments. 
 Dough Ornament Recipe:  2 c. flour, 1/2 c. salt, 3/4 c. water.  Mix, knead, roll out to about 1/8 inch (this made 6 Christmas tree cookie cutter shaped ornaments). Cut out, I inserted a hole using a straw to thread later with string, and then and baked for 2 hours at 250. 
 Once they were cooled, I gave Blythe some paint (you can use, whatever-watercolor, glitter and glue, etc), and she went to town. 
 She soon adopted a technique for dipping her brush in every color before decorating, which accidently turned out to be a reddish color, and green. 
 She was really proud and kept asking anyone who walked by to look and see what she was doing.  She worked super hard, and only paint a portion of her face in the process, certainly less damage than I do when painting!  I had her mama write her name and the year on the back, and then I used a clear coat of spray paint on both sides to give them a little extra protection against aging.  Wish that  would work on me...
 I threaded some ribbon through the holes...
 And Blythe has ornament #3 to add to her tree.  We are actually now going to be working on ornament 4, and this year we will be incorporating her little brother in the mix. 

Ornaments: Chihuahua Ornament

Monday, November 26, 2012 4 comments

 As soon as I acquired Peanut from his owner (my brother), with minimal tears, and much nagging, I realized he needed an ornament.  All my pets have an ornament on my tree. Uhhh, they don't sell cute chihuahua ornaments? I used to be of the former party that believed the chihuahua wasn't the most precious, adorable, cutest, most beautimous creature on planet earth, but I've seen the light, and what do the stores mean by these strange renditions of the 'chihuahau' that don't in anyway capture how stupendous the breed is?  After two years of hunting, I gave up and made my own.  On a hut for reindeer something or rathers I saw a cute reindeer ornament I modeled this after.  Subtract those antlers, add those radar ears, and you've got yourself a Peanut. 
I involved Peanut in the process, from selecting the perfect shade of brown...
 To face measurements. 
 I stitched his name on one side, so visitors with less artistic vision wouldn't mistake this for a deer on my tree.  Psssh.
 I added those big ears by pinching one end.  Peanut was involved b/c he takes this sort of thing seriously....and because he's always glued to my side....my leg....my head.  Whatever he can get closest to, that's where he is at.  Homeboy doesn't have an independent streak anywhere in that little body. 
 He makes a nice project rest. 
 After stitching the face, I added a little stuffing, and stuffed the side with the name, and the face together, and I included a ribbon for hanging, and a bell for holiday sake. 
 I think he was moved. 

Halloween Transfer Shirts

Monday, October 08, 2012 1 comment
This Thursday I'm taking a collection of projects to GMT....this is half of the first segment.  I got a little carried away.  I'll be demoing how to make these little shirts, incredibly easy.  I've done this about fifteen thousand different ways.  I've sent out all my Halloween cards and gifts for this year, so now I'm working on NEXT year.  Above, the shirt for Micah's second Halloween....now I'm on the hunt for some cute leggings and an appropriate bow. 
I made this little Halloween bag for my buddy Donovan....
 He has a little brother on the way (coming to a nursery, not nearly close enough to me, February).  His name has yet to be revealed, so I thought I was super cleaver (don't burst my bubble) and I found a monster icon and and put Monster Mash....get it....baby food, mash, get it?  OK....I'm over it. 
 My pal, Laine, at school has a little baby girl who will be here by Friday whether she comes on her own, or with the help of the doctors.....she is definitely going to need some Halloween gear.  She also has a little black kitty waiting to meet her at home who has no idea his life is about to be turned upside down, but maybe he will be more forgiving if she wears a little tribute to him?
Seriously, I could go on and on, but I'll stop and review the steps to making these....and then I'm off to making turkeys and gingerbreads, and probably leprechauns and firecrackers. 
Step One:  You need to grab some transfer paper and a shirt/onsie/bib/bag/anything that will stay still works.  They sell this for transfering to white fabric (light) or dark fabric, so depending on what you are doing, depends on what you purchase. 

Step Two:  You can create your own design via the paint, or you can purchase them on sites like Etsy and have them personalized.  Here is the cat without a name.  You can download it, put it in a word document, right click and move it to the 'back' and then type the name in whatever font/size you want.  I then did 'print screen' or snag it to get the whole thing.  There may be an easier way, but this is my ghetto computer skills at work. 
Step Three:  Paste the whole thing in another word document.  Under picture tools one of the options is to rotate horizontal.  You need the name to be facing the opposit direction b/c you iron this down and you want the mirror image. 

Step Four:  Print it out (sometime of the ink jet transfer papers have a program you can use for free, if you just do step two and ssave your file as a pdf, you can copy them into the program and it will rotate the whole thing for you). 
Step Five:  Cut it out, I leave a little bit of the white, it won't show up on the shirt, but it helps as you peal it off if a little wants to come up, the color will stay. 
Step Six:  Press it down (put pressure, pick up the iron, and press in the next stop, don't 'rub' it like a normal iron so it doesn'ts lip around).  Let it cool, and lift carefully. 
These are machine washable on the gentle cycle after they 'set' for 72 hours.