Category: Hair Accessory
Showing posts with label Hair Accessory. Show all posts

Making Bows 101

Wednesday, August 17, 2016 No comments
I'm currently in a holding pattern.  I've been collecting some fun things to put together my dream craft room.  But...my brother is currently residing in said room.  I was going to try to up my youtube game this year, but....there really isn't a great place to record.  BUT here is a video I did....you'll see my issues....I ran out of storage room, I ran out of glue, and my dog saw her shadow or something and decided to express her feelings mid video.  BUT...I told a gal I'd teach her how to make a bow, but...it's been a little chaotic, so I recorded her a video for now and provided some supplies so I'm almost teaching her...and when we finally do get to get together for bow lessons....she'll be ready for Bow 102.  So...if you want to see a few ways to make some (almost) free bows.  You can find that video here.
I also refer to a bow pattern I have online (free).  That lives here.

Bling It On

Wednesday, February 10, 2016 No comments
 Today there should be a segment airing on Good Morning, Texas with bling.  Lots of bling. Six projects filled with bling.  There are a few I won't have time to demo, so I'll be posting those instructions soon.
You can watch the segment via my facebook.  I'll post a few tutorials I don't have time to show on youtube.  
The above bobby pins are one of the projects.  I made them using these fun little spare parts pieces and bobby pins with the flat circle I hot glued the little pieces to and then I wrapped the brad ends around the pin to secure it into place.

DIY Felt Baby Bow

Friday, June 26, 2015 No comments
 I've seen these adorable felt bows all over the net and in little boutiques.  I've been meaning to try them out for awhile.  My friend, Nicole, had a little girl and I made her an outfit....and I think it's important she understand my bow expectations....so.....it seemed like a good time to get started.  ;o)
 I bought some thin elastic.  You could add these to a bobby pin or clip, but....this was my prerogative.  Here is the measurement chart I used.  I then cut the two pieces (show above) out of felt.  Here is a free pattern I put together to make these.  The top one is the 'loops' of the bow, the bottom is the base.
 I added a glue dot to the middle of the base and placed the top on the glue dot.
 I then added more glue to the middle and folded in each side to form the bow's loops.
 I added MORE hot glue to the middle and pulled the little strip over the bow.
 Like this...
 I flipped it over on the back, where I glued the elastic, and I put MORE glue over the elastic and continued to pull the strip over to cover the elastic.
 I trimmed off the excess.
 I then used my fingers to press in the loops and make them fluffier.
 I paired it with this little onsie I made with my embroidery machine.  I bought a machine last summer and I haven't posted about it yet b/c it's sort of taken on a life of it's own.  It may needs it own blog....
Right now I'm just making gifts for friends, but I may try my hand at a few things for sale-emphasis on a few.  Stay tuned.  In the meantime...a girly outfit for a little girl in Houston.

Baseball Baby Bow

Monday, May 25, 2015 No comments
 I made a little baseball outfit (coming soon) for a friend of mine who was having a baby.  Her husband follows a team OTHER than the one I follow, though the colors are the same.  I'll post the rest of the outfit soon, but first....where all outfits should start-the bow.  These little guys are so easy to make.
I bought some fabric and cut out four circles, and then I grabbed some buttons-baseball shaped buttons (found these little guys at Hobby Lobby).
 I left one flat, but I folded the other four in half, and then in half again until I had a quarter of a circle.  I glued these together at the point (from the inside).
I glued all four folded quarters around the flat circle, then added the ball to the middle.  I added some elastic to the back (again, with the glue).  I covered up the elastic with a scrap of fabric.  Easy...and about 2 bucks cheaper than even the cheapest flower at the craft store.
As for the elastic piece, the sizes usually range around the following sizes:
Newborn-13 inches
0-1 year-14 inches
1-6 year-14 inches
7-teen-15 inches
Adult-17.5 inches

Easy Boutique Style Hair Bow

Thursday, August 14, 2014 No comments
 My friend Amber and I were at a boutique last spring, and we were looking through the hair bow selection at one of the vendor's booths.  I'm always struck by the price on those little beauties, so....just to reiterate how simple these are to make yourself...here is the exact version of one of the bows we saw.
They sell elastic in the sewing section, but if you look near the hair accessories at craft stores, you can find this special elastic that is used frequently to make the new 'bumpless' pony tail holders.  It's a little gentler.  You get approximately 3,456 feet of it for about 3 bucks...add a coupon and it's practically free.
I also found this little cluster of flowers, already together on a little felt pad in the jewelry making section.  With my coupon, it was less than two bucks.  I took a piece of scrap felt, some little pearls, and a hot glue gun.
 I cut the elastic to fit a new born babies head (just google dimensions to fit your hair bow wearer's general head size).  I glued the ends to the piece of felt the flowers were already on.  If your flowers aren't on felt, cut a piece out and glue them down.
 It's not necessary, but I covered the two ends with another piece of felt.
I glued some pearls into the middle of each flower just to jazz it up.  For about 6 bucks less than the boutique....I've got my very own boutique style bow.

More Bows...

Friday, March 28, 2014 No comments
 There are twelve step programs for people like....I heart making bows....I think mostly b/c you can make these for mere pennies.  Seriously.  The above bows I made using only scraps for a friend of mine that just had a baby girl.  Some of these styles I've done before...but there are a few new ones I tried out....
This one reminds me of a yoyo.  She wanted a bright blue bow and I had this fabric left over from a project where I decided on a darker blue at the last minute....I could make about 30 more of these with that fabric....whoops.
 Super simple.  I cut a strip about 20 inches by 1 1/2 inches.
 I stitched loosely up the length of the fabric fabric, folding it together.
 I then started pulling the fabric and wrapping it around it circles until I had what I wanted.  I sewed all of those layers together and added a button to the middle, then add some elastic.
 This next flower I used another strip about the same size, but just rolled it around and around.  Here is a tutorial.  I glued it all down to a piece of fabric, attached felt leaves and elastic and then added one more piece of fabric with hot glue to cover that all up.
 I made this little felt flower.  Here is that super simple tutorial.  Made from scraps from a felt road I made for my nephew.
 For this bottom flower (my favorite), I used this felt flower tutorial.  I used scraps from a project I had leftover white fabric.  When I make these with felt, I cut six circles and fold them into fourths, but since fabric is so much lighter, I used 8 and overlapped the second set where the creases were.  Then I added two pearls and a crystal bead.
 I hot glued the elastic, then covered my mess with a little circle of fabric.

Penguin Pinwheel Bow

Saturday, December 14, 2013 No comments
 I made a penguin shirt to go with the penguin palooza I put together for my goddaughter's birthday. I decided to make a little bow to go with it because, duh, she's my goddaughter-bows are understood.  For the center I made a mini pinwheel bow using my princess hair bow tutorial from last week.  I then just did a double loop back and forth for the back, tied them all together and attached them together....
 I did go back with my shirt and stitch around all the penguin parts so it stays put....I'll see if mom can send me some pictures....she definitely needs a tutu with this do.

Pinwheel Princess Bow

Wednesday, November 20, 2013 No comments
 I've made many a bow in the last few years as my friends started producing baby girls.  I decided to explore the cheerleaderish type bow.  This little pink mess is a pinwheel bow.  For the center I used these little crown buttons I found at Hobby Lobby.
All you need is ribbon (I used some that is about 3/4 inch thing), a thinner/matching piece for the center (if you aren't using a button, you tie a little knot and either glue it down or sew it down).  Wire/thread or glue for the middle to hold it together, and a match or fire to heat the edges of the ribbon so it won't fray, scissors, and glue.
 I decided on the side I wanted it to be and just took my ribbon, left a tail the size of the loop, and went back...
 ...and forth (to loops here)...
 ...and back and forth again so you now have two loops on each side, and two tails.  I overlapped it by about 2/3 of the ribbon so my pinwheel wouldn't be too wide.  You are actually looking at what is going to be the back of the bow here (the tails will be on the front).
 Pinch it in the middle (the tails should still be facing the back)....
 ...then accordion fold each side back up towards the pinched center.
 At this point you can tie it with wire, sew it (like I did), or glue it.
 I sewed the crown onto the front.  You could tie a knot in your thinner piece of ribbon, then glue it to the front, and wrap the ends around the back, overlapping your clip.
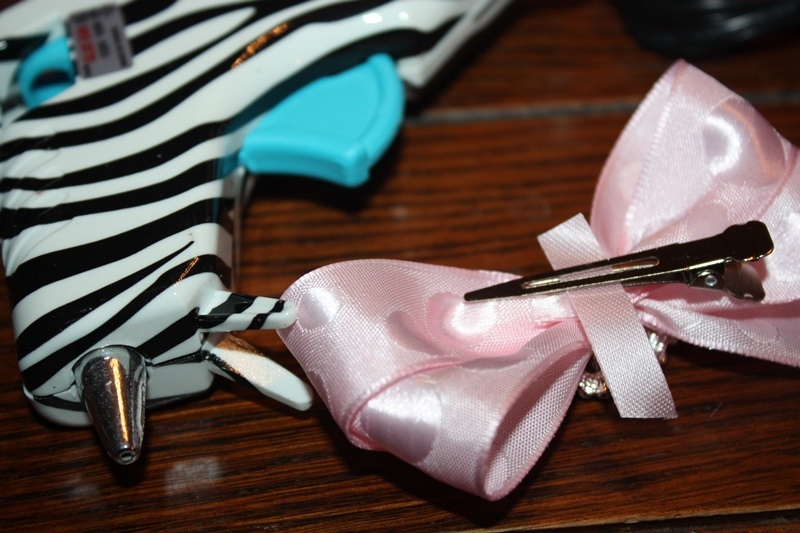
 Since I did a different center, I used my ribbon, slide it between the back of my alligator clip, glued it down, and wrapped it up to meet my crown at the front...
 Glued down...
 ...glued over the top towards the crown...
 ...ready to clip...
 I used the flame to sheer the edges of the ribbon tails so they won't fray....ready for a princess' head.