Category: Frames
Showing posts with label Frames. Show all posts

Vintage Jewelry Projects

Wednesday, September 06, 2017 1 comment
I love collecting vintage jewelry and brooches.  The goal is to spend as little as possible though, so I collect them at salvation army stores and thrift stores.  You can get a great deal when you find those bags with only 'one earring.'  I'm not going to actually uses the jewelry for it's original purpose, so I'm OK just having one earring, but I love repurposing something that had a life before...in this case, I hope it was a fun one.  
I recently did a segment for Good Morning, Texas.  They asked me to bring some projects using old jewelry.  I'll link the video here, but I'm also including a few pictures.  I used some of my brooches to decorate frames.  
I also made a wreath with some using a dollar store wreath I covered with some burlap ribbon.  The only tools I needed were a glue gun, so it was really easy, and I love getting to look at these vintage jewels in their repurposed form.
http://www.wfaa.com/entertainment/television/programs/good-morning-texas/turning-vintage-jewels-into-keepsake-items/456078403


Floating Art Work

Monday, January 09, 2017 No comments

I've been blogging the details of a nursery I put together a few months back.  The whole shebang is coming soon...promise.  I wanted to blog some of the details first.  The theme was lightly a travel theme, with the colors navy, mint, and gray being the overall picture.  If that makes sense.  Jessica and her husband travel a lot, and this little baby has even traveled to Europe in the first few months of his existence (via Mom).  Most of the artwork for the wall I made, but this was the one piece I bought because I really loved it.  It was 24 dollars from Etsy, and I was able to customize the colors I wanted.  To save on the rest of it, I decided to grab a picture frame at goodwill for two dollars.  
 This is the original frame.  It had  floral print.  I used some navy spray paint to give it new life.  There was a problem though...it turns out it was a 12x15 and not an 11x14.  I went back and forth with what to do, and I decided to float the art work in the middle.  Usually when I float I put a second piece a glass behind it, but again, I was trying to save money, so.....I used some transparent tape on each corner and decided it wasn't that noticeable.  Trust me, I'd be the first person bothered by this (I tried all different mats etc and just didn't like it).
I used some hot glue to run along the edge of the glass so that it remained in place.  Room coming soon...

DIY Cork Board

Friday, November 18, 2016 No comments
 Several years ago my brother moved in for a little bit....and it ended up becoming a 'lot a bit' when he purchased a new car.  What I learned in the meantime (along with lots of ideas for Vegan cooking) was that I can live without a guest room.  Which means....it's time for a craft room!  I'm going to do an extensive post all about said craft room when its finished, but in the meantime....I'll be posting some of the diy projects.  I can already tell you this will be my favorite room of all times!  This first project was an easy one....I had a frame someone had given me and some paint I bought for some laundry room projects.
 I bought a large piece of cork from Home Depot....it was less than 6 bucks and I had a TON left over even though the frame is at least 24 inches by 18.  I used the insert to measure out how big to cut it.
 I cut the piece out with my jigsaw.  If you only own one tool (and I only own three), this is one I say is a must.  You could use a saw, but....a jigsaw is what I'd want with me on a deserted island.  No brand advertisement or suggestions, just sayin'....
 I then slipped my finished piece into the frame and hot glued the edges.
Winning at life.

Wish Banner

Thursday, April 24, 2014 No comments
 I bought this window for two bucks in TN....I would have spend 10 times that (literally) in Dallas.  I had to store it at my pal's house for six months...along with about four others until I drove my car back up for a visit....and was able to take these with me.  I'm pretty sure her husband canceled his membership to my imaginary fan club when I took up his garage space.  I can live with that for a savings that big.  I wanted to use this as a frame for my room.  I bought some metal roses with magnets on the back, and then used a second magnet on the other side of the window to hold them in place.  These hold up my pictures.  I have a few more things to add but in the meantime....I wanted to make a little banner.  My room needed a little more burlap to cancel out so much white.
I cut some burlap into the shape of pennants.  I hot glued the top edge to some rope.
 Burlap loves to shed.  I didn't want to sew the edges, so I found this no fray glue 'stuff' at the craft store and ran it along the sides on the back.  It dries clear, though I could still see it on the back side, but not on the front.
I cut out the letters on cardstock.  I then just placed them over each triangle and used a dabber to dab white paint on the outline I had cut out.  I did this using freezer paper in the past.  Here is that tutorial.

2 Dollar Chevron Frame

Monday, January 27, 2014 No comments
 I'm doing a series of thrifty crafts over the next week and then putting them all together on Good Morning, Texas next Monday morning.  Paige and I went shopping at the Dollar General (their pick) complete with a filming crew.  Sure, a craft store is my home away from home, but I always supplement the doodads with cheap stuff from dollar stores around town.  I say that a lot on TV.  I have no affiliations to any store, or an perks for saying I shop there-but...I do because...it's cheap.  The frames at this particular store were anywhere from a buck to 4 bucks.  I wasn't concerned with the design, but rather the shape. I found this one for half off in the clearance section (2 dollars total).
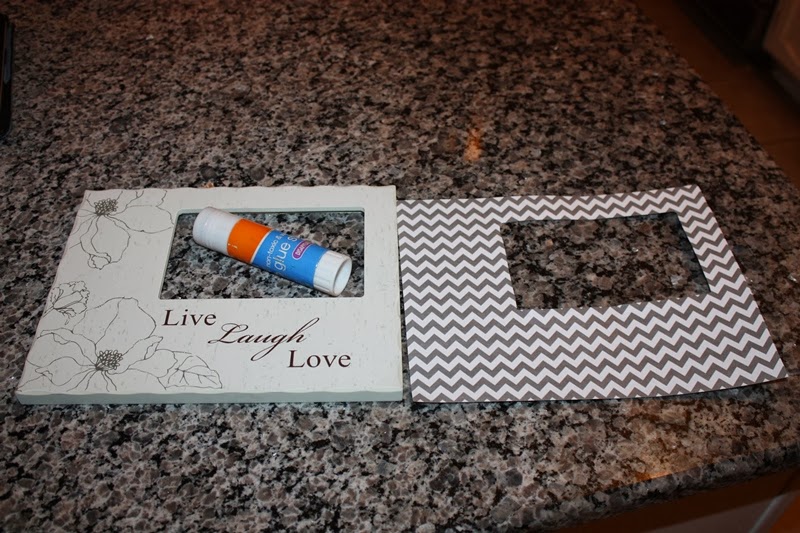
 I found some chevron paper at Hobby Lobby for 25 centers a sheet and traced the frame (make sure the print is facing the right way if your frame is not even like this one-I learned this the hard way).
 I just used a glue stick to get it stuck down, BUT you could definitely use mod podge for a stronger fix.  The paper is pretty thin, sometimes mod podge makes it bubble if you are using paper thinner than card stock and it takes a lot of smoothing down.  I'm waiting to get matted mod podge instead of the glossy stuff I have on hand.
I made a flower with a scrap of fabric I had, thought you could buy one.  Here is the tutorial for that flower (one of my favorite).  I just hot glued it onto the frame.  I'm going to make a couple more of these with different colored frames.

Frame to Tray

Wednesday, January 02, 2013 1 comment
 I'm headed to GMT tomorrow to share some things you can do with some 'things' you get for Christmas that you might get in abundance from relatives....like frames.  I'll work on a more prolific vocabulary before 9 am tomorrow...Frames:  There is only so much wall space, right?  As opposed to sticking these guys in a box labeled 'spring garage sale'....here's a repurposed idea that is super easy to throw together....seriously.  I've seen it around, always considered trying it out, and 3 minutes later....I did. 
Basically, instead of pictures, though you could do a collage of pictures as well, I bought some scrapbook paper.  This particular frame required two sheets, so I just matched the design and taped it together on the back, then trimmed it down to size using the insert inside.  44 cents total on that.
 I found these handles at Hobby Lobby, though any home improvement store should have them, but every other week HL puts their knobs and handles half off.  I used furniture tacks (nails are fine too) and hammered them into the frame (the only trick is making sure it's a real wooden frame, if it's not-use permanent glue). 
I've seen where people have also used knobs to create little feet for their stand, but.....I only have 4 1/2 minutes, and two other projects.  Incidentally, no feelings were hurt in the making of these projects-I went to the thrift store for frames instead of my gift supplies! 

Bottle Cap Frame

Monday, September 10, 2012 No comments
 I've been admiring all the frames and mirrors decorated with bottle caps for awhile.  I began a collection of my own, and even found a soda store that sold an assortment.  I don't know why the fascination....but, I'll save that explanation for a therapist someday, in the meantime-here is my two dollar frame. 
I found a wooden frame at the craft store for just over a dollar. 
 I painted it black, and then I lined up my bottle caps, and found a hammer.
 I decided to flatten out the bottle caps.....gives it character. 
 I used hot glue to attach them.  A few didn't want to adhere, so I went back with some super glue for those stubborn caps.  And I was left with a pretty colorful frame. 

Frames Quote Board Center

Friday, July 27, 2012 No comments

I've always wanted to make a message center out of misc frames.  I've seen these out and about.  The problem is....I've run out of room in my house to keep clothes, my purse, or dust bunnies, I certainly don't have enough wall space for a framed message center.....enter classroom ideas.  As I started thinking 'next school year' and wrapping up the year, I covered one board in black fabric.  I bought misc frames at the thrift store (usually sold cheaper without the glass)....and I sprayed them all gold.  I guess I needed a little dazzle in my life.
I covered up some clips with pieces of scrapbook paper to be able to quickly change out student work/quotes, or whatever makes it way on the message board. 
 Ideally, I could hang these up by a nail, but the cork is just a thin layer of concrete, so I used the sticky hooks, and I just stapled the excess 'sticking part.  I'll cover these up with something creative....or not, but....I'm liking it.

Watermelon 5 Cents Screen Door Hanging

Friday, July 29, 2011 2 comments
 ...and speaking of screens.  I made this one for my summer door.  I saw this original painting design on Gainer's Crafts.  I love this idea b/c watermelon just screams summer to me.  I used a piece of screen, and placed it on top of a trashbag to paint.  This made the paint pool and when it dried it stayed better on the screen. 
I'm now out of screen and frames this size, so I guess it's on to a new crafting venue.  

Picture/Card 'Frame'

Monday, May 09, 2011 2 comments
 I didn't make this...I bought it.  Normally, I'd have eyed this and tried it out at home, but I'm to a point at the moment that I'm writing 'breath' down on my to do list. 
I bought it this past weekend while visiting my pal in Tennessee...more on this soon.  We only had one afternoon to shop, and I bought a ton of fun things in that short amount of time.  I've seen this idea around, and it was my plan to make one, but I balanced out my options and decided I'd put it off until the future and just blog about what someone else put together. 
Old frame, painted, and scraped a little for the good ol' vintage feel.  Three wires nailed onto the back using small nails. 

 Here's a close up. 
 Add small clothes pins (they have these at Walmart and craft stores), attach pictures, or cards from Christmas, Birthdays, or general bulletin board type fun.  How easy. 
This post brought to you by-two hour shop-a-thon in TN....the other 72 hours I'll account for later. :O) 

Thrift Store+Vinyl=Framed Glass Chandelier

Sunday, May 08, 2011 14 comments
This framed, glass chandelier has a future ahead of her.  She'll eventually hang at a few upcoming parties with no wall behind her, but for photo taking purposes, I plucked down a canvas painting and hung it against the wall.  This was really easy to put together, and I think it's going to make a real splash at the parties it will be attending in the (near?!?!?) future.  ;O)  I saw an idea like this at Third Monday.  This one shop has an old window with a colored vinyl picture like this hanging in the window...and I got to thinking...  I hunted down a vinyle chandelier at Hobby Lobby (they are also all over the net).  I got mine for half off ($10).  It also came with rhinestones, and can be plopped onto a wall if the frame isn't doing it for you. 
I then found a frame at the Thrift Store for $5....I'm sure I could have found one cheaper at a garage sale, but I'm kind of into this molding.  I sprayed it with a 99 cent can of glossy spraypaint from the store. 
I applied the vinyl, and now...I need to start gathering the rest of these supplies for the festivities. 
I have a week of Mother's Day post going on, so I'm interrupting so I can enter this in a vinyl project in a round up at the Iron Crafter 

Book Wreath for $1

Tuesday, November 09, 2010 7 comments
I saw this really cute idea for a book wreath here.  She got the idea from another super cute site, and when I was done getting lost in cyberspace, I knew I needed additional firewood decorations for my house.  The process could not be much easier, AND it can't get a whole lot cheaper.  I'm thinking of quitting my job and mass producing these.  It would be really cute with an initial inside as well, or multiple colored paper.  I'll work on that soon. 
I bought a wreath for a dollar at the Dollar Tree, and a book in the Clearance Section of Halfprice books for 80 cents.  My criteria was that the book be as fat as possible for as cheap as possible with few G rated content.  I didn't even use fifty pages of the book to put this wreath together. 

I used a paper slicer to slice the 6 inch pages into 1 inch strips. 
I added a really small drop from the glue gun to create a ton of loops. 
I then start gluing these to the front of the wreath. 
The glue gun bit me a few times, but I really think this is the best way (as opposed to pins).  It let me completely manipulate the spacing. 
I also grabbed a 2 dollar frame from the thrift store. 
I used a dollar can of spray paint to paint it black as a backdrop for my wreath.  I've got the bow, and now I just need to find the perfect location.  I'm off to print off my recycled book wreath business cards now.  Or not.