Category: Elf
Showing posts with label Elf. Show all posts

Teaching Tuesday: Elf on the Shelf Week

Tuesday, November 20, 2018 No comments
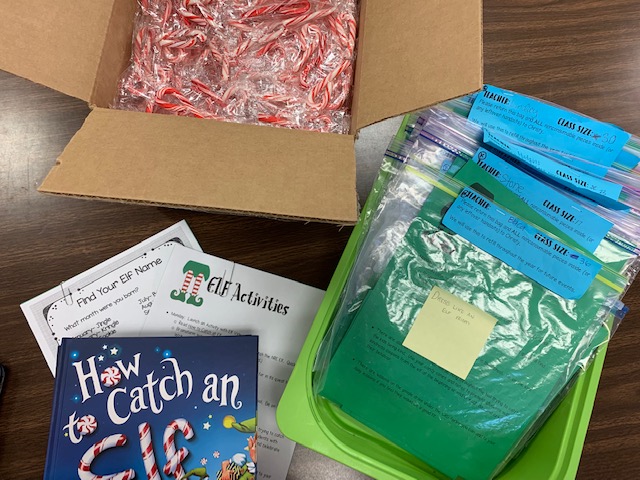
 As a specialist, I do a lot of 'big theme days' for the whole school, but I have to be sensitive (or try) to the 'rest' of the schedule.  In August, I had all these grand plans for an Elf on the Shelf week complete with a Santa's Workshop.  Enter, district scheduling and it turns out there are about 543,122 test going on this week.  I don't know why.  So, I adapted.  My teammate and I used some of our budget last year to purchase this book for the different grades.  I made a powerpoint with an award winning poem (insert sarcasm) about there being an elf at our school that spends December catching kids being kind.  I then bought some green bowls at Walmart that I added vinyl to and I'm going to place all over the building.
The PTA graciously donated a ton of little candy canes to the project, and I made a 'caught being kind' note and printed off enough for every student.  I'm giving each teacher a baggie with the notes and candy canes so that the elf can 'catch their kids' being kind throughout the week and leave notes on their desk to find in the morning.  The PTA is going to come up and pull pranks throughout the school each day, and on Friday all the teachers are going to dress up like elves.
I put some fun things on our school drive like 'finding your elf name' that I found online for free by just googling.
In a week filled with testing, this should be fun without causing too much interruption.

Elf Garland

Thursday, November 01, 2018 No comments
 I have this white tree, and I decorated in with a ton of vintage Santa ornaments the first year I had it.  Last year, I adorned it with angels, and this year I'm all about the elf....and then I'll start over again next year.  I was trying to decide what garland I wanted to add to the elf tree this year.  Most of my ornaments are green and red.
 I found these little wrapped gifts at Hobby Lobby for 2.99 and 40% off.  I bought 3 packages and used just the red, green, and silver.  I also used some twine.  Originally I thought I'd need to make the holes with this scrapbook poker, but it turns out the embroidery needle I used did the job easily b/c it's a really flimsy shiny paper, and a Styrofoam square.
I did do it towards the top so they wouldn't be spinning around, and I tied a knot once I had it in place to both sides to keep them from sliding around.  I'll be back later with my elves!

Elf Gift Box

Tuesday, December 01, 2015 No comments
 My friend Maurine has three little boys who are obsessed with elf on the shelf.  Two out of three also have gifts right around Christmas.  Last year I decided to send a big elf themed gift for them to enjoy all Christmas season so that their birthday gifts would be a little more isolated.  I filled a big box with gifts for all three boys and sent it on its way right after Thanksgiving.
 I embroidered elf hat shirts for each boy, I put somekisses in a bag (elf kisses), I found some elf cupcake liners and decorations for them to make, a book about elves, elf hats, pencils, and plus toys (from the dollar tree), and even an elf toy for the dog.
I three in some grown your own candy canes, and edible candy canes and shipped it on it's way.  

Christmas in July-Last Year's Cookie Exchange

Thursday, July 24, 2014 1 comment
 Speaking of cookie exchanges.  We were on that topic, right?  Look, I always take all these pictures in December, but since I blog in advance most of my post-my blog is usually super full, so I have to put it off until the next year, but then....my blog is full again, so I dlecide to divide some of these things out....and since most of the craft stores probably have started clearing some aisles for Christmas....why not throw on a few ideas here as well.  The last 5 years or so we've done a cookie exchange at work.  We do a little different twist because there are a lot of ladies that love to bake and would like to share some cookies-or rather the recipes, so our take on the traditional cookie exchange is more of a recipe exchange.  Whoever wants to participate signs up in advance (we usually have anywhere from 17-25 participants depending on the year.  Once I have a count I send it out and each person is responsible for bring a bag of two cookies for each person with the recipe attached.  It gives us all a chance to try out new recipes, but we usually just have to bake a double batch of cookies.  I always get some great recipes to add to my collection, and I don't have to try baking them all myself-and get to try some of my pins without the work!
We lay them all out on the counter, then each person goes around with a basket or a bag and takes one of each other person's cookies. There were a ton of great recipes I'll share.  Some decorate their bags, other just do the ziplock thing=I'm fine with either-it's what's inside that counts, right?  ;o)
Here are two of the recipes I loved...
Elf Treats-they reminded me a peanut butter/chocolate rice crispie treat-a marriage of some of my favorite things!
 Elf Treat Cookies
by Laine and Stacey
Ingredients:  1 c. sugar, 1 1/3 c. creamy peanut butter, 4 1/4 c. rice crispie treats, 1 c. corn syrup, 1 pinch of salt, 3/4 c. chocolate chips, 6 chopped Reese's peanut butter cup
Instructions:In a large saucepan melt sugar, corn syrup, and peanut butter over medium heat until smooth. Remove from heat.  Quickly add the salt and cereal and stir to combine.  Add the chocolate chips and stire again.  Wait 1 minute and then add Reese's and fold mix together.  Line baking sheet with parchment paper and press down.  Cut into bars when cooled.
...and a second one....
I also loved these chocolate ones-they are my perfect combo of sweet and salty!
Salted Chewy Chocolate Cookies
 by Claire
Ingredients: 1 1/4 cup butter, 2 cup sugar, 2 eggs, 2 tsp vanilla, 2 cup flour, 3/4 cup cocoa, 1 tsp baking soda, 1 tsp salt, Kosher salt to top
Instructions:  Preheat over 350 degrees.  In a bowl cream together the butter and sugar then add the eggs and vanilla.  Sift flour, cocoa, baking soda, and salt into mix and beat until blended.  Drop by tablespoon onto an ungreased cookie sheet.  Sprinkle a dash of Kosher salt on top of the dough.  Bake for 8 minutes.  Cool on a cookie sheet for one minute.  Cool on rack.  
 

Christmas Photo Props

Saturday, November 16, 2013 No comments
 I'm putting together quite a few crafts for a few segments coming up on GMT.  So many that I'll be posting a lot more than usual (and usual is at least five times a week) to get them all up with tutorials etc.  This project is a little extra something I put together.  Photo props are super popular right now at Christmas parties, so I decided to put together a few of my own for some fun photo opportunities for upcoming Christmas parties.  I saw some items like this for sale and I thought....uh....I'm pretty sure I can make that.  There aren't many things I can say I do well without a lot of practice, but I've always loved cutting randoms shapes with a pair of scissors.  I cut these shapes out and hot glued them to bamboo sticks to be used a photo booth.
 Mix and match.  And...I made a template to cut your own if you to want to have fun with photos at your Christmas party.  You can download them for free here.
Photos to follow soon.  

Christmas in July: Recycle Crafts

Wednesday, July 24, 2013 No comments
This is what my friend Terry does all summer long.  I have ADHD of the crafting world and I find I can't mass produce, but she does.  She also is the reason the show hoarders will probably be back for a new season b/c if you craft, and have spent 3 seconds with Terry you will realize you can never throw anything away.  Ever.  Because she canfind a way to use anything.  Case in point, the project above is a snowman face.  She painted it, cut out a few pieces for the nose and eyes out of scrap woods and attached them to cabinet doors she found in an alley.  Below she just painted up an adorable little Jesus in a manger.  
 How clever is this....fan blades....Santa's beard is made out of shredded old sheets, and the hats are little sweaters etc she gets at thrift stores.
 She haunts the thrift stores in Dallas for old Christmas supplies and uses these in her project-she made the candy canes in the boot out of pipe cleaners.
 She found these trays and cake pans at a garage sale-you can add magnets or just use these as is...
 Old shovels she added Elf/Santa faces too and they can sit on the corner of a porch.
 Old lamp shades she paints...
 ...or dresses up like some of our favorite December friends...
 These little guys are some of my favorite made from scrap woods-the beads were from necklaces from the thrift shop.
These are just a few of a million little projects she makes out of fence post etc.love the 'hair' made out of broken Christmas lights.  Seriously....can't wait to head over and see what she has going on this summer.  

Roly Poly Christmas Creatures

Thursday, December 22, 2011 1 comment
 I made these roly poly guys over the summer.  I've made the Santa's a long time ago via the tutelage of Terry, but I decided to branch out.  I was planning on going even further down the Christmas path but I found I only had three in me for the time being.  These are pretty easy to make, but I made the mistake of mass production, and I remember quickly why I don't 'do' mass production. For the head I cut out circles (the body is about 4 times the size of the head).  I guess you can call this a circle....that's kind of offensive to the circle family.
 I created a loose stitch around the sort of circle.  Pulled it and stuffed it with old shirts.  You could use stuffing too....but I was feeling frugal.  I stitched it together...I use the term 'stitch' kind of like I used the term 'circle' before.  The stuffing showing doesn't really matter b/c it's going to be glue down to the feet. 
 I sewed some feet using a heart shape and stuffed them with rice, and then I made glove shapes and a cylinder of fabric for 'arms.'  I stuffed all of these as well. 
 I then assembled each character.  I used my glue gun to attach all the pieces.  I added these 'sleeve' things to cover where the gloves met the arms.  I added hats as well, and used more misc fabric to cover where it met the head.  Again, I used a glue gun to do this, it's so much easier than the sewing machine, and my home ec teacher wasn't checking my work afterwards :wipes brow:.
 Santa and his elves got beards.  Take yarn and go back and forth creating loops you then tie in the middle.  I brought out my trust glue gun and slapped these onto the faces. 
 Attach nose, and then add some rose colored cheeks using Mary Kay blush circa 1993 or something.
 Meet Santa.
 His elf.
 ...and uh...their drummer boy.
 ...and this photo reminds me....I don't do mass production it's not fun for me!