Category: crackers
Showing posts with label crackers. Show all posts

Susan's Cracker Mix

Monday, August 28, 2017 1 comment
Last June I headed to a retreat and the gal we put in charge of bring some snacks did NOT disappoint.  This recipe made a huge bowl....and we put it to good use.  This is a recipe I'm not losing!  It sounds so simple, but it is soooooo delicious!
Susan's Cracker Mix
Ingredients:  2 boxes of chedder ritz bits, 1 boxes of white cheddar cheese its, 1 box of wheat thins, 1 c. of canola oil, 1 (1 oz) pkg of dry ranch seasoning mix.
Instructions:  
1.  Take a large pan (like a disposable turkey pan) and mix the crackers, oil and seasoning.
2.  Bake at 225 for 2 hours (stirring every 30 minutes) and then leave the crackers in the oven over night (or for a few hours) to dry.
3.  Store in an airtight container.

Bacon Cracker Appetizers

Friday, May 27, 2016 No comments
 These are, seriously, the easiest appetizers ever, and SOOOOO delicious.  I was a skeptic because I'm not a huge fan of meat, in particular bacon.  I know, I know....scary.  But....with the brown sugar sweetness, this is just the way I like my bacon...with carbs.  You can make these trays up in advance and pop them into the oven through a party, or while you are home alone and nobody can see.  The best part is they literally make a million.

All you need is...
bacon (get the thin/cheaper kind, I know....wow?), club crackers, brown sugar, and cayenne pepper.

Then you....
The original recipe used a wire rack (like a cookie cooling rack).  I have one of those.  I have no idea where it is currently living, so.....I used a mini muffin pan.
I lined up my crackers and cut my strips of bacon into sixths (just long enough to cover the cracker).
I thin mounded brown sugar on top of the bacon (this helps keep it from curling, and gives it a sweet taste).  Sprinkle a teeny tiny bit of cayenne on each one (unless you are brave, don't over do that).
 Bake at 350 for about 13 minutes.  Remove, cool.  Eat.  Repeat.

Fire Crackers

Monday, June 15, 2015 No comments
I brought this recipe to a luncheon last summer....and was asked for the recipe by quite a few people.  This usually lets me know-it's a hit.  It was the easiest cracker recipe I've tried (no oven required-a plus in the heat of the summer).  You can use any mix of crackers, but I like the small saltines and cheese its.  Bag them up and take them with you to a picnic.
Fire Cracker Recipe
Ingredients:  1 lb crackers (1/2 cheese its, 1/2 mini saltines), 1 1/2 cups canola oil, 1 pkg dry ranch salad dressing, 2-3 T crushed red peppers (two if you don't like too much spicy)
Instructions:  Mix everything but the crackers and then pour the dressing mix over the crackers.  Toss several times over the space of an hour.  Store in an air tight container.  Do not place these in the fridge. Let it sit overnight to soak up the seasoning.  Some of the oil may pool at the bottom, pour it out.   

Pimento Cheese Crackers

Tuesday, October 16, 2012 1 comment
I've been pursuing pimento cheese in every form for the last few years.  I'm not really sure what that says about me.  I'm pretty sure I don't care, but when I saw this recipe for pimento cheese crackers at therunawayspoon, I was pretty sure I'd met my next project.
I especially like this recipe b/c it's one of those 'do ahead' and bake the day of as desired....anything you can do in advance of mealtime is my kind of project because when I'm working the last thing I want to do is come home straight from work and get to cooking.  I also love crackers.  And pimento.  This one is definitely a keeper in my pimento collection. They remind me of traditional cheese crackers....with a kick.   The recipe makes 3 dozen crackers, which is just enough.  For me. 
Pimento Cheese Cracker Recipe
Ingredients: 4 oz jar diced pimentos, 8 oz grated sharp cheddar, ½ c. cold butter, 1 ½ c. flour, 1 t. Worcestershire Sauce, ½ t. garlic powder, 1 t. paprika, dash of cayenne pepper, pinch of salt, pinch of pepper, 1/2 c. chopped pecans
Instructions:
1.  Rinse and drain pimentos, dry on paper towel and then leave them for 10  min. to dry.
2.  Mix cheese and cold butter in a food processor, add the flour, Worcestershire Sauce, garlic powder, paprika, cayenne, salt, and pepper.
3.  Mix until dough begins to come together.
4.  Add pecans and mix in processor until the dough pulls away from sides and forms a ball.
5.  Add dried pimentos and pulse until it forms a ball of dough.
6. Place dough on waxed paper.  Knead the dough a few times to spread pimento pieces into dough. 7.  Cut two more pieces of waxed paper, divide dough into two and place each ball on waxed paper.  Form into a log and roll tightly, press together tightly, and twist the ends.   Refrigerate for at least an hour  (up to two days, or freeze for up to three months). 
8.  Slice into 1/4 inch thick slices, and bake at 350 on cooking stone or parchment paper.  Bake 10 – 12 minutes until edges are browning.  . 

Homemade Gift: Family S'More Kit

Thursday, November 17, 2011 3 comments
I saw this idea last year on HGTV, and I made it for my boss for Christmas last year.  She has 4 kids.  I adapted this idea rom HGTV. 
 Step One, I found a tin box to house my goodies, and I sprayed it down with chalkboard paint. 
I'd suggest adding a coating of primer so the chalkboard paint sticks.  I was planning on writing the instructions for baking these in the microwave, but the paint didn't dry enough by the time I needed to deliver it.  The show wrapped their box with a bandana and added marshmallow toasting sticks, but I was imagining these baking in my bosses oven.  It's more her style. 
The show also showed whipping together some homemade marshmallows, and this is a great recipe I've tried in the past, but I decided just to use some Wilton markers to color designs onto a bag of marshmallows.  I did this the year before with some different marshamallow art work. 
Insteade of using traditional chocolate squares from a premade bar, I took HGTV's advice, and I melted some nice chocolate morsels (30 seconds at a time.  I heated, stirred, heated stirred....it took about 1.5 minutes or it to melt and be pourable.)  I created a little tented tray out of foil, and poured it into my boat, and then let it chill in the fridge. 
I broke it into ragged chunks...
...and bagged up my pieces. 
Last stop were graham crackers.  I decided to go with a homemade version, and I found a yummy sounding (and in the end, a yummy tasting recipe at Smitten Kitchen). 
Graham Cracker Recipe
*Makes 48 2x2 inch crackers
Ingredients:
2 1/2 c. lour, 1 c. dark brown sugar, 1 t. baking soda, 1 t. kosher salt, 7 T unsalted butter (cut into 1 inch cubes and frozen), 1/3 c. mild flavored honey, 5 T. whole milk, 2 T. vanilla, cinnamon/sugar to top
Instructions:
1.  Combine flour, brown sugar, baking soda, and salt in a food processor.  Add butter and pulss on and of until consistency of corn meal.  (I used a pastry cutter b/c I didn't feel like cleaning my food processor).
2.  In a small bowl, whisk honey, milk, and vanilla. 
3.  Add wet ingredients to the dry and puls on low until dough barely comes together (this will be sticky). 
4.  Lay out on plastic wrap and dust with flour, then turn and pat into a rectangle about 1 inch thick.  Wrap it and chill until firm (about 2 hours or overnight). 
5.  Roll out crackers (keep half of the dough in the refridgerator so it stays chilled while it's waiting to be rolled).  Roll dough to about 1/8 inch thick, and cut to the size you want.  I used one of these 'fancy' rollers for a fun finish. 
6.  Set on baking tray lined with a silpat or parchment paper, and sprinkle with cinnamon sugar mix. 
7.  Chill on the tray or another 30 minutes (or 15 minutes in the freezer).
8.  Use a skewer or fork to poke holes (don't go all the way through) into the top of the cracker. 
9.  Bake at 350 or about 20 minutes (until brown and slightly firm at the touch).  Rotate 1/2 way through. 
I wrapped these all up, and they joined their friends in the box o' yummy fun.

Cheddar Crackers (faux Cheez-Its)

Wednesday, September 28, 2011 1 comment
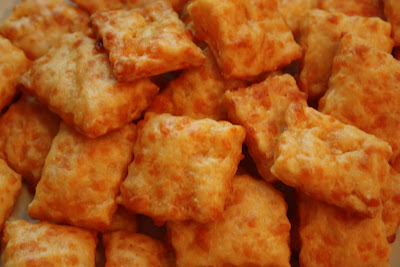
These cheddar crackers taste a lot like the 'crack' they disguise in boxes with names like 'Cheez It's.'  They just taste fresher, and softer.  You can roll 'em thin and make them crispier, but a little thicker and it's a cracker/bread that fits in you hand, and on your hips rather nicely.  I found the recipe here at Montana Homecooking.  I'd say they were delicious and they can't be missed, but I'm worried I'd convince myself to go make ANOTHER batch.  I am, however, saving this recipe because it was great, and I'll make it again someday. 
Cheddar Cracker Ingredients
1 c. flour, 3/4 t. salt, 1/2 t. ground pepper (optional) , 4 T. cold unsalted butter, cut into small pieces, 8 o zgrated cheddar cheese, 3-4 T. water
Cheddar Cracker Instructions
1.  Place the flour, salt and pepper in a food processor, then add butter and pulse until the mixture resembles coarse meal. Add grated cheese a little at a time until the mixture again looks like coarse meal.
2.  Pulse in 3 to 4 tablespoons of water, one tablespoon at a time, until the dough forms into a ball. It will take a minute or so.
3.  Remove from processor, wrap in plastic, and chill anywhere from 20 minutes to 24 hours.

Roll the dough out to 1/8th-inch thickness directly on a baking sheet. You don't want to roll them paper thin, neither do you want to roll them too thick. If they are too thin, they will not puff up as much. If they are too thick, they will not be as crispy.  You've all read the three little bears, be Goldilocks.
Using a knife or pizza cutter, cut 1 inch squares, you can also use small cookie cutters to make shapes.
Bake at 350° F for 15-20 minutes or until crackers are golden brown. Begin watching these about 10 minutes in, mine took 15 minutes.